> ## Documentation Index
> Fetch the complete documentation index at: https://docs.replit.com/llms.txt
> Use this file to discover all available pages before exploring further.
# Managing Your Spend
> Control AI costs and monitor spending with usage limits, budgets, Plan Mode, and Agent modes. Learn strategies to optimize your Replit usage and reduce unnecessary token consumption.
export const CreditPackTable = () =>
| Credit Pack |
Price |
Discount |
| $100 credits |
$100 |
— |
| $300 credits |
$290 |
$10 off |
| $500 credits |
$480 |
$20 off |
| $1,000 credits |
$950 |
$50 off |
;
export const OrganizationBudgetIncrement = '$500';
You can control your costs on Replit by using built-in budget controls, optimizing how you work with [AI Agent](/features/agent/overview), purchasing credit packs, and monitoring your usage patterns. Learn more about [AI billing](/billing/ai-billing).
## View usage
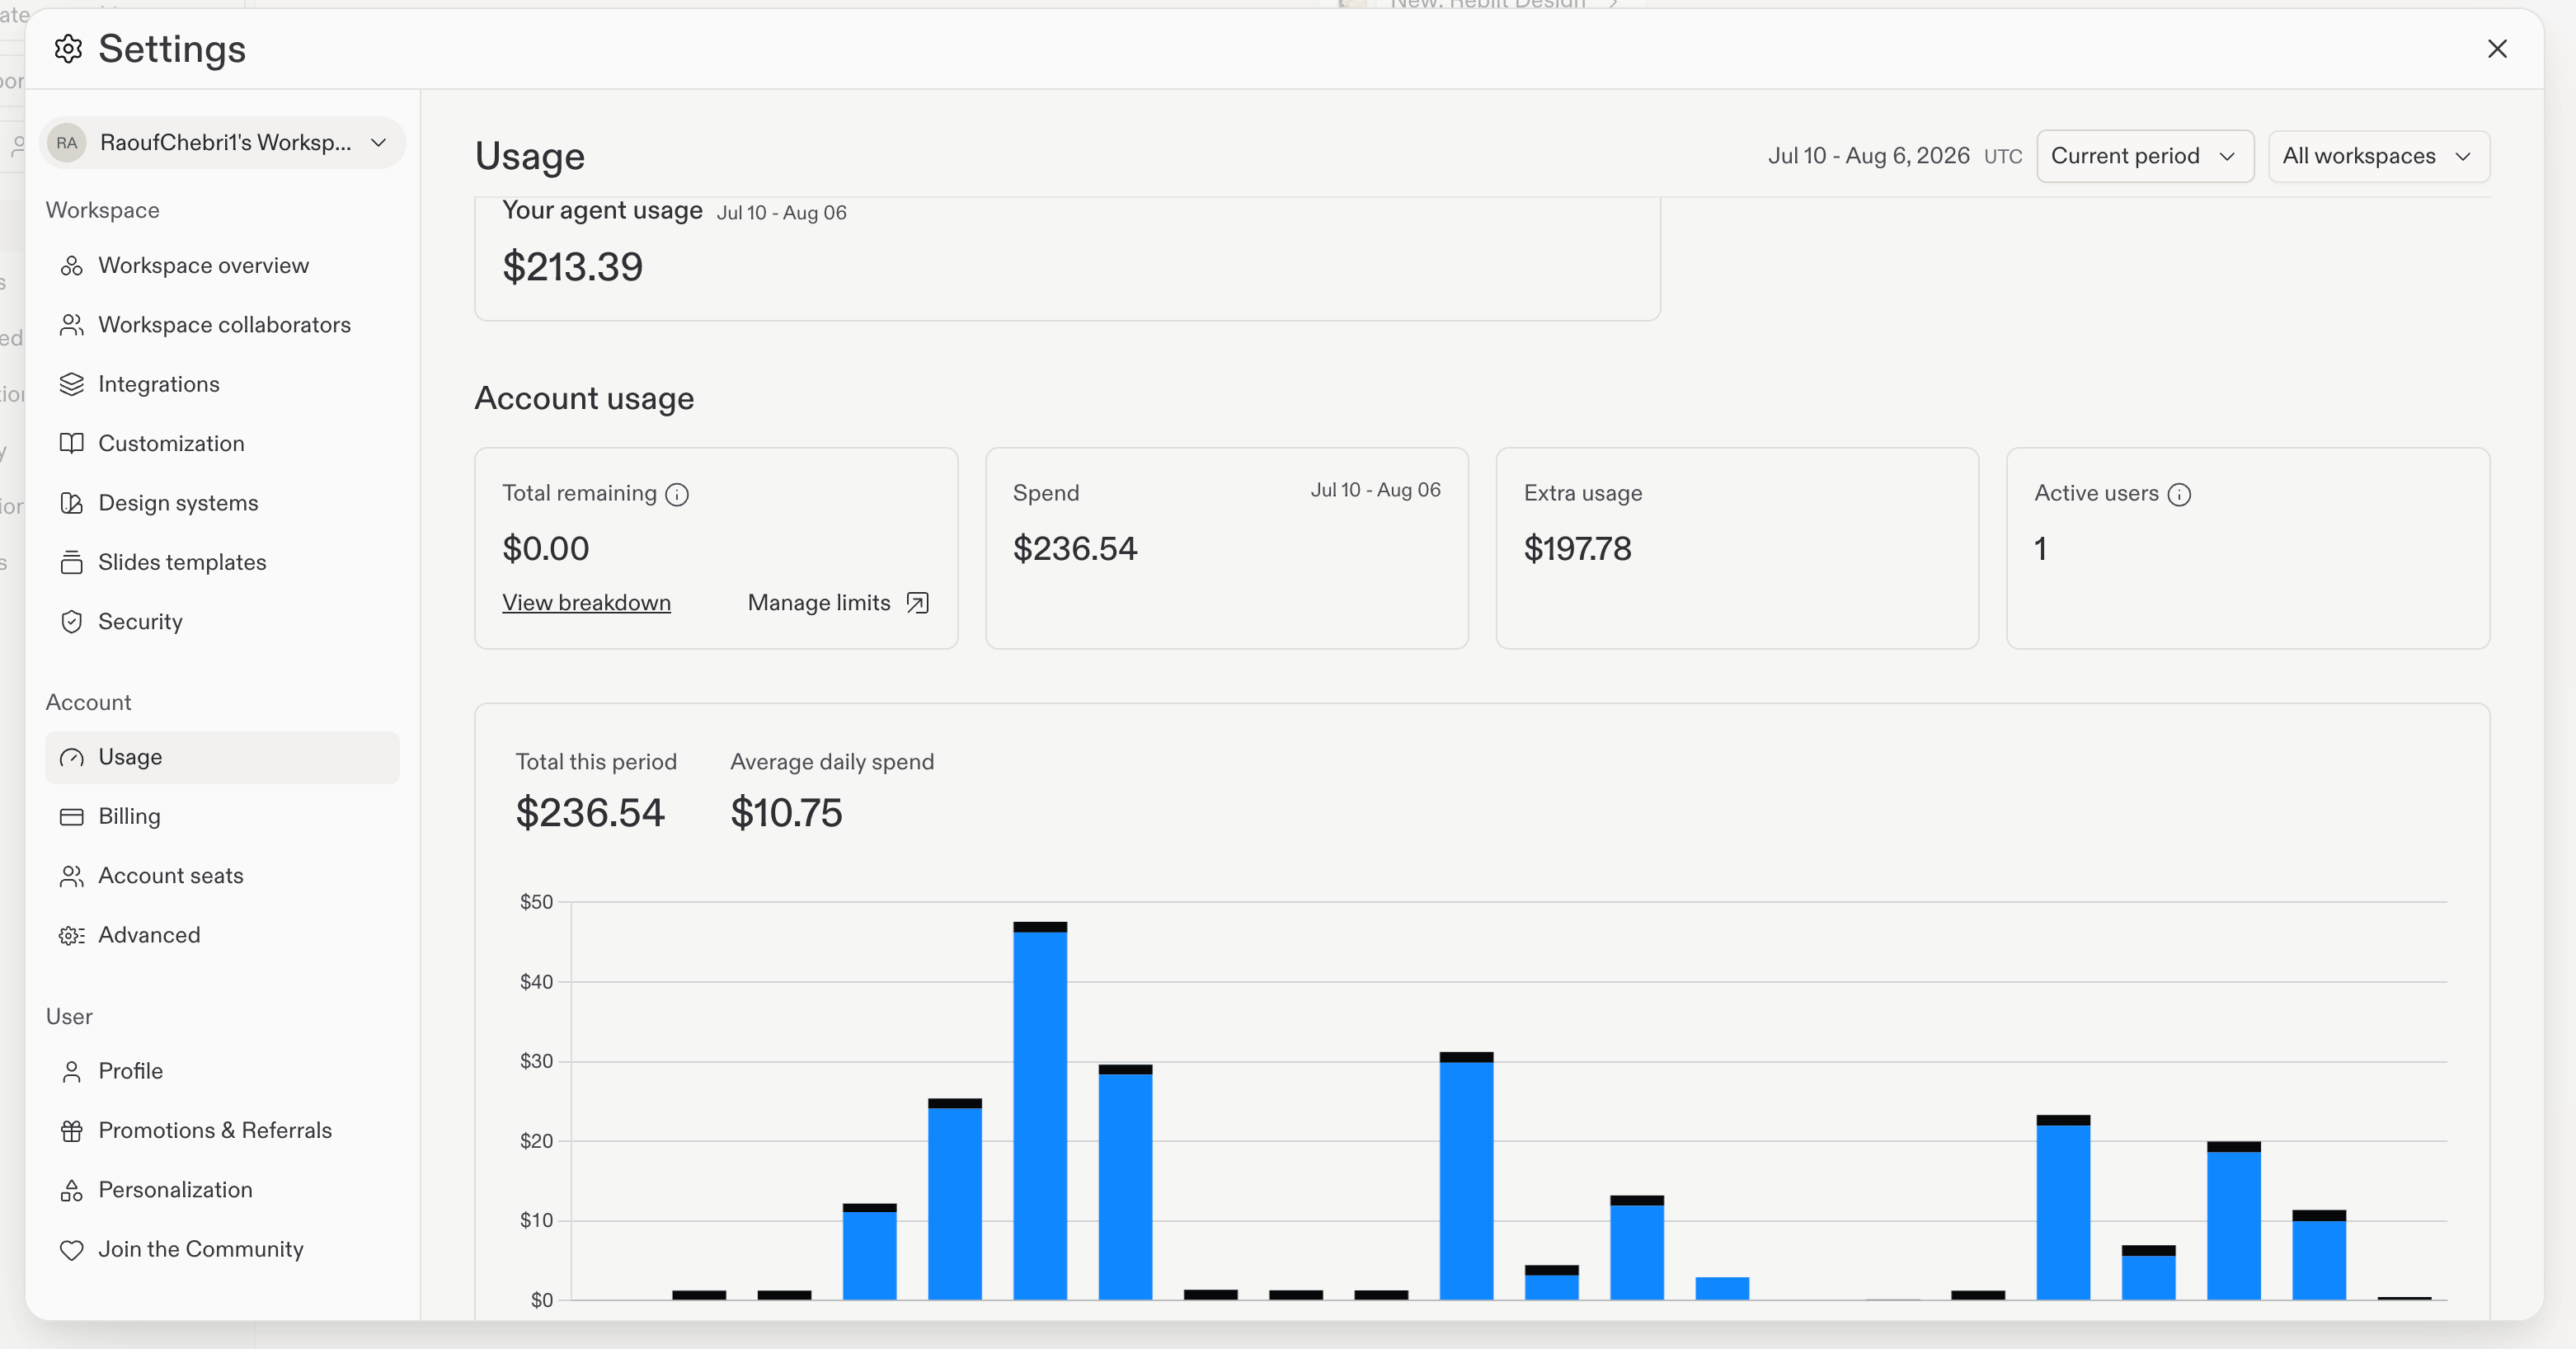
Use the [usage page](https://replit.com/usage) to see where your credits go across your personal account or workspace. Filter by date, resource, project, workspace, group, or member to find what drives usage.
Usage updates in near real time, so you can check recent activity without waiting for a daily report.
 ## Optimize AI costs
AI features like [Agent](/features/agent/overview) are powerful tools, but strategic use can help you maximize value while controlling costs. Here are effective ways to reduce AI spending.
### Use Plan Mode for cost-effective collaboration
[Plan Mode](/features/agent/plan-mode) is one of the most effective ways to save on AI costs. When you enable Plan Mode, Agent creates a detailed plan without making any code changes. This approach offers several cost benefits:
* **Chat before committing**: Discuss and refine the approach with Agent before any work begins
* **Lower token costs**: Planning conversations use fewer tokens than code generation and editing
* **Precision targeting**: Review and adjust the plan to ensure Agent only works on what matters
* **Iterative refinement**: Get the scope right before spending tokens on implementation
Use [Plan Mode](/features/agent/plan-mode) when you're exploring solutions, refining requirements, or want to understand the approach before implementation.
### Control costs with Agent modes
[Agent modes](/features/agent/agent-modes) let you choose cost vs. capability:
* **Free Mode**: no-cost everyday Agent work within your plan's allowance.
* **Auto**: automatic model selection for paid work in Power or Max.
* **Power**: more capability at an affordable price.
* **Max**: the best frontier models for the most demanding work.
Agent reviews its own code automatically as it builds, catching mistakes and reducing costly rework—there's no setting to turn on or off. To keep more control over what you spend, scope work first with Plan Mode:
* **Review before execution**: See what Agent plans to do before it makes changes.
* **Selective approval**: Approve the changes that fit your goals and skip the rest.
Start with [Free Mode](/features/agent/agent-modes) for everyday work. Choose [Power mode](/features/agent/agent-modes) when you need more capability at an affordable price. Plan first, then approve changes step by step.
## Purchase credit packs
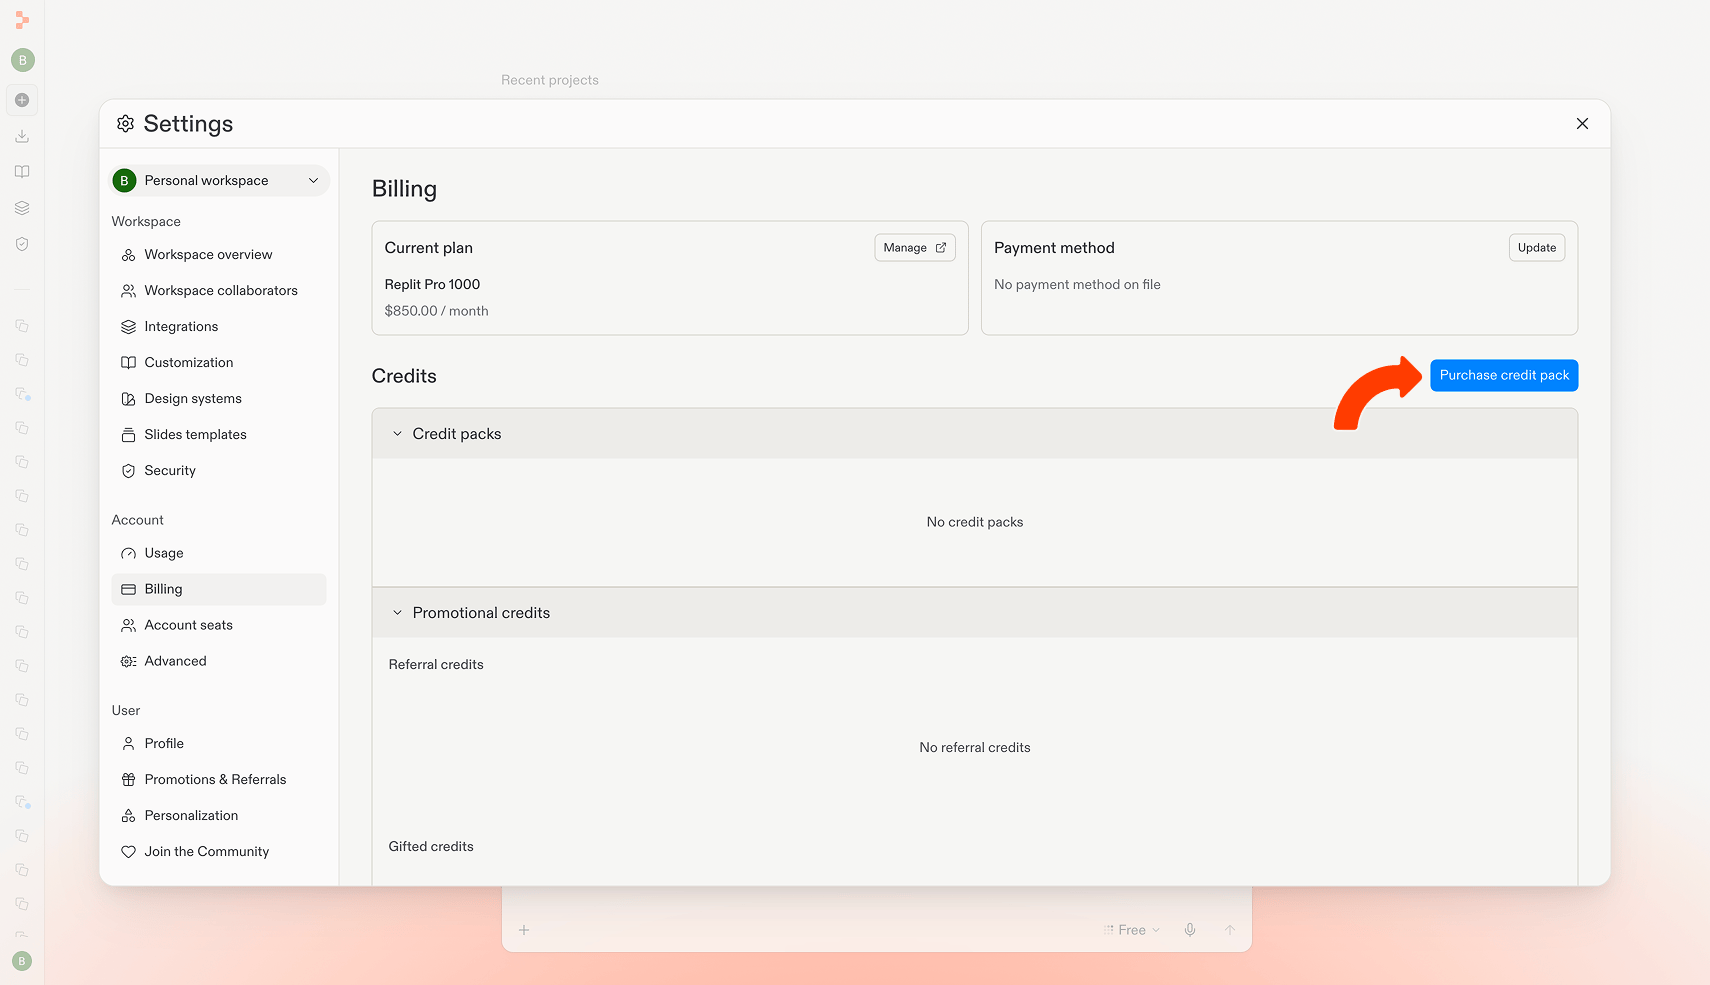
If you're on a Core or Pro plan and need additional credits beyond your monthly subscription allowance, you can purchase credit packs. Credit packs have discounts when you buy larger amounts, making them ideal for covering temporary usage spikes or preparing for larger projects.
From your workspace, select **Settings** in the left sidebar.
Select the **Billing** tab.
Select **Purchase credit pack** and choose the pack size you want.
## Optimize AI costs
AI features like [Agent](/features/agent/overview) are powerful tools, but strategic use can help you maximize value while controlling costs. Here are effective ways to reduce AI spending.
### Use Plan Mode for cost-effective collaboration
[Plan Mode](/features/agent/plan-mode) is one of the most effective ways to save on AI costs. When you enable Plan Mode, Agent creates a detailed plan without making any code changes. This approach offers several cost benefits:
* **Chat before committing**: Discuss and refine the approach with Agent before any work begins
* **Lower token costs**: Planning conversations use fewer tokens than code generation and editing
* **Precision targeting**: Review and adjust the plan to ensure Agent only works on what matters
* **Iterative refinement**: Get the scope right before spending tokens on implementation
Use [Plan Mode](/features/agent/plan-mode) when you're exploring solutions, refining requirements, or want to understand the approach before implementation.
### Control costs with Agent modes
[Agent modes](/features/agent/agent-modes) let you choose cost vs. capability:
* **Free Mode**: no-cost everyday Agent work within your plan's allowance.
* **Auto**: automatic model selection for paid work in Power or Max.
* **Power**: more capability at an affordable price.
* **Max**: the best frontier models for the most demanding work.
Agent reviews its own code automatically as it builds, catching mistakes and reducing costly rework—there's no setting to turn on or off. To keep more control over what you spend, scope work first with Plan Mode:
* **Review before execution**: See what Agent plans to do before it makes changes.
* **Selective approval**: Approve the changes that fit your goals and skip the rest.
Start with [Free Mode](/features/agent/agent-modes) for everyday work. Choose [Power mode](/features/agent/agent-modes) when you need more capability at an affordable price. Plan first, then approve changes step by step.
## Purchase credit packs
If you're on a Core or Pro plan and need additional credits beyond your monthly subscription allowance, you can purchase credit packs. Credit packs have discounts when you buy larger amounts, making them ideal for covering temporary usage spikes or preparing for larger projects.
From your workspace, select **Settings** in the left sidebar.
Select the **Billing** tab.
Select **Purchase credit pack** and choose the pack size you want.
 ### Available credit packs
Credit packs are available in four sizes, with increasing discounts on larger purchases:
### How credit packs work
* **Purchase location**: Available in **Settings** → **Billing** → **Purchase credit pack** for Core and Pro plan customers
* **Expiration**: Credit packs expire six months after the purchase date
* **No renewal**: Credit packs do not automatically renew
* **No rollover**: Unused credits from a pack do not roll over after expiration
* **Automatic usage**: Credits are automatically used from the credit pack that expires earliest first, helping you maximize the value of your purchases
* **Auto-reload**: Turn on auto-reload to automatically purchase a *new* credit pack when your balance runs low, so you don't get interrupted mid-project
* **Manage anytime**: Enable, adjust, or turn off auto-reload from **Settings** → **Billing**
Your usage limits and budgets will apply to usage after you use any credit packs you may have. If you want to limit your usage to just credits you've purchased in your pack, set any limits to \$0.01.
### View payment receipts
If your account uses top-ups, open **Settings** → **Billing** and find **Payment receipts** to review successful one-time top-ups and auto-reload payments. Each row shows the payment date, purchase type, amount, and refund status. Select **View receipt** to open the receipt from the payment provider.
## Set up limits and budgets
You can establish monthly usage limits and budgets for all usage-based billing services to monitor and control your costs.
### Usage limits
Usage limits cap your spending beyond your monthly credits. When you reach your limit, usage-based services are blocked until the next billing cycle or until you increase the limit.
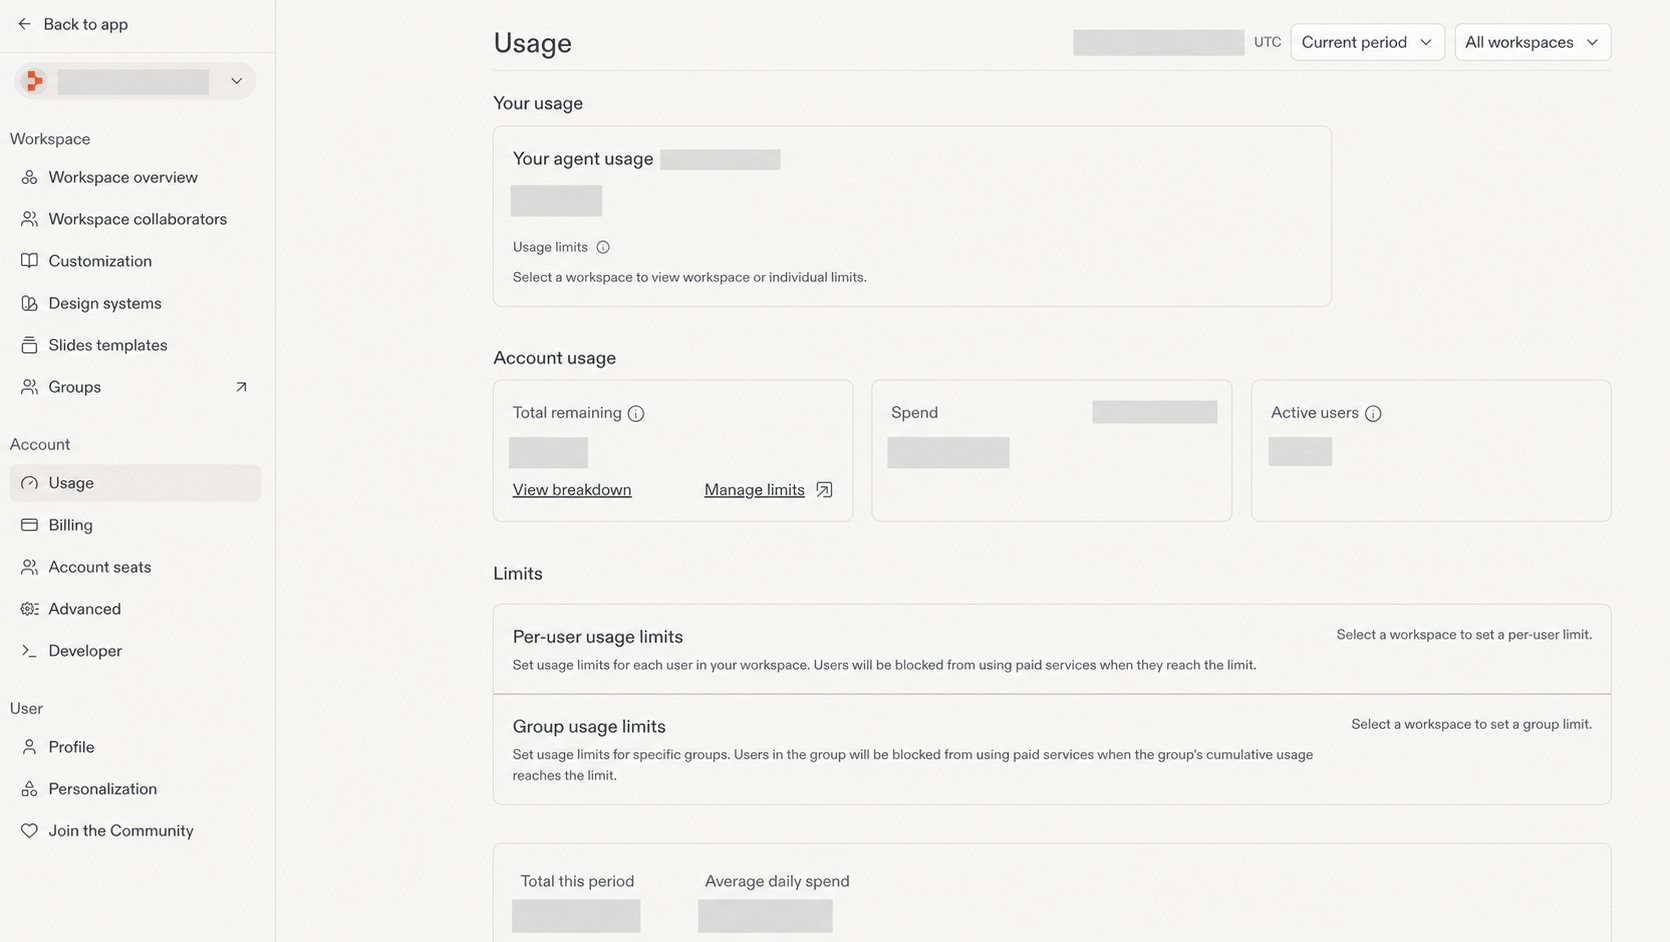
For Core accounts, open **Settings** → **Account** → **Usage**. In the **Account usage** section, select **Manage limits** to set up a usage limit. For organizations, open the [usage page](https://replit.com/usage) and select **Manage limits** under **Account usage**.
### Service shutdown limit
When this limit is reached, services will be suspended until the budget is increased or the next billing cycle begins. This will help prevent extra charges.
Set this limit from the same **Manage limits** dialog described under [Usage limits](#usage-limits).
### Available credit packs
Credit packs are available in four sizes, with increasing discounts on larger purchases:
### How credit packs work
* **Purchase location**: Available in **Settings** → **Billing** → **Purchase credit pack** for Core and Pro plan customers
* **Expiration**: Credit packs expire six months after the purchase date
* **No renewal**: Credit packs do not automatically renew
* **No rollover**: Unused credits from a pack do not roll over after expiration
* **Automatic usage**: Credits are automatically used from the credit pack that expires earliest first, helping you maximize the value of your purchases
* **Auto-reload**: Turn on auto-reload to automatically purchase a *new* credit pack when your balance runs low, so you don't get interrupted mid-project
* **Manage anytime**: Enable, adjust, or turn off auto-reload from **Settings** → **Billing**
Your usage limits and budgets will apply to usage after you use any credit packs you may have. If you want to limit your usage to just credits you've purchased in your pack, set any limits to \$0.01.
### View payment receipts
If your account uses top-ups, open **Settings** → **Billing** and find **Payment receipts** to review successful one-time top-ups and auto-reload payments. Each row shows the payment date, purchase type, amount, and refund status. Select **View receipt** to open the receipt from the payment provider.
## Set up limits and budgets
You can establish monthly usage limits and budgets for all usage-based billing services to monitor and control your costs.
### Usage limits
Usage limits cap your spending beyond your monthly credits. When you reach your limit, usage-based services are blocked until the next billing cycle or until you increase the limit.
For Core accounts, open **Settings** → **Account** → **Usage**. In the **Account usage** section, select **Manage limits** to set up a usage limit. For organizations, open the [usage page](https://replit.com/usage) and select **Manage limits** under **Account usage**.
### Service shutdown limit
When this limit is reached, services will be suspended until the budget is increased or the next billing cycle begins. This will help prevent extra charges.
Set this limit from the same **Manage limits** dialog described under [Usage limits](#usage-limits).
 ### Organization budgets
For organizations, you can set your usage budget from the [settings page](https://replit.com/t/replit/settings/billing). Budgets must be in increments of {OrganizationBudgetIncrement}.
You must have organization admin or owner permissions to enable a monthly usage limit. If you don't have access, contact your organization owner.
### Per-user spend limits
Enterprise admins can give individual members a different spend limit than the workspace default. Use this to grant power users a higher cap or to tighten a single member's spend without changing the rest of the workspace.
From your Enterprise workspace, open the [usage page](https://replit.com/usage). The **Agent users** table lists every member of your workspace alongside their current usage.
Find the member you want to adjust and select the edit icon in the **Usage limit** column. The dialog shows the workspace default, any applicable group limit, and a field for the new per-user limit.
### Organization budgets
For organizations, you can set your usage budget from the [settings page](https://replit.com/t/replit/settings/billing). Budgets must be in increments of {OrganizationBudgetIncrement}.
You must have organization admin or owner permissions to enable a monthly usage limit. If you don't have access, contact your organization owner.
### Per-user spend limits
Enterprise admins can give individual members a different spend limit than the workspace default. Use this to grant power users a higher cap or to tighten a single member's spend without changing the rest of the workspace.
From your Enterprise workspace, open the [usage page](https://replit.com/usage). The **Agent users** table lists every member of your workspace alongside their current usage.
Find the member you want to adjust and select the edit icon in the **Usage limit** column. The dialog shows the workspace default, any applicable group limit, and a field for the new per-user limit.
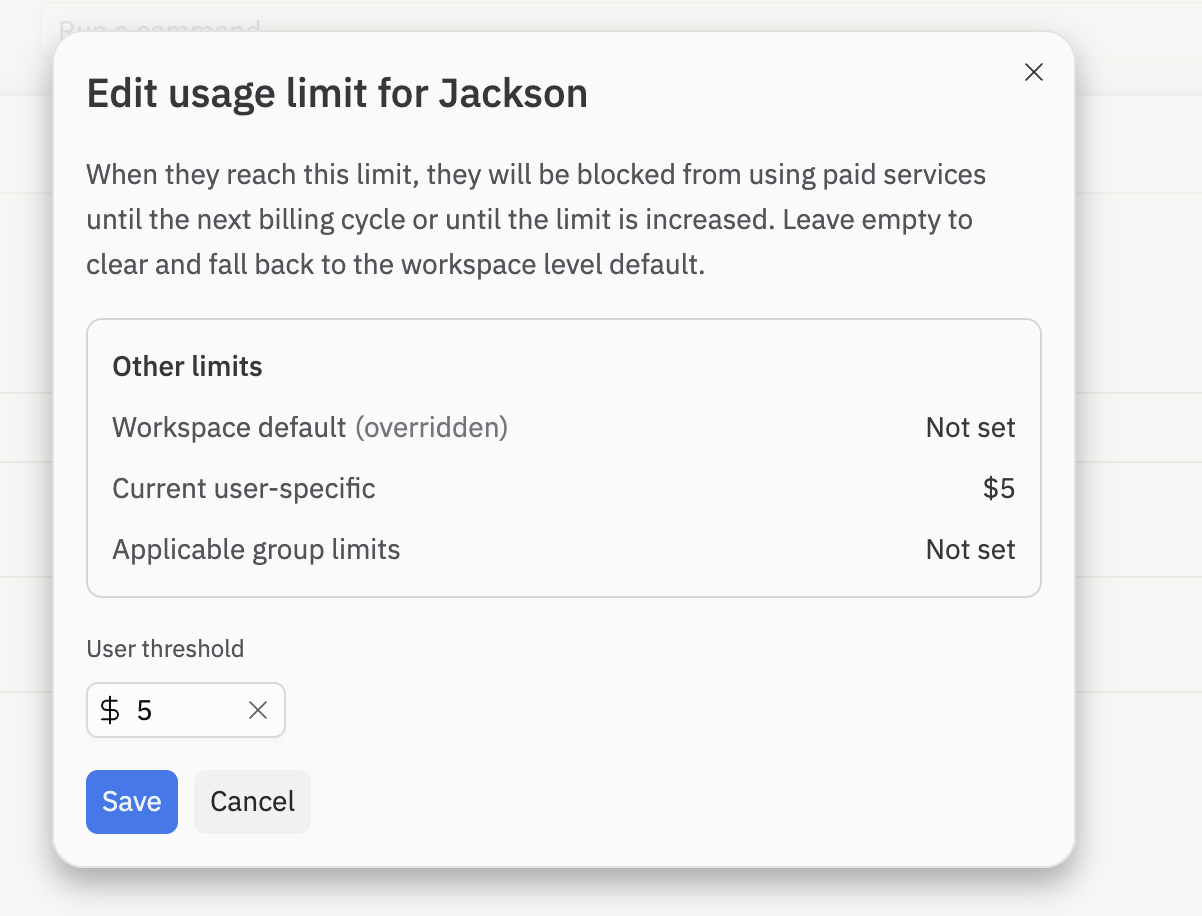 Enter the new limit and select **Save**. The override takes effect immediately and the new value appears in the **Usage limit** column. To remove an override later, clear the field and save. The member then falls back to the most specific group or workspace limit that applies to them.
Per-user spend limits are available on the Enterprise plan. Members assigned to a [custom group](/teams/identity-and-access-management/groups-and-permissions) inherit that group's limit unless an individual override is set. Per-user overrides always take precedence over group and workspace defaults.
### Organization admin controls
Organization admins can manage AI model access and integrations from the [organization billing settings](https://replit.com/t/replit/settings/billing).
**Disable external AI model integrations**
Enable this setting to block all users in the organization from using external AI model integrations (such as OpenAI, Anthropic, xAI, and Perplexity through Replit's managed connectors).
Enable this setting to block all users in the organization from using Replit-managed AI integrations.
Enter the new limit and select **Save**. The override takes effect immediately and the new value appears in the **Usage limit** column. To remove an override later, clear the field and save. The member then falls back to the most specific group or workspace limit that applies to them.
Per-user spend limits are available on the Enterprise plan. Members assigned to a [custom group](/teams/identity-and-access-management/groups-and-permissions) inherit that group's limit unless an individual override is set. Per-user overrides always take precedence over group and workspace defaults.
### Organization admin controls
Organization admins can manage AI model access and integrations from the [organization billing settings](https://replit.com/t/replit/settings/billing).
**Disable external AI model integrations**
Enable this setting to block all users in the organization from using external AI model integrations (such as OpenAI, Anthropic, xAI, and Perplexity through Replit's managed connectors).
Enable this setting to block all users in the organization from using Replit-managed AI integrations.