> ## Documentation Index
> Fetch the complete documentation index at: https://docs.replit.com/llms.txt
> Use this file to discover all available pages before exploring further.
# Databricks Connectors
> Choose and set up a Databricks connector so Replit Agent can build applications backed by your Databricks workspace.
The Databricks connectors are available exclusively on the **Enterprise**
plan.
 The Databricks connectors let Replit Agent query your Databricks workspace. Builders can create dashboards, reporting tools, and data applications using natural language. No SQL expertise is required.
Replit supports two Databricks connection types. Choose one based on the identity that should run each query.
## Choose a connection type
| | **User-to-machine (U2M)** | **Service principal (M2M)** |
| - | - | - |
| Connector name in Replit | Databricks for Databricks Apps (U2M) | Databricks (Service Principal) |
| Query identity | The individual builder | A shared service principal |
| Databricks permissions | Each builder's Unity Catalog permissions | The service principal's permissions |
| Audit attribution | The builder who ran the query | The service principal |
| Builder sign-in | Each builder signs in with their own Databricks account | No individual Databricks sign-in |
| Best for | Per-user permissions and audit attribution | Shared access and non-interactive workflows |
Use each builder's Databricks identity, permissions, and audit attribution.
Use one shared Databricks identity and permission set for authorized
builders.
## Set up the U2M connector
U2M setup involves three roles:
1. **Databricks account admin**: creates an OAuth app connection and provides SQL Warehouse details.
2. **Replit organization admin**: configures the connector with the OAuth credentials.
3. **Builder**: signs in with their Databricks account and starts building.
### U2M prerequisites
Before you start, confirm you have:
* A Databricks **account admin**. App connections are configured in the account console, not the workspace admin settings.
* A Replit organization admin.
* A Databricks account for every builder who will use the connector.
* Workspace access for every builder, including **Can use** permission on the SQL Warehouse and the required Unity Catalog permissions.
### Step 1: Create an OAuth app connection
You must be a Databricks account admin to complete this step.
The Databricks account admin registers Replit as an OAuth application. The app connection provides the client ID and client secret used to configure Replit.
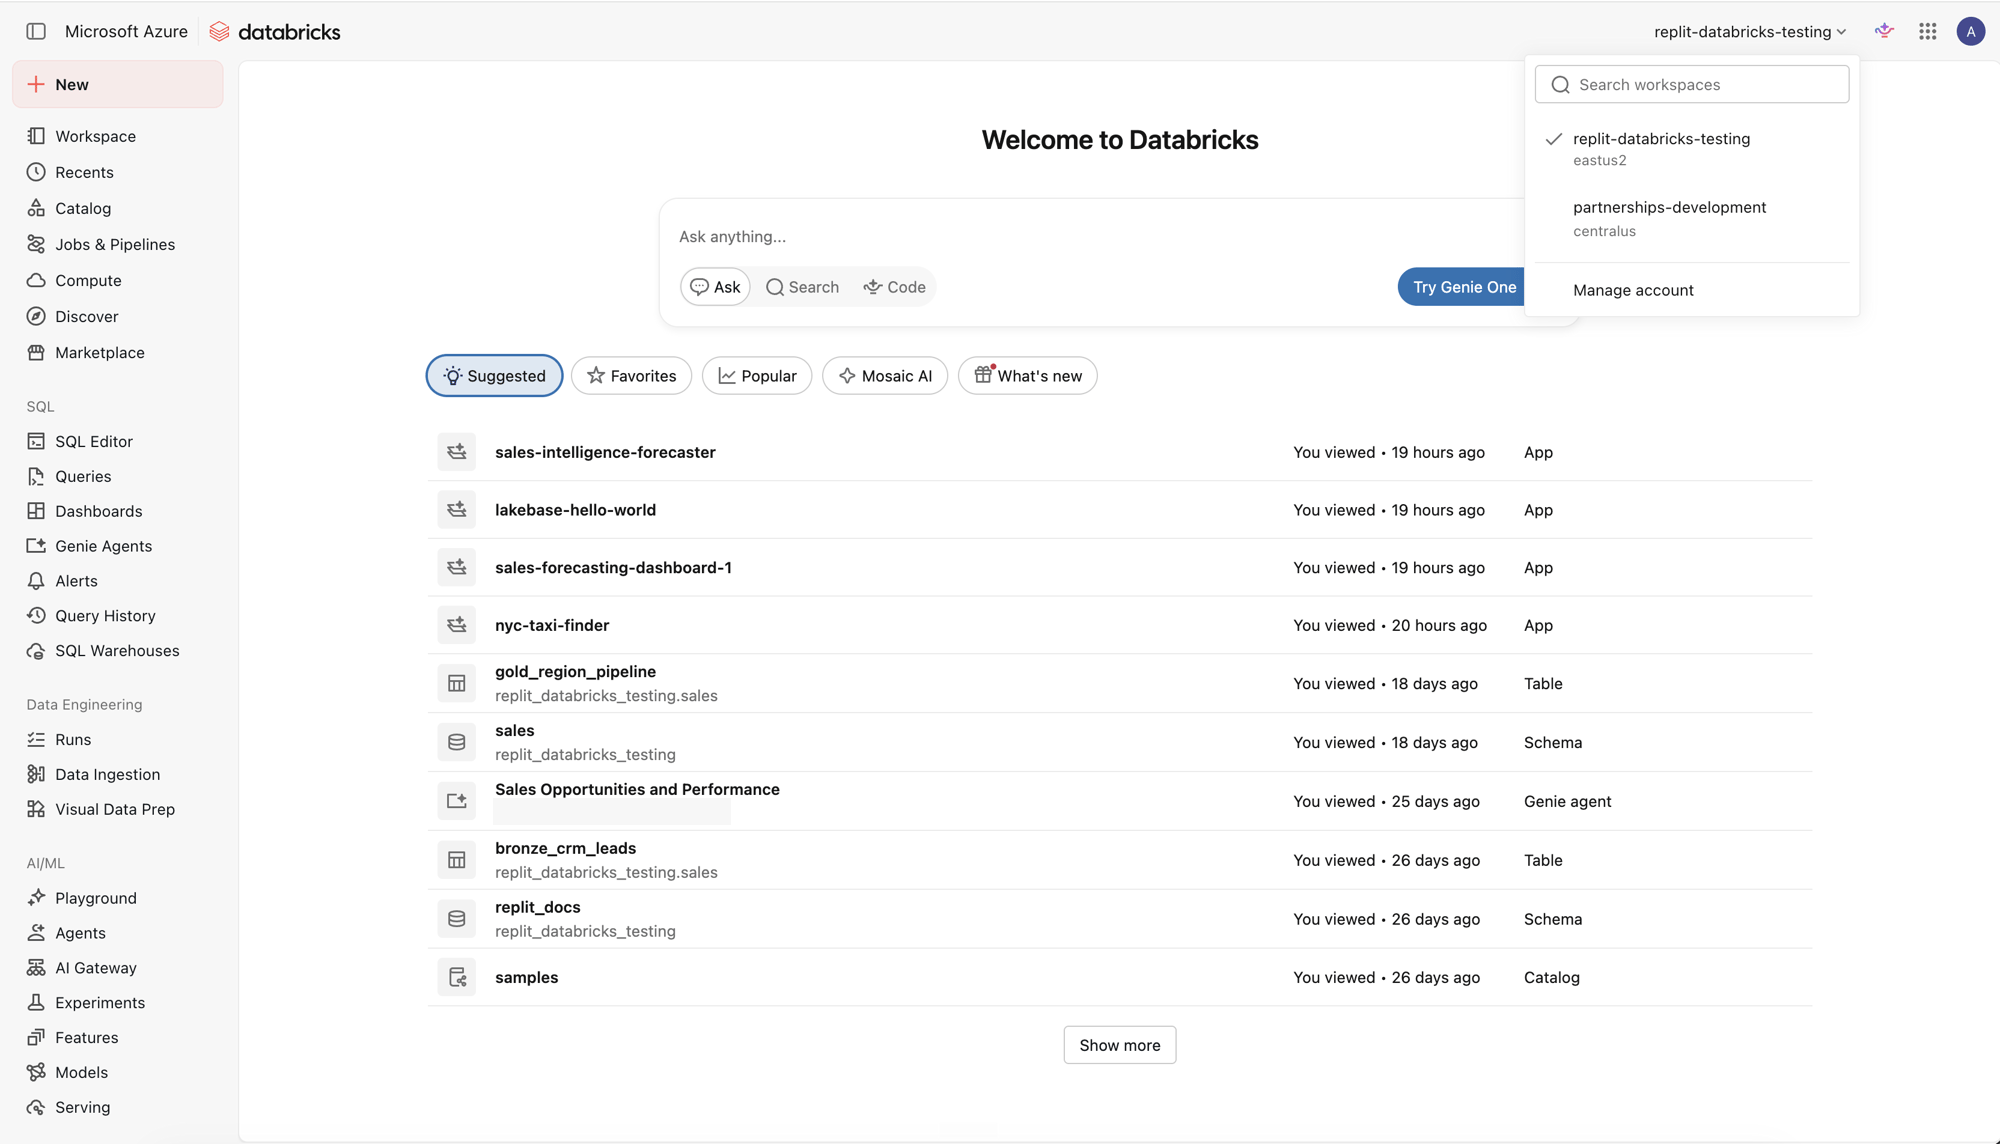
In your Databricks workspace, open the workspace picker in the top-right corner and select **Manage account**.
The Databricks connectors let Replit Agent query your Databricks workspace. Builders can create dashboards, reporting tools, and data applications using natural language. No SQL expertise is required.
Replit supports two Databricks connection types. Choose one based on the identity that should run each query.
## Choose a connection type
| | **User-to-machine (U2M)** | **Service principal (M2M)** |
| - | - | - |
| Connector name in Replit | Databricks for Databricks Apps (U2M) | Databricks (Service Principal) |
| Query identity | The individual builder | A shared service principal |
| Databricks permissions | Each builder's Unity Catalog permissions | The service principal's permissions |
| Audit attribution | The builder who ran the query | The service principal |
| Builder sign-in | Each builder signs in with their own Databricks account | No individual Databricks sign-in |
| Best for | Per-user permissions and audit attribution | Shared access and non-interactive workflows |
Use each builder's Databricks identity, permissions, and audit attribution.
Use one shared Databricks identity and permission set for authorized
builders.
## Set up the U2M connector
U2M setup involves three roles:
1. **Databricks account admin**: creates an OAuth app connection and provides SQL Warehouse details.
2. **Replit organization admin**: configures the connector with the OAuth credentials.
3. **Builder**: signs in with their Databricks account and starts building.
### U2M prerequisites
Before you start, confirm you have:
* A Databricks **account admin**. App connections are configured in the account console, not the workspace admin settings.
* A Replit organization admin.
* A Databricks account for every builder who will use the connector.
* Workspace access for every builder, including **Can use** permission on the SQL Warehouse and the required Unity Catalog permissions.
### Step 1: Create an OAuth app connection
You must be a Databricks account admin to complete this step.
The Databricks account admin registers Replit as an OAuth application. The app connection provides the client ID and client secret used to configure Replit.
In your Databricks workspace, open the workspace picker in the top-right corner and select **Manage account**.
 In the account console, select **Settings**, then open the **App connections** tab.
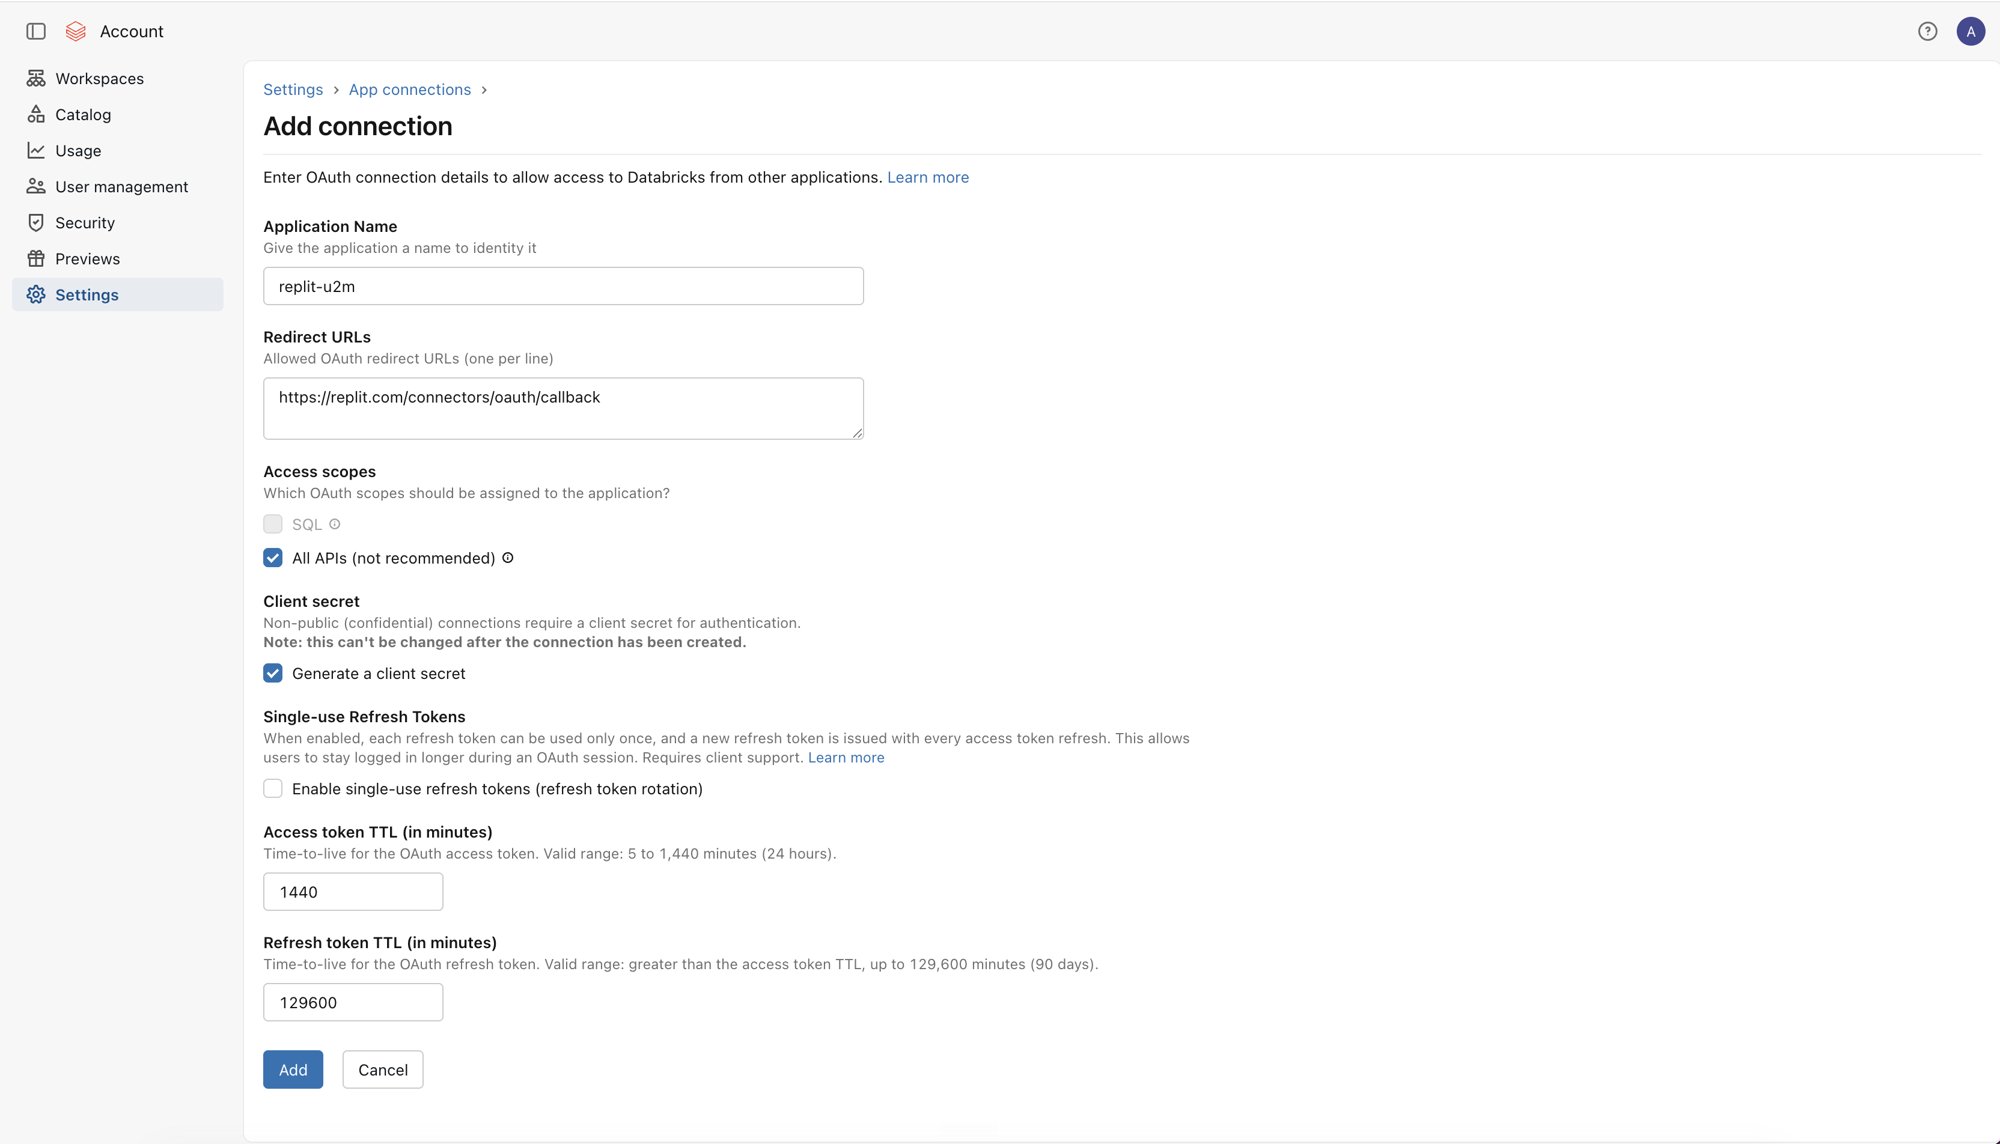
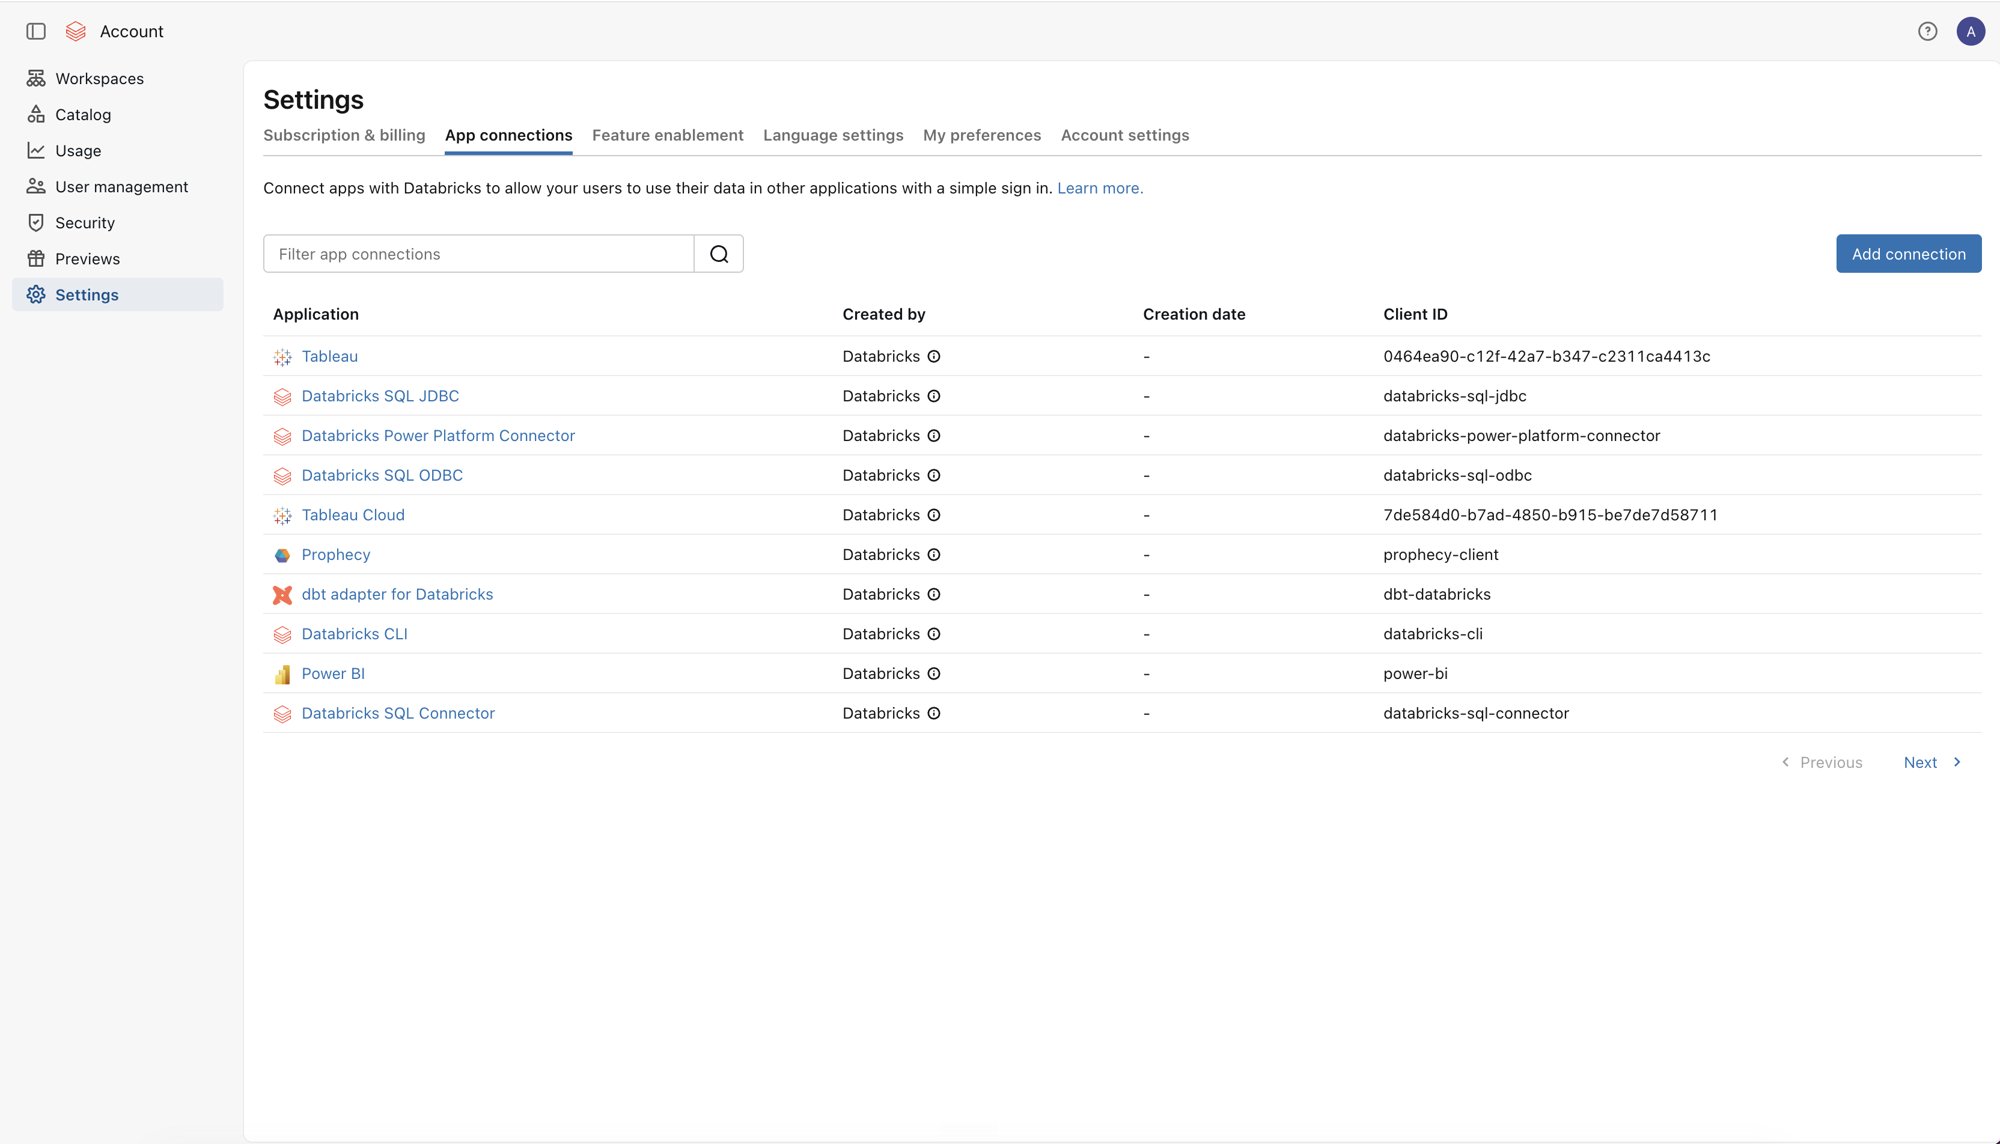 Select **Add connection**. Enter an application name that identifies Replit, such as `replit-u2m`.
Under **Redirect URLs**, enter:
```text theme={null}
https://replit.com/connectors/oauth/callback
```
Under **Access scopes**, select **All APIs**. This allows Agent to use Databricks SQL and the Databricks APIs needed to build and manage Databricks Apps.
Select **Generate a client secret**. Databricks cannot add a secret to this connection after it is created.
Set the token lifetimes according to your organization's security policy. The example uses **Access token TTL** `1440` minutes (24 hours) and **Refresh token TTL** `129600` minutes (90 days), the maximum values shown by Databricks. A shorter refresh token lifetime can require builders to sign in more often.
Select **Add**.
**All APIs** grants broader access than SQL alone. Control the connector's effective access with each builder's Databricks permissions.
Select **Add connection**. Enter an application name that identifies Replit, such as `replit-u2m`.
Under **Redirect URLs**, enter:
```text theme={null}
https://replit.com/connectors/oauth/callback
```
Under **Access scopes**, select **All APIs**. This allows Agent to use Databricks SQL and the Databricks APIs needed to build and manage Databricks Apps.
Select **Generate a client secret**. Databricks cannot add a secret to this connection after it is created.
Set the token lifetimes according to your organization's security policy. The example uses **Access token TTL** `1440` minutes (24 hours) and **Refresh token TTL** `129600` minutes (90 days), the maximum values shown by Databricks. A shorter refresh token lifetime can require builders to sign in more often.
Select **Add**.
**All APIs** grants broader access than SQL alone. Control the connector's effective access with each builder's Databricks permissions.
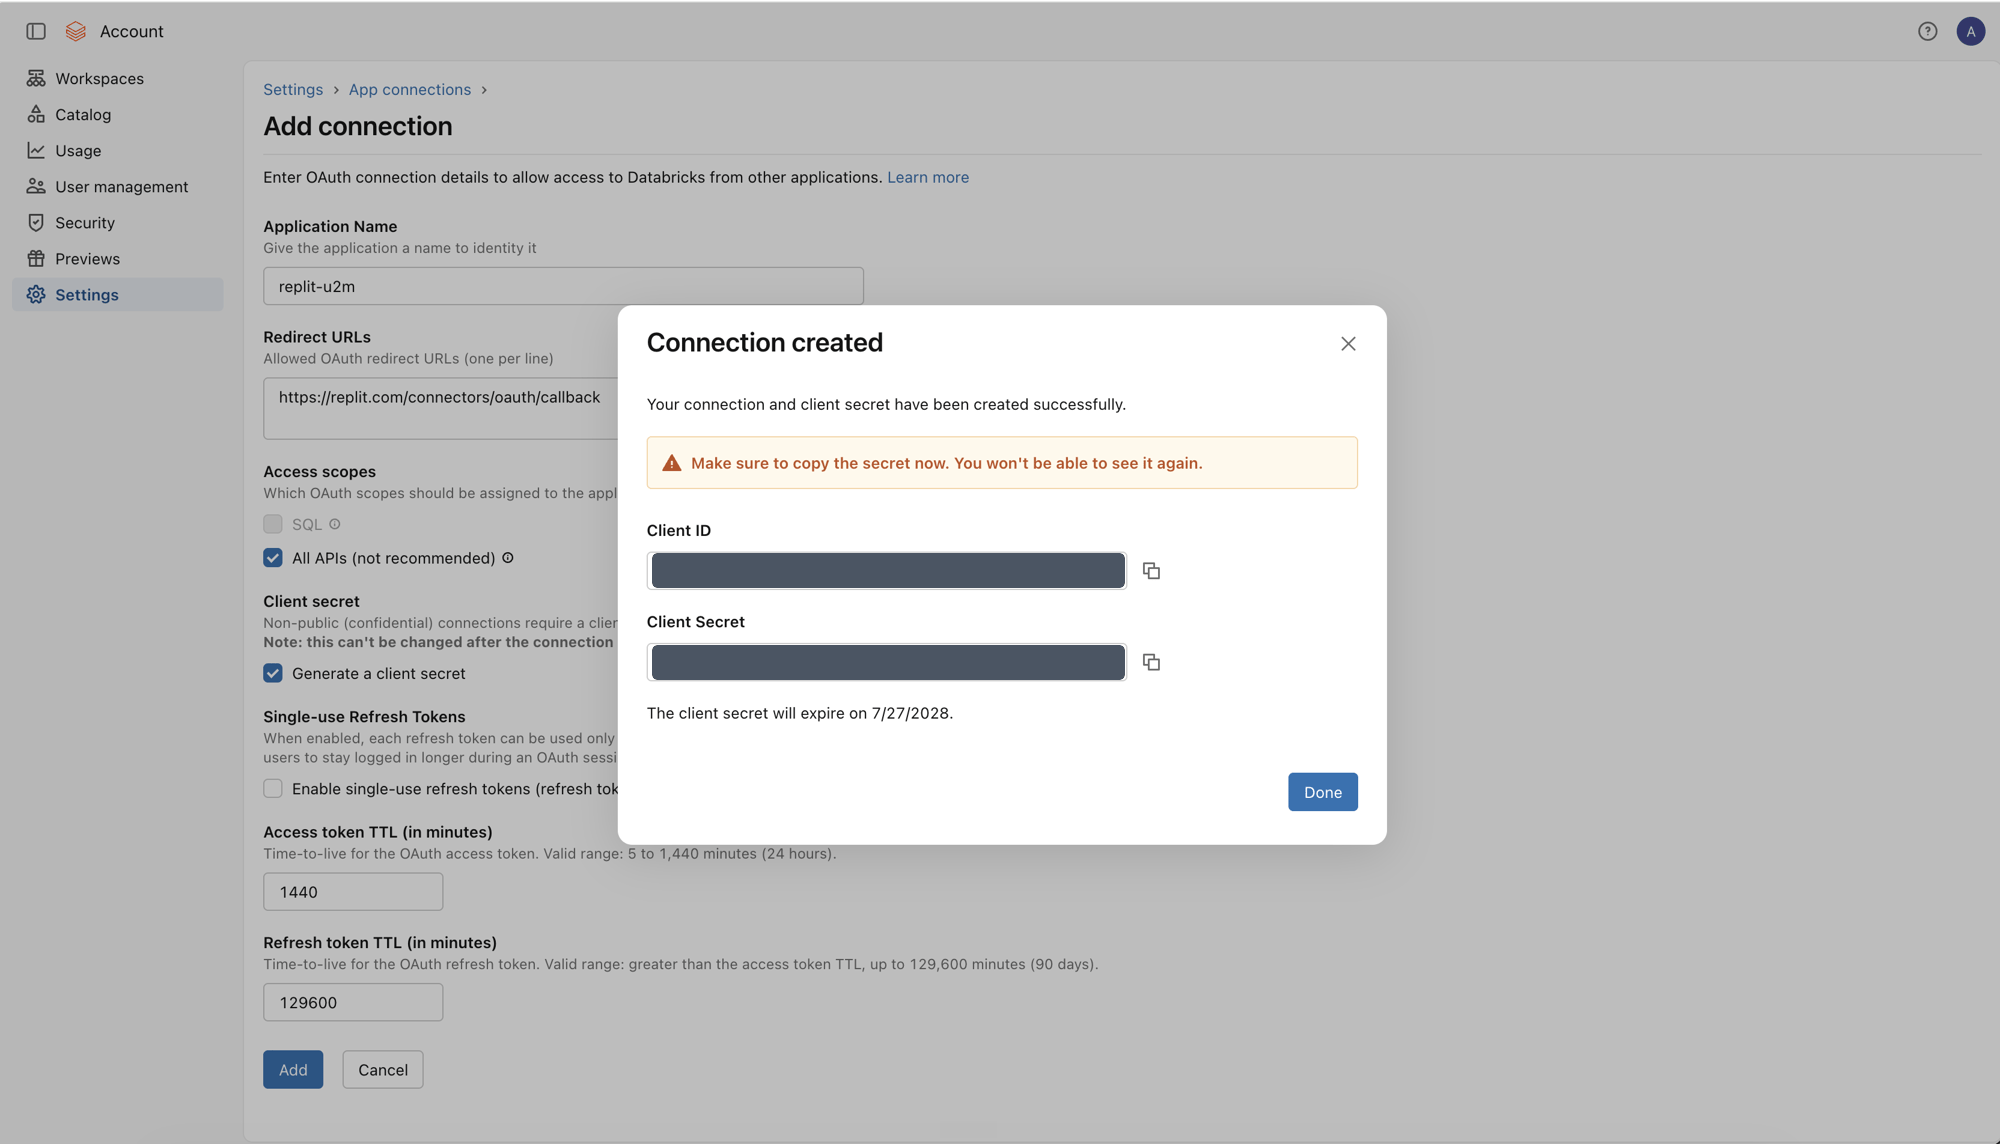
 Copy the **Client ID** and **Client Secret**, then store them in your organization's secret manager.
Databricks displays the client secret once. Record its expiration date and rotate the app connection before the secret expires.
Copy the **Client ID** and **Client Secret**, then store them in your organization's secret manager.
Databricks displays the client secret once. Record its expiration date and rotate the app connection before the secret expires.
 New or updated OAuth app connections can take up to 30 minutes to become
available.
### Step 2: Share the SQL Warehouse details
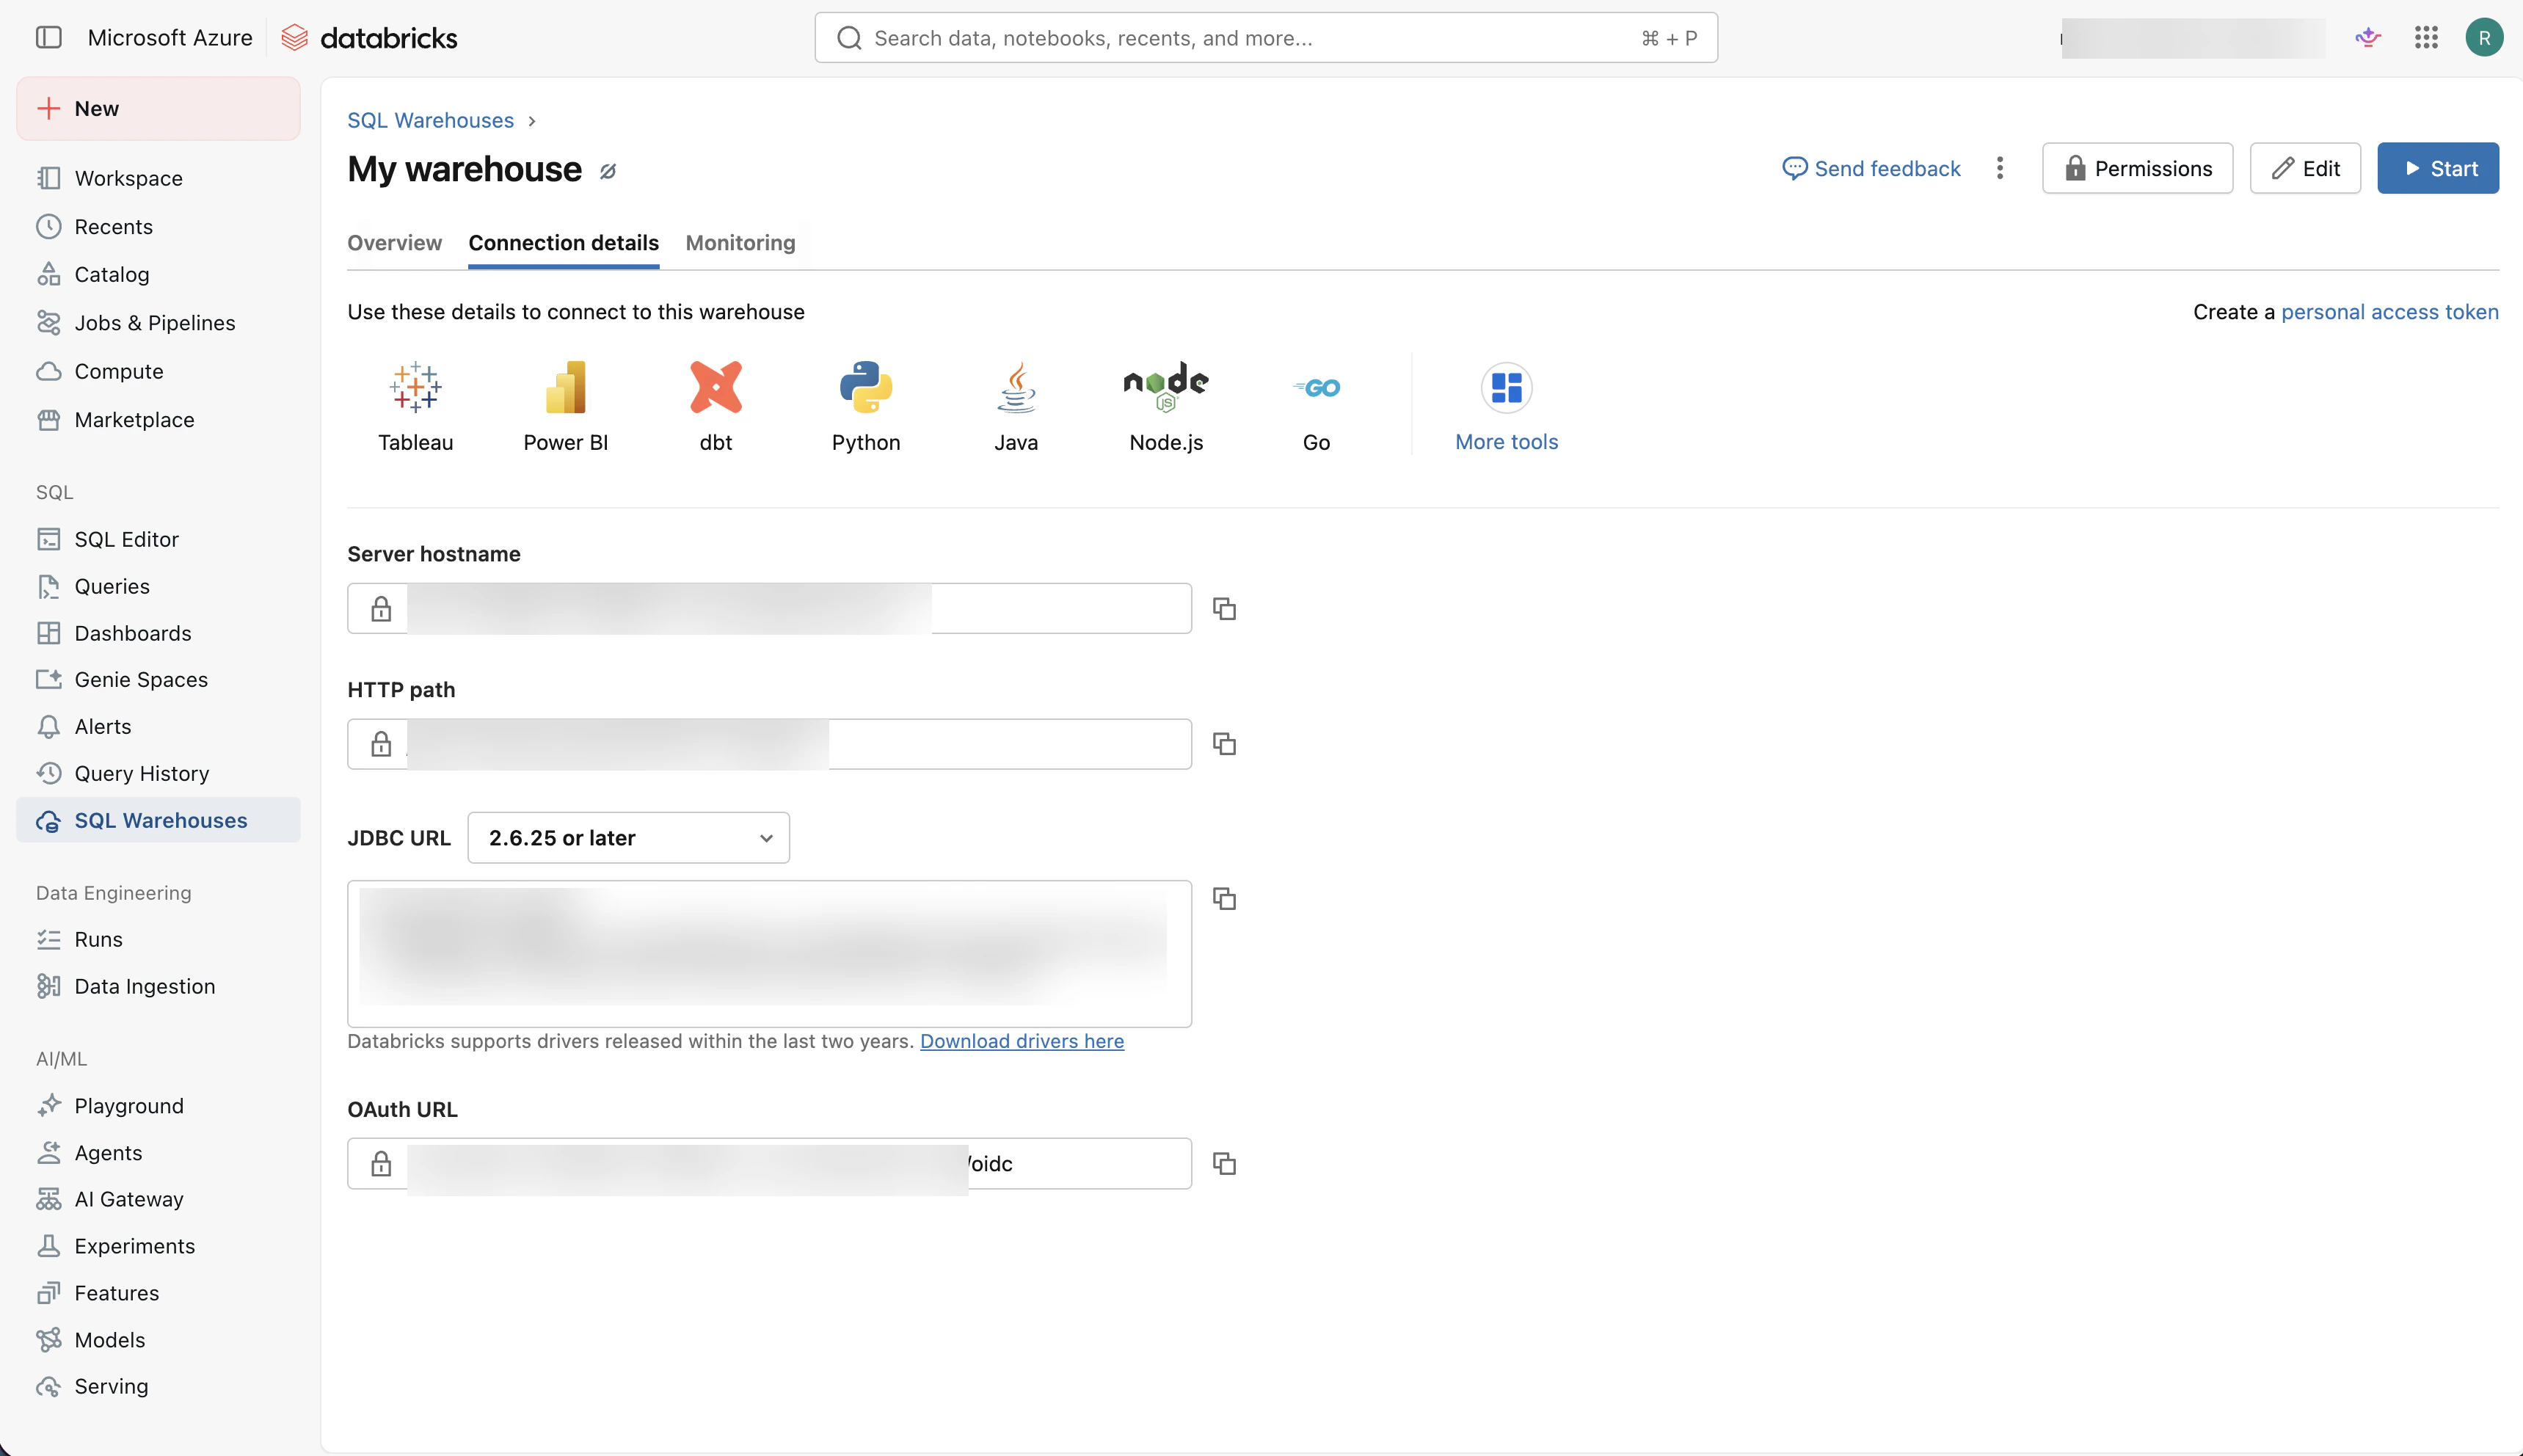
Each builder enters the SQL Warehouse details when authorizing the U2M connector. Publish these values somewhere your builders can access, such as an internal onboarding page.
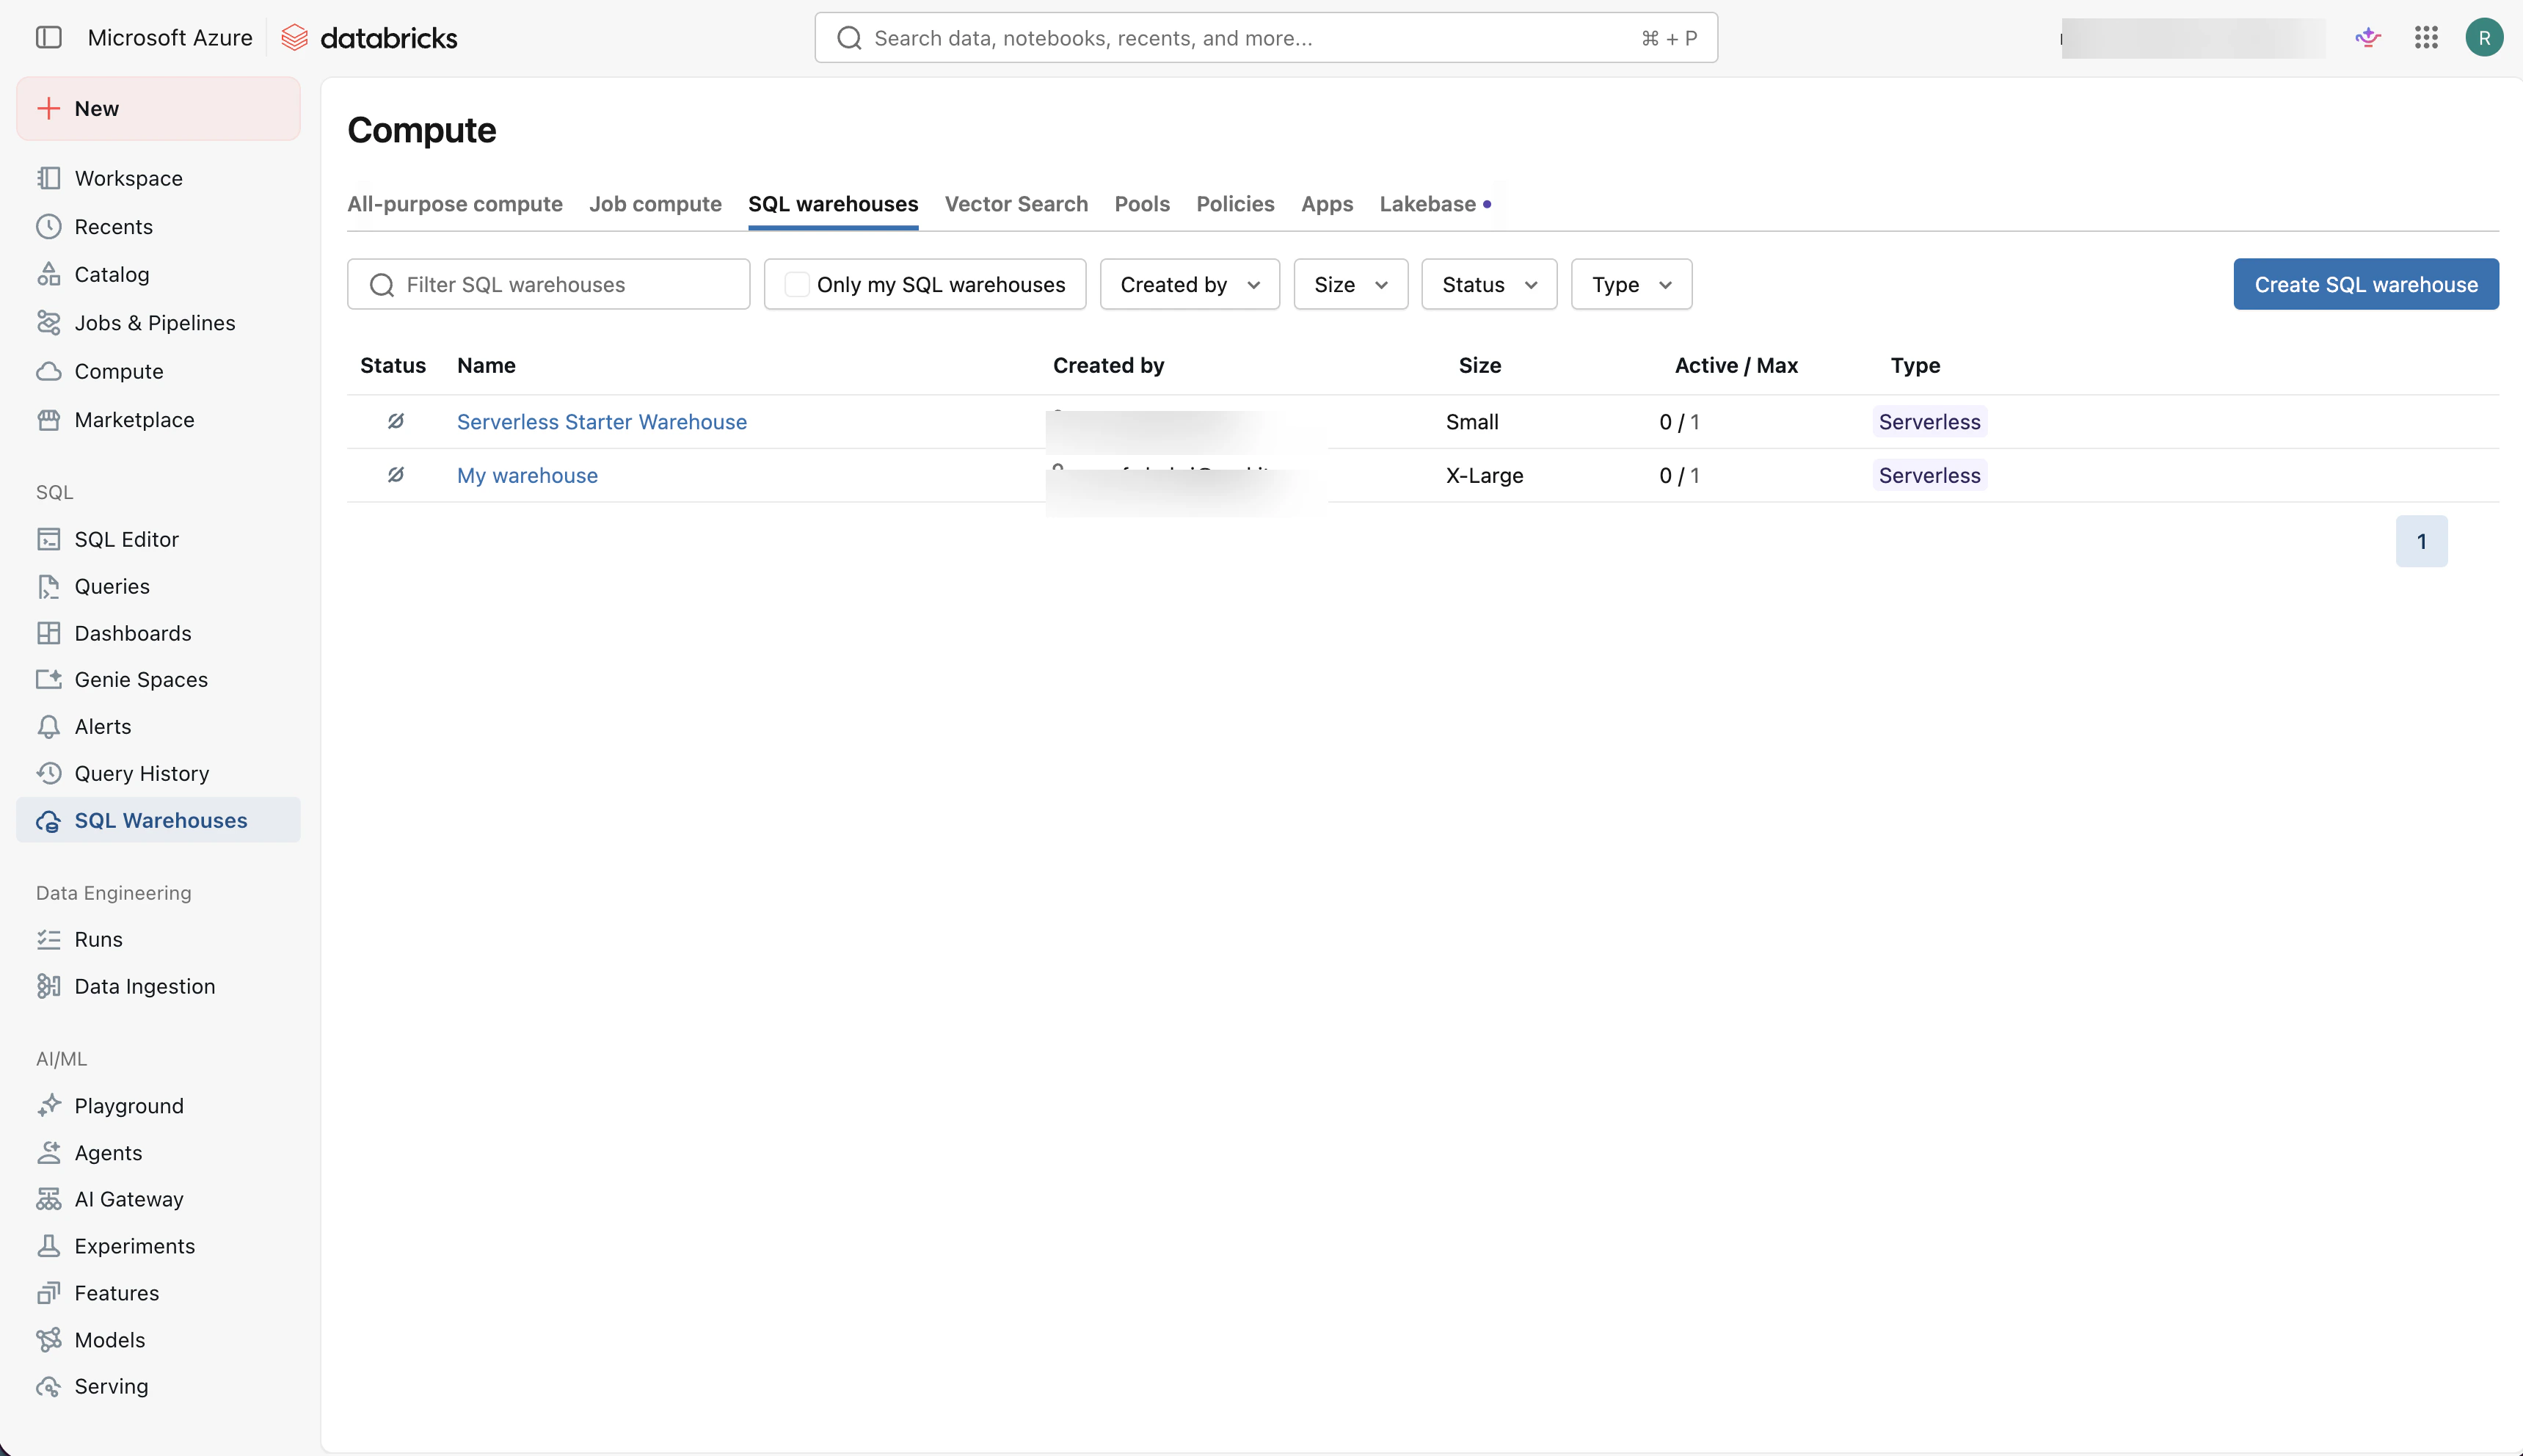
In the Databricks workspace, select **SQL Warehouses** and open the warehouse builders should use.
New or updated OAuth app connections can take up to 30 minutes to become
available.
### Step 2: Share the SQL Warehouse details
Each builder enters the SQL Warehouse details when authorizing the U2M connector. Publish these values somewhere your builders can access, such as an internal onboarding page.
In the Databricks workspace, select **SQL Warehouses** and open the warehouse builders should use.
 Select **Connection details**, then copy the **Server hostname** and **HTTP path**.
 ### Step 3: Enable U2M in Replit
You must be a Replit organization admin to configure connectors.
From your Replit account home, open **Settings**, then **Integrations**. Search for `Databricks U2M`, find **Databricks for Databricks Apps (U2M)**, and select **Enable**.
Enter the **Client ID** and **Client Secret** from the Databricks app connection.
Confirm that the redirect URL shown in Replit matches the URL configured in Databricks:
```text theme={null}
https://replit.com/connectors/oauth/callback
```
Under **Connector Scopes**, enable `all-apis` and `offline_access`. The `offline_access` scope gives Replit a refresh token for long-lived sessions.
Select **Configure**.
### Step 3: Enable U2M in Replit
You must be a Replit organization admin to configure connectors.
From your Replit account home, open **Settings**, then **Integrations**. Search for `Databricks U2M`, find **Databricks for Databricks Apps (U2M)**, and select **Enable**.
Enter the **Client ID** and **Client Secret** from the Databricks app connection.
Confirm that the redirect URL shown in Replit matches the URL configured in Databricks:
```text theme={null}
https://replit.com/connectors/oauth/callback
```
Under **Connector Scopes**, enable `all-apis` and `offline_access`. The `offline_access` scope gives Replit a refresh token for long-lived sessions.
Select **Configure**.
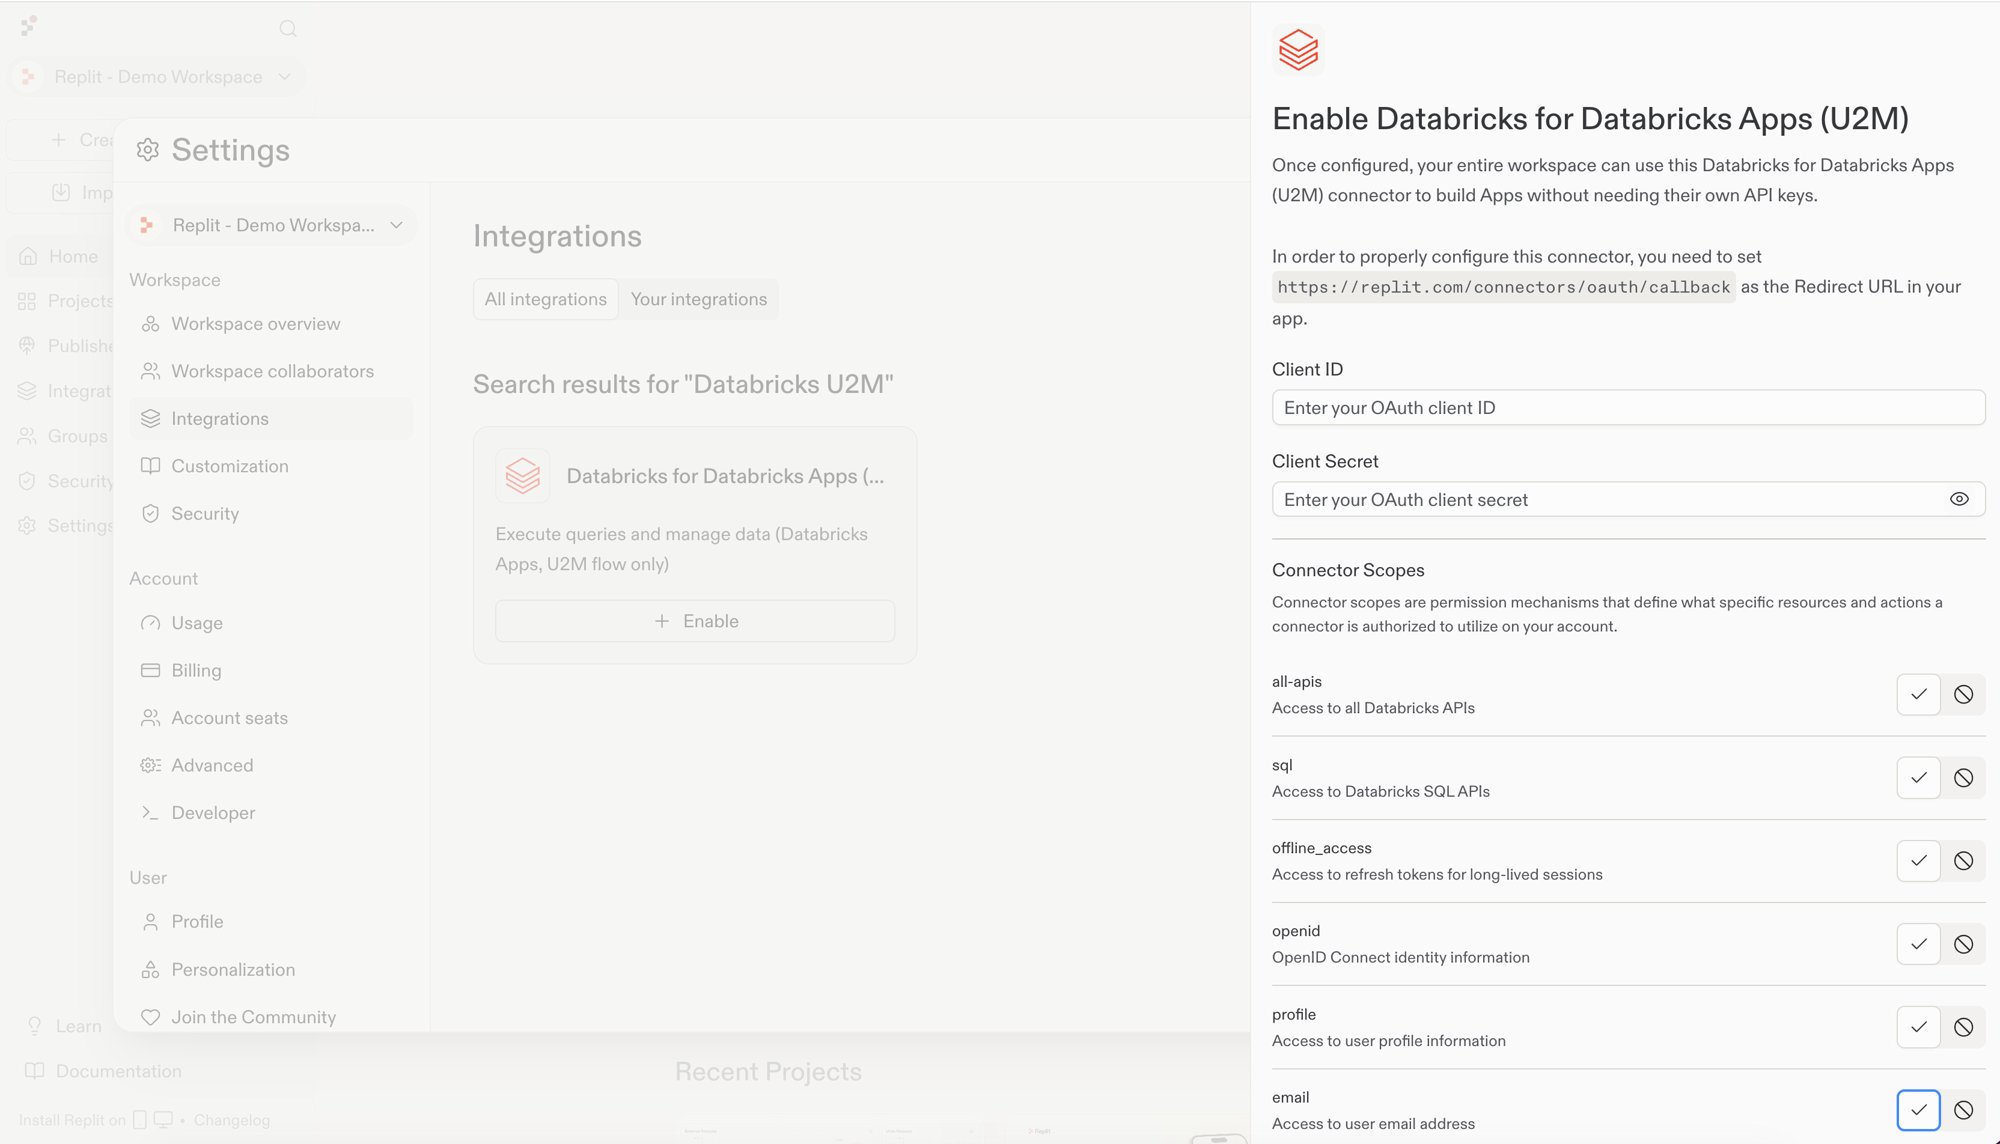 Confirm that **Databricks for Databricks Apps (U2M)** appears under **Your integrations**.
### Step 4: Sign in as a builder
Each builder signs in with their own Databricks account before using the connector. Replit can refresh the session until the refresh token expires.
On the **Integrations** page, find **Databricks for Databricks Apps (U2M)** and select **Sign in**. Review the connection details, then select **Continue to Databricks for Databricks Apps**.
Confirm that **Databricks for Databricks Apps (U2M)** appears under **Your integrations**.
### Step 4: Sign in as a builder
Each builder signs in with their own Databricks account before using the connector. Replit can refresh the session until the refresh token expires.
On the **Integrations** page, find **Databricks for Databricks Apps (U2M)** and select **Sign in**. Review the connection details, then select **Continue to Databricks for Databricks Apps**.
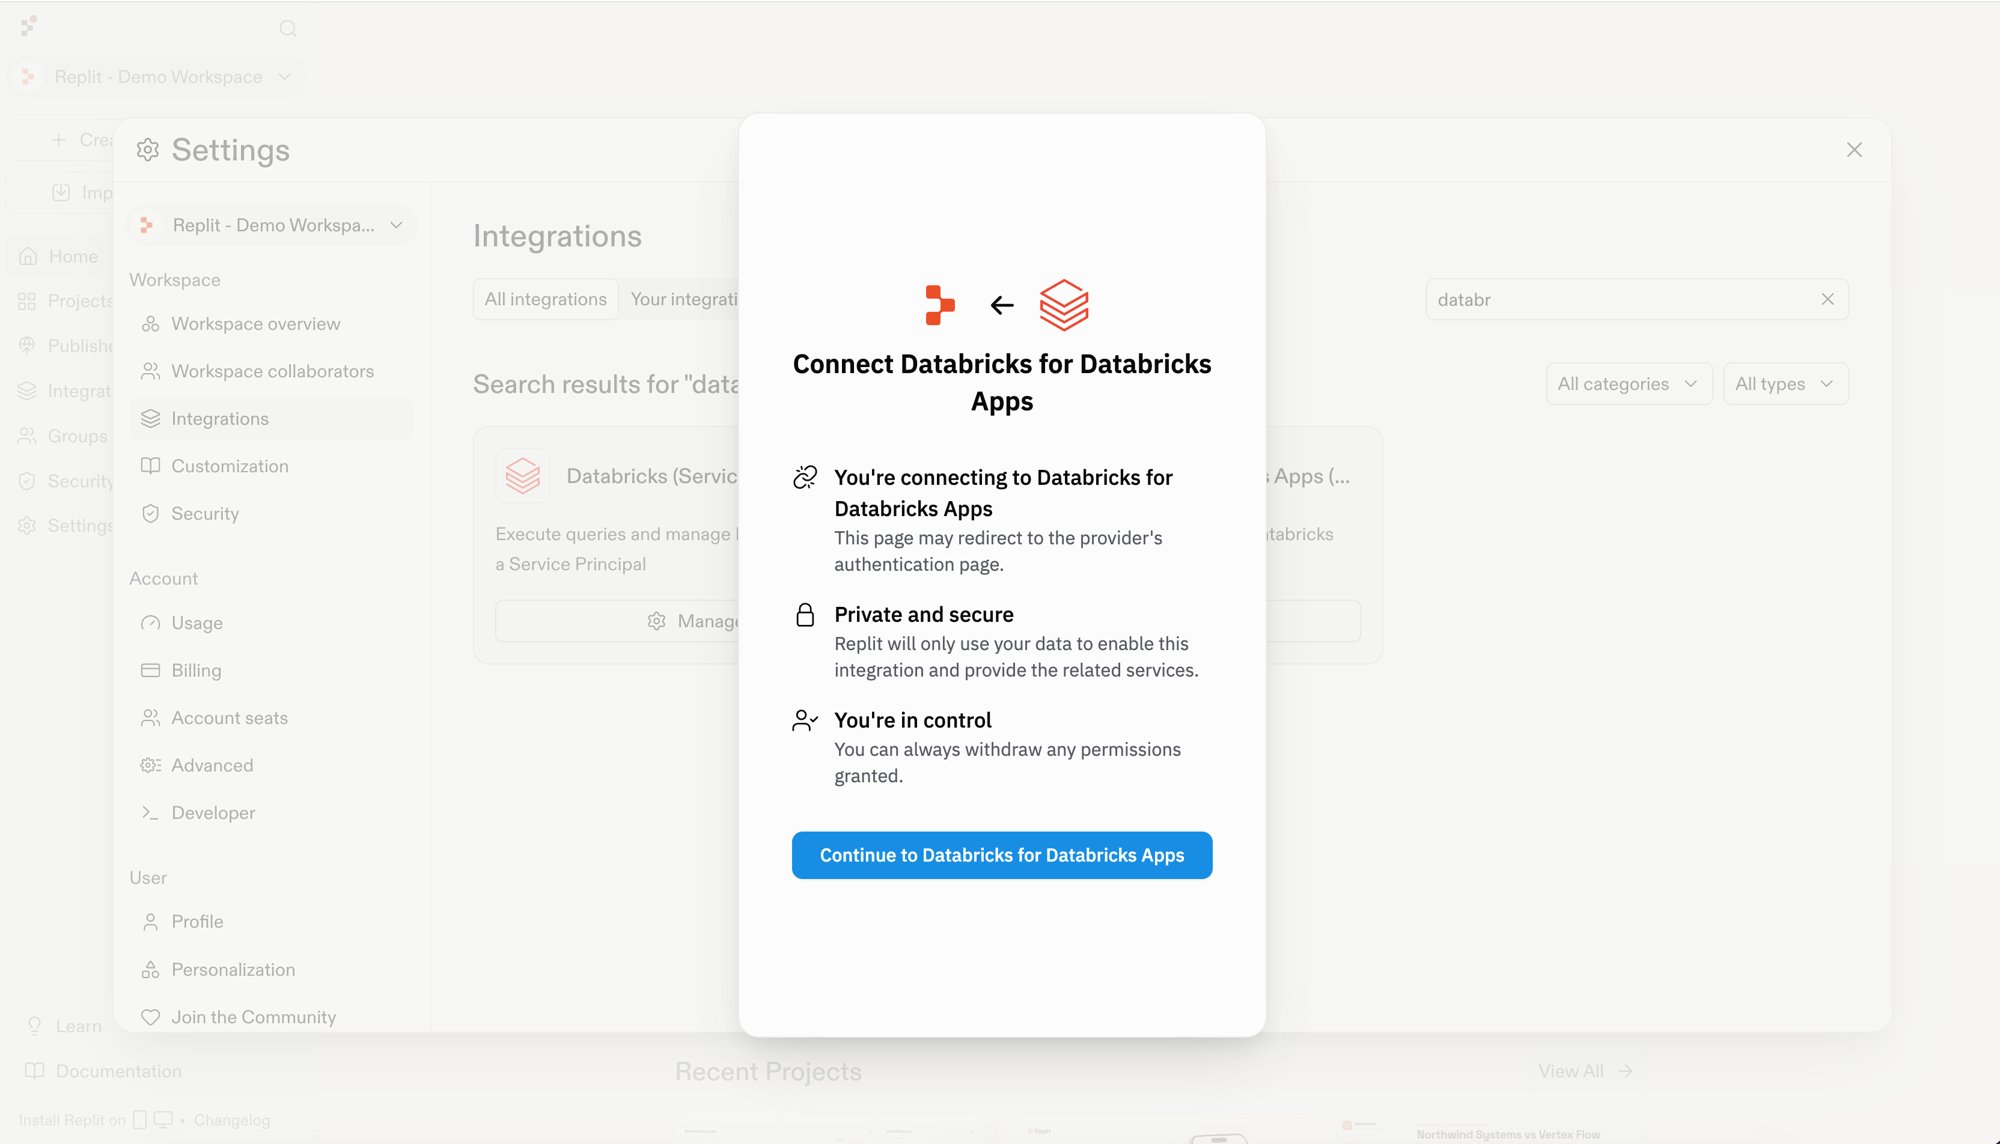 Enter the SQL Warehouse **HTTP path** provided by your Databricks admin, then select **Next**.
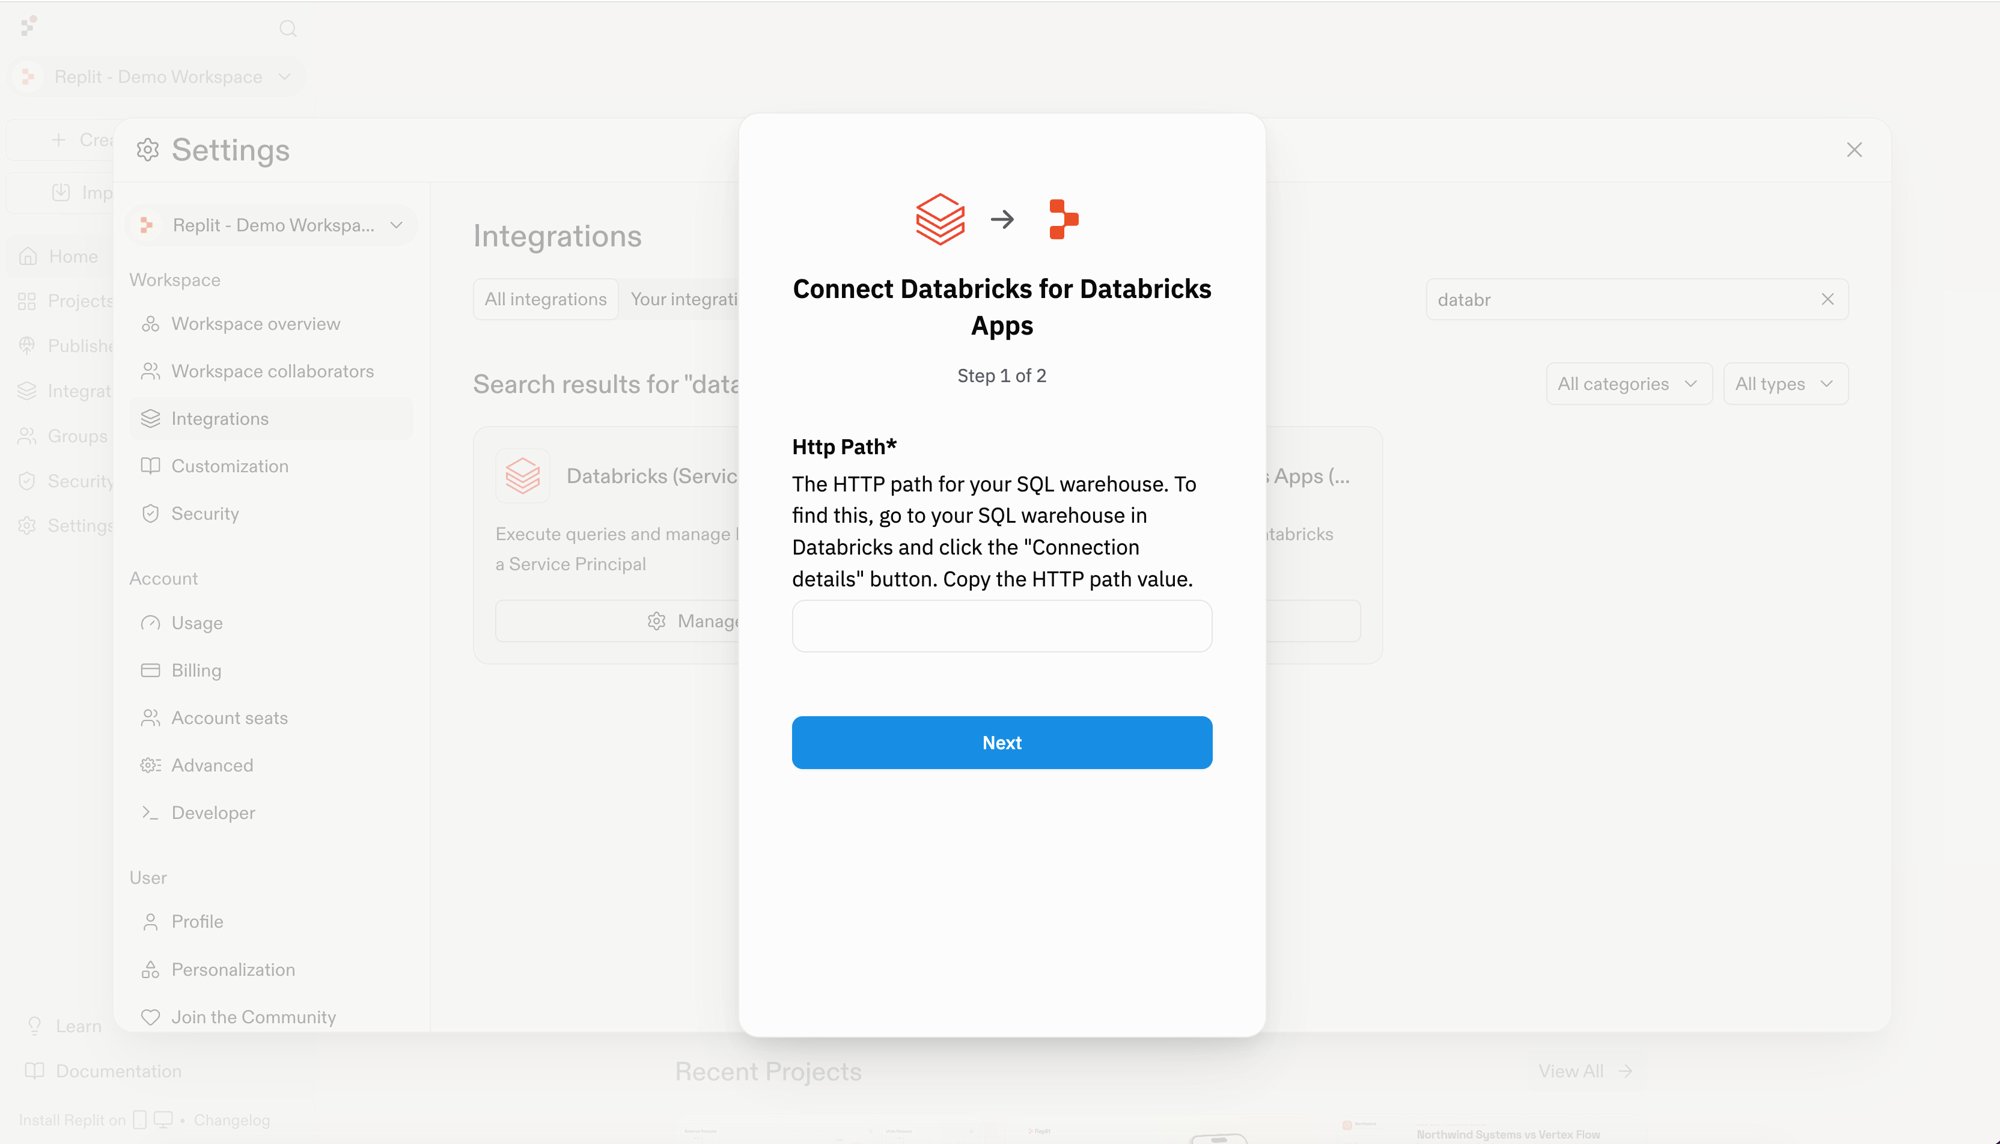 Replit next asks for the SQL Warehouse **Server hostname**. Enter it and continue to Databricks. Sign in when prompted, review the requested access, and approve the request.
Every query Agent runs through this connection uses your Databricks permissions and is attributed to you in Databricks audit logs.
After approval, Databricks returns you to Replit and the connector is ready to use.
## Set up the service principal connector
Service principal setup involves three roles:
1. **Databricks admin**: creates the service principal and grants permissions in Databricks.
2. **Replit organization admin**: configures the connector and access in Replit.
3. **Builder**: starts building with the shared Databricks identity.
### Service principal prerequisites
Before you start, confirm you have:
* Databricks account admin or workspace admin access.
* Replit organization admin access.
### Step 1: Create a service principal in Databricks
You must be a Databricks account admin or workspace admin to complete this
step.
The Databricks admin creates a machine-to-machine identity, called a [service principal](https://docs.databricks.com/aws/en/admin/users-groups/service-principals), that Replit uses to connect to Databricks.
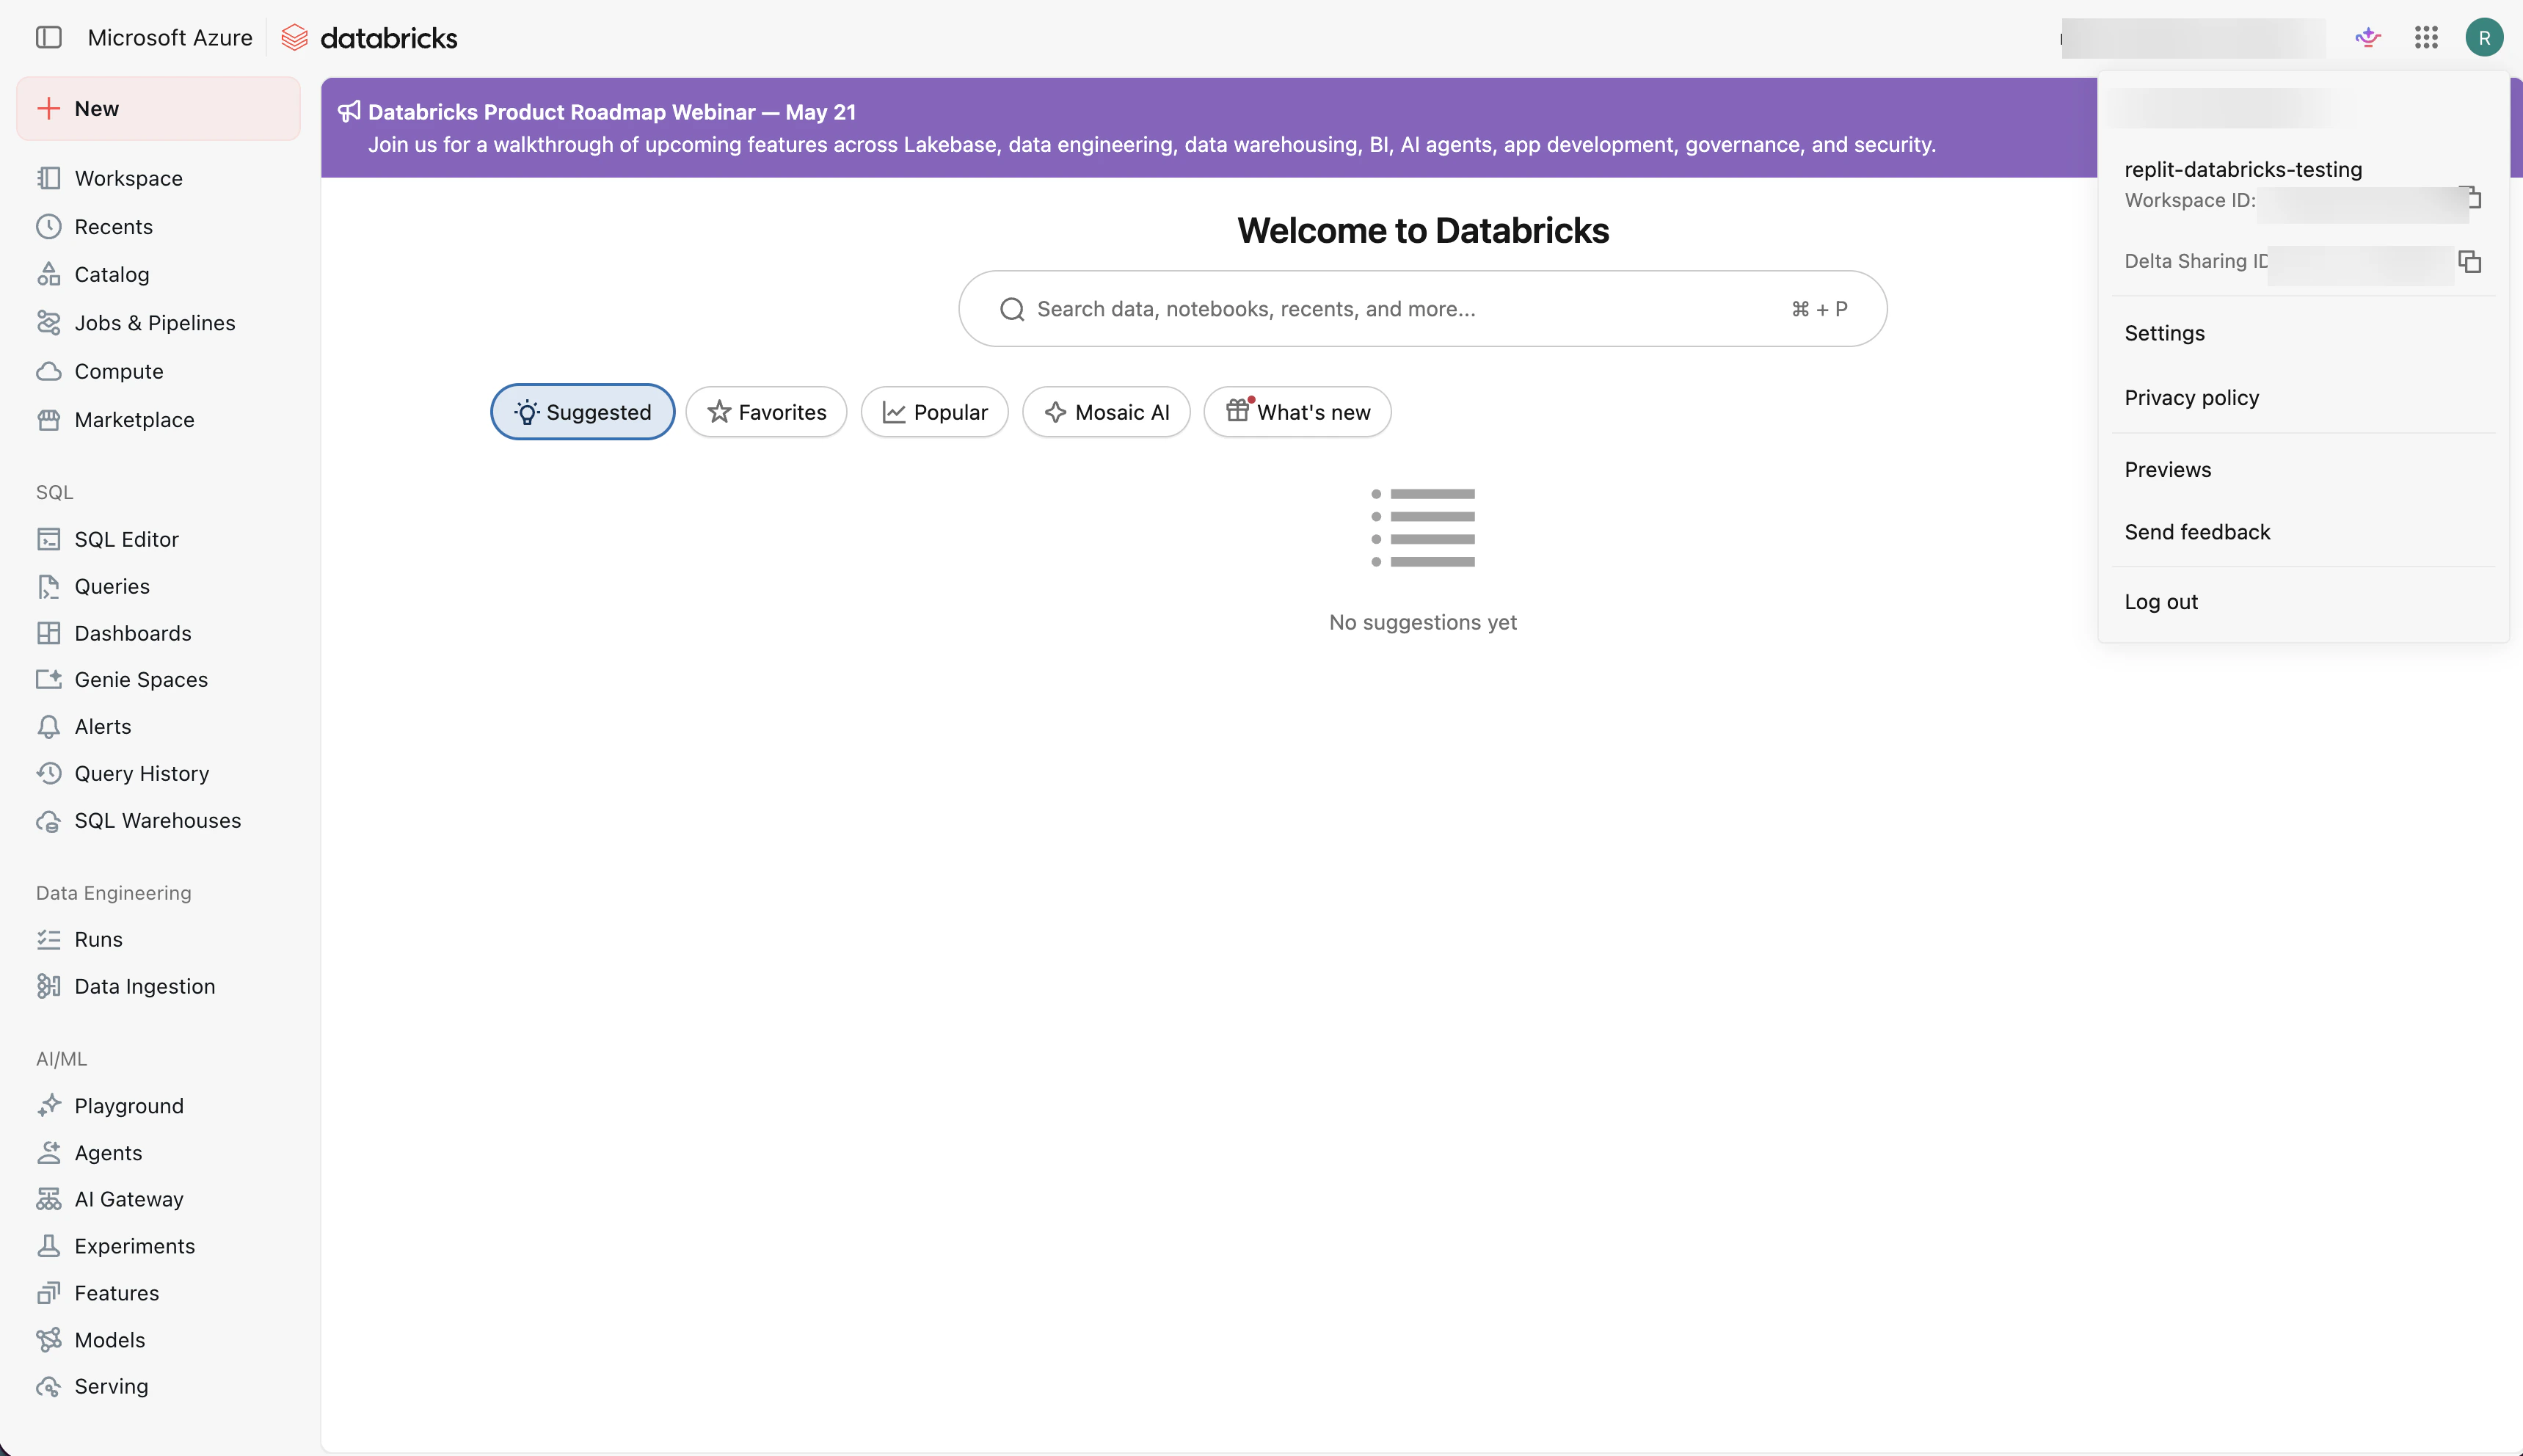
In Databricks, select your avatar in the top-right corner, then select **Settings**.
Replit next asks for the SQL Warehouse **Server hostname**. Enter it and continue to Databricks. Sign in when prompted, review the requested access, and approve the request.
Every query Agent runs through this connection uses your Databricks permissions and is attributed to you in Databricks audit logs.
After approval, Databricks returns you to Replit and the connector is ready to use.
## Set up the service principal connector
Service principal setup involves three roles:
1. **Databricks admin**: creates the service principal and grants permissions in Databricks.
2. **Replit organization admin**: configures the connector and access in Replit.
3. **Builder**: starts building with the shared Databricks identity.
### Service principal prerequisites
Before you start, confirm you have:
* Databricks account admin or workspace admin access.
* Replit organization admin access.
### Step 1: Create a service principal in Databricks
You must be a Databricks account admin or workspace admin to complete this
step.
The Databricks admin creates a machine-to-machine identity, called a [service principal](https://docs.databricks.com/aws/en/admin/users-groups/service-principals), that Replit uses to connect to Databricks.
In Databricks, select your avatar in the top-right corner, then select **Settings**.
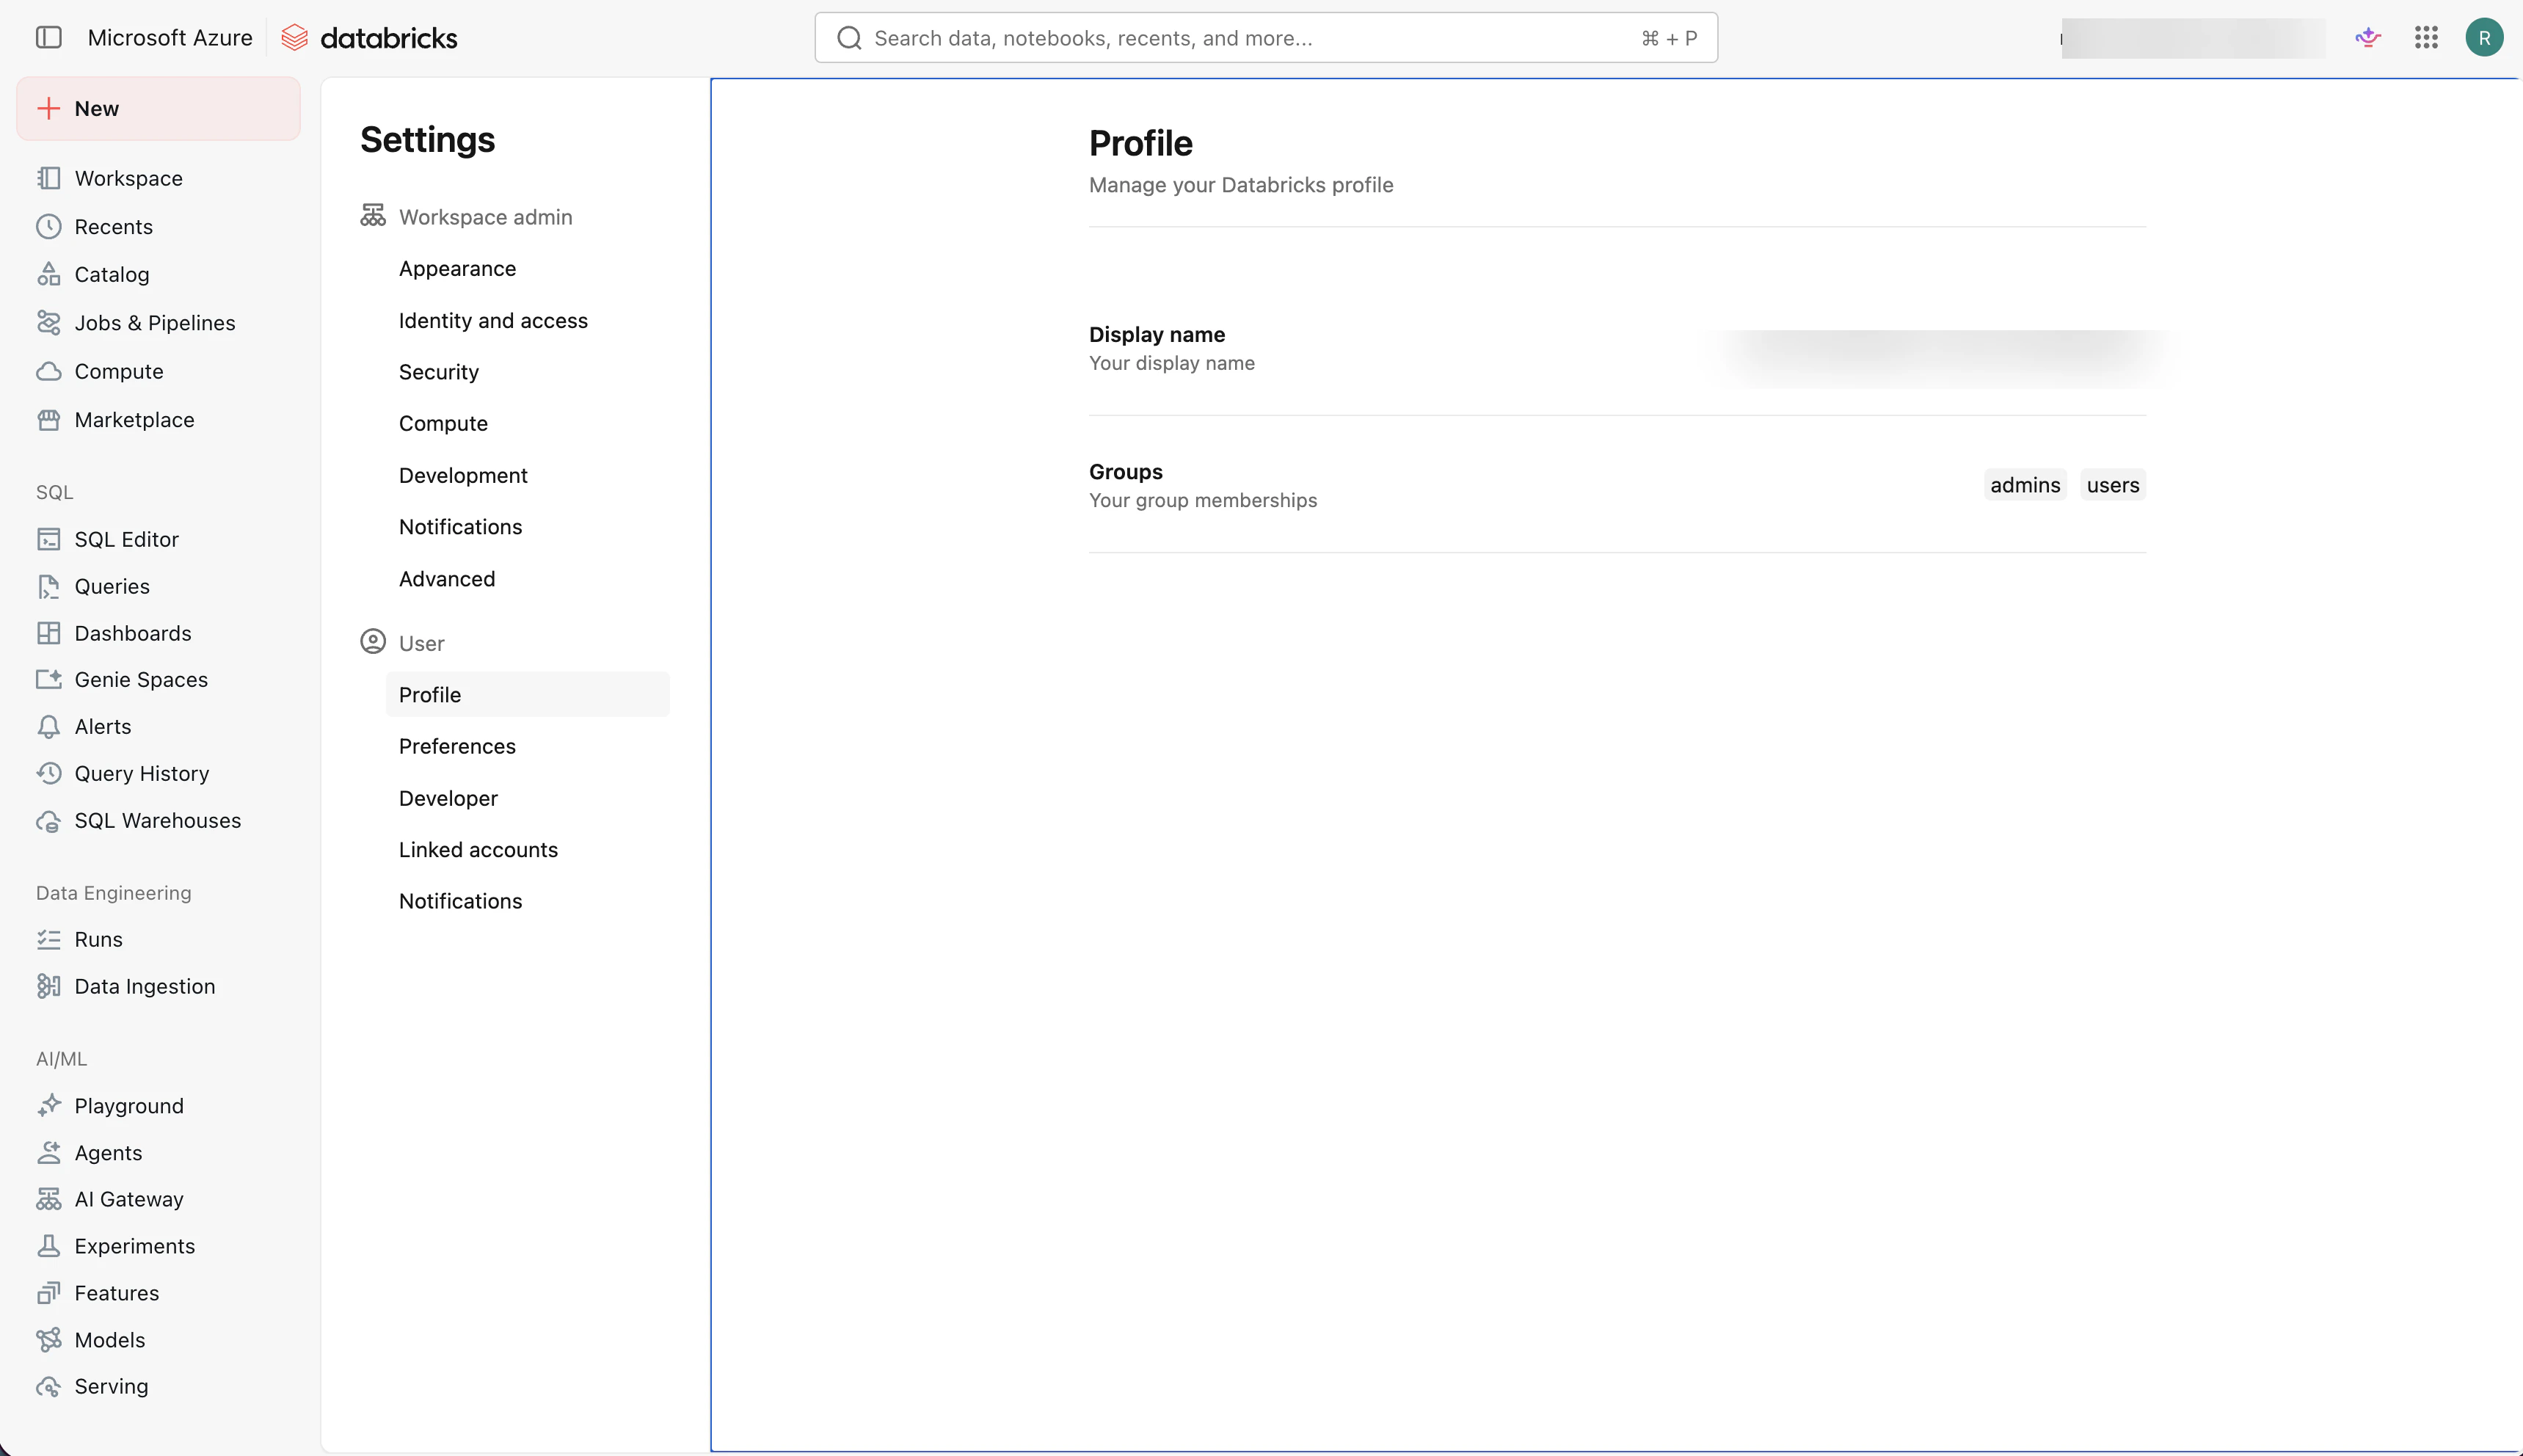
 In the Settings sidebar, select **Identity and access**.
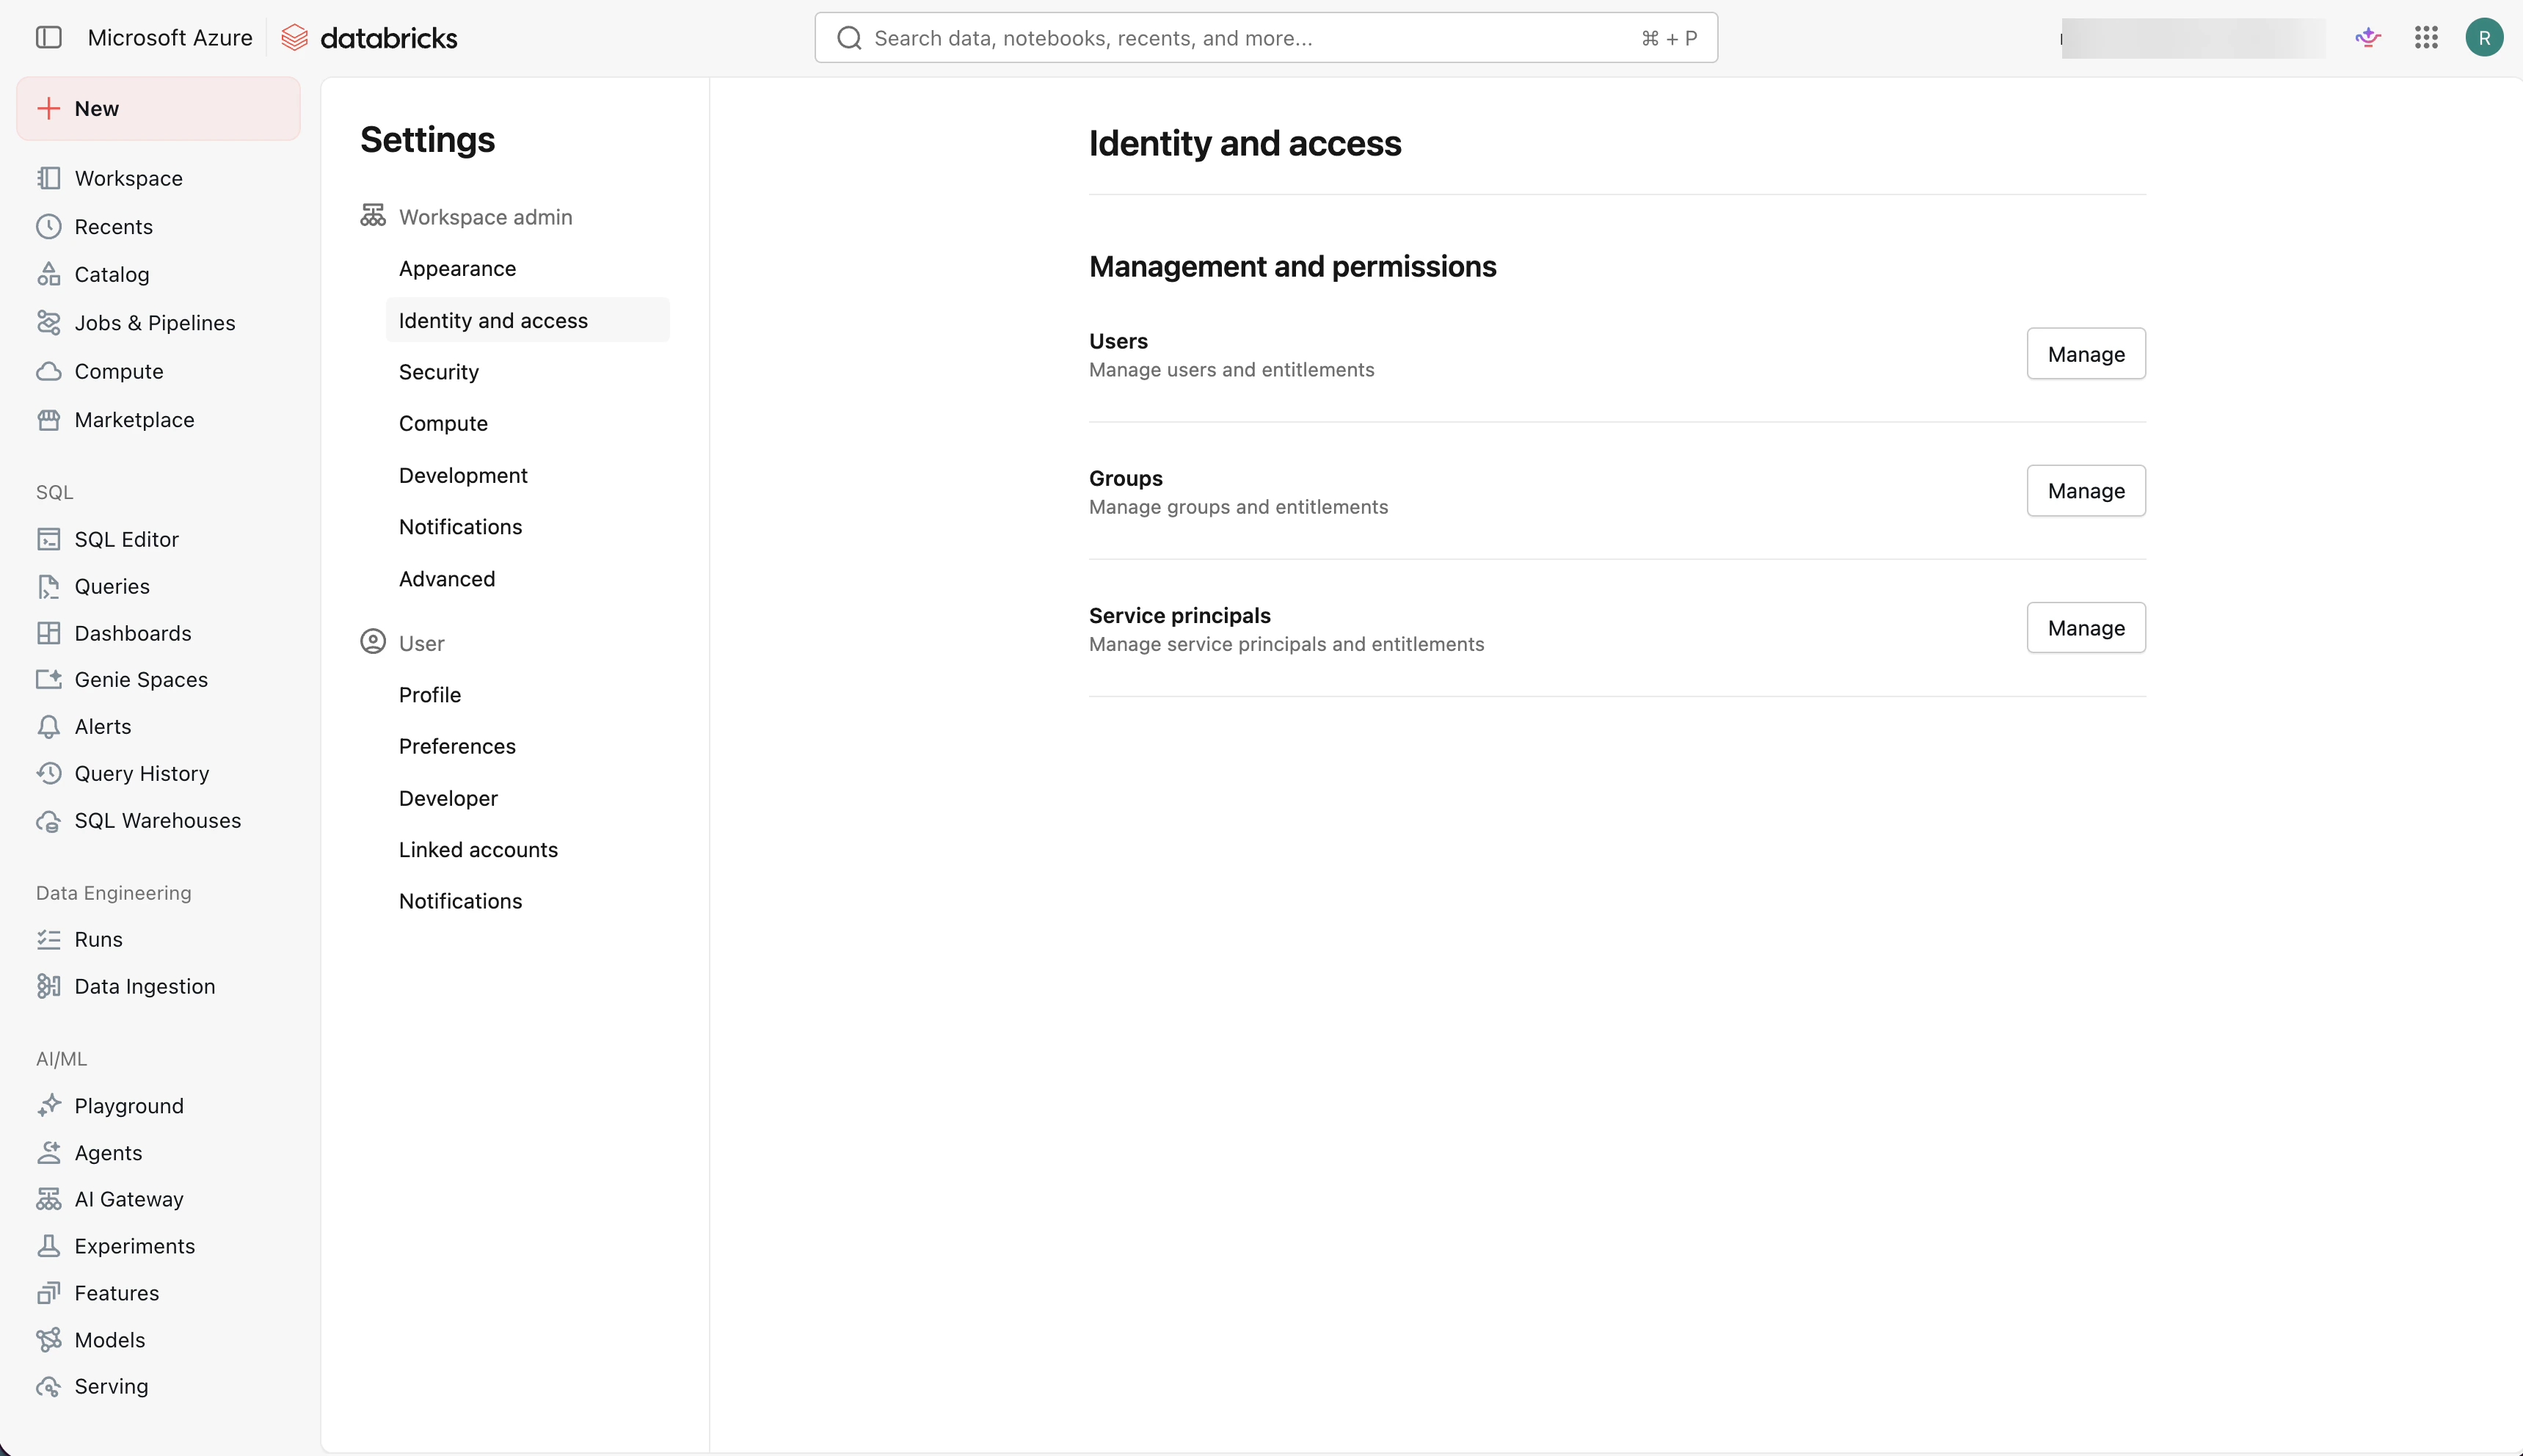
 Under **Management and permissions**, find **Service principals** and select **Manage**.
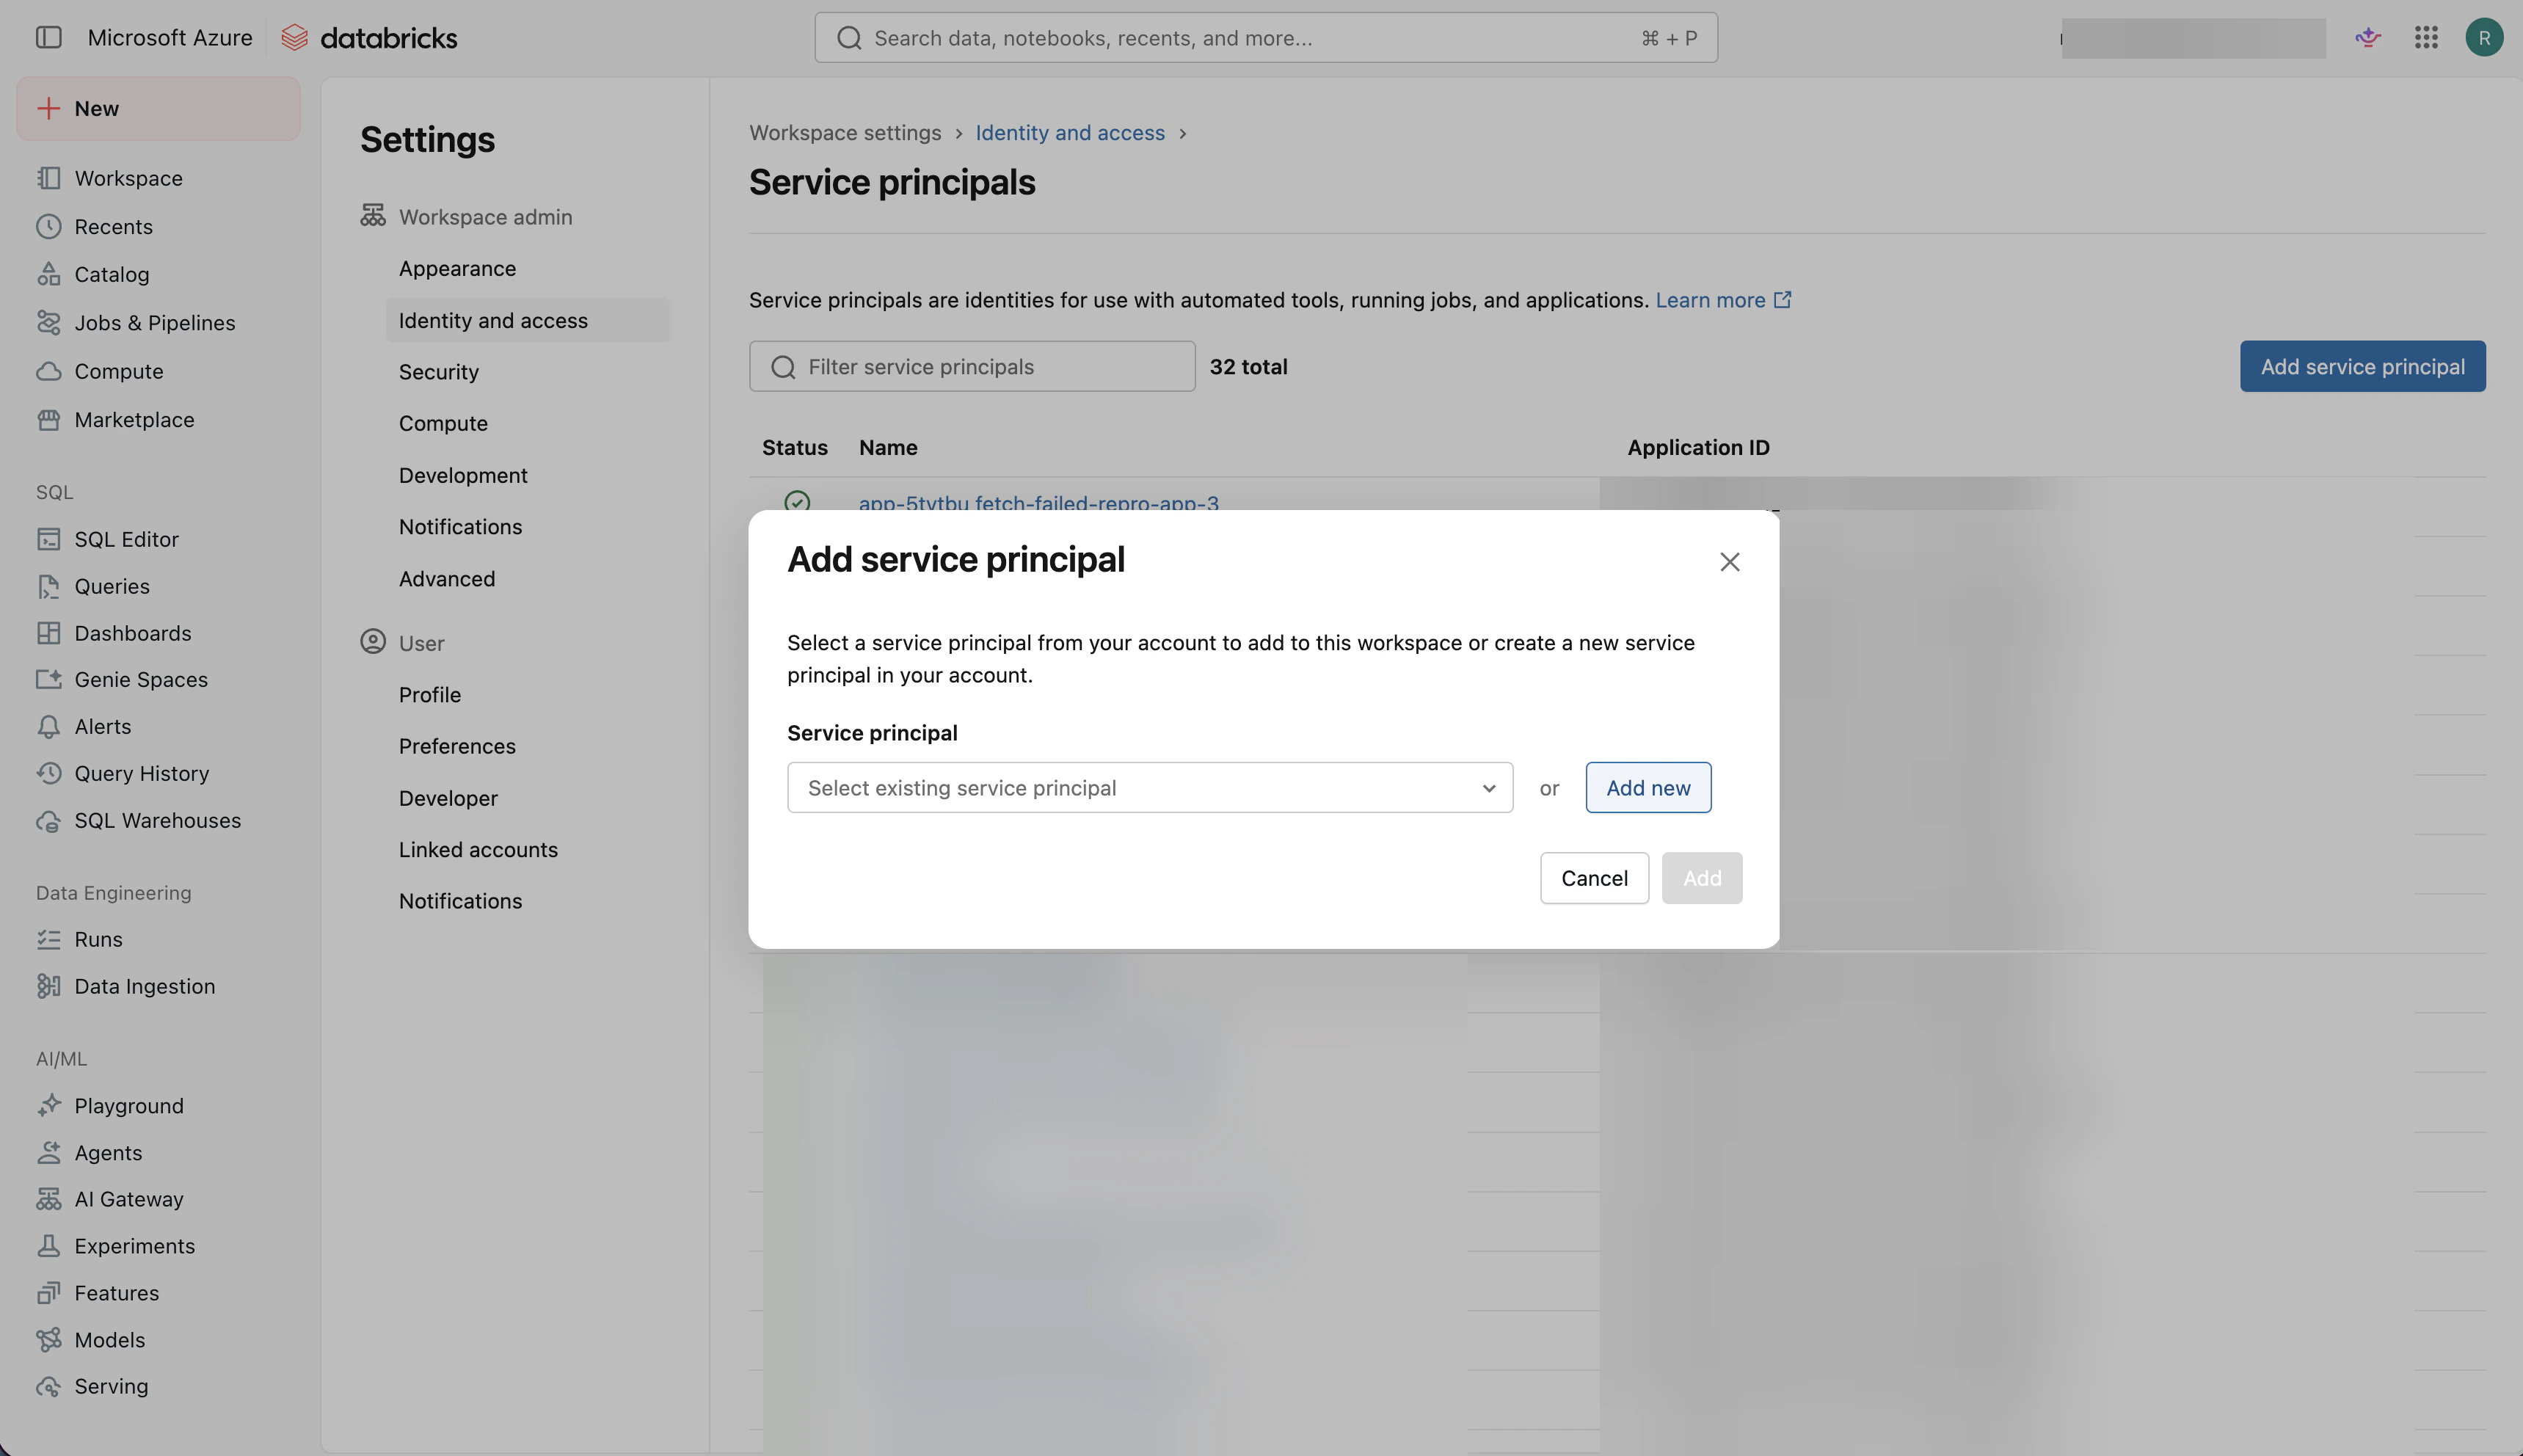
 Select **Add service principal**, then select **Add new**.
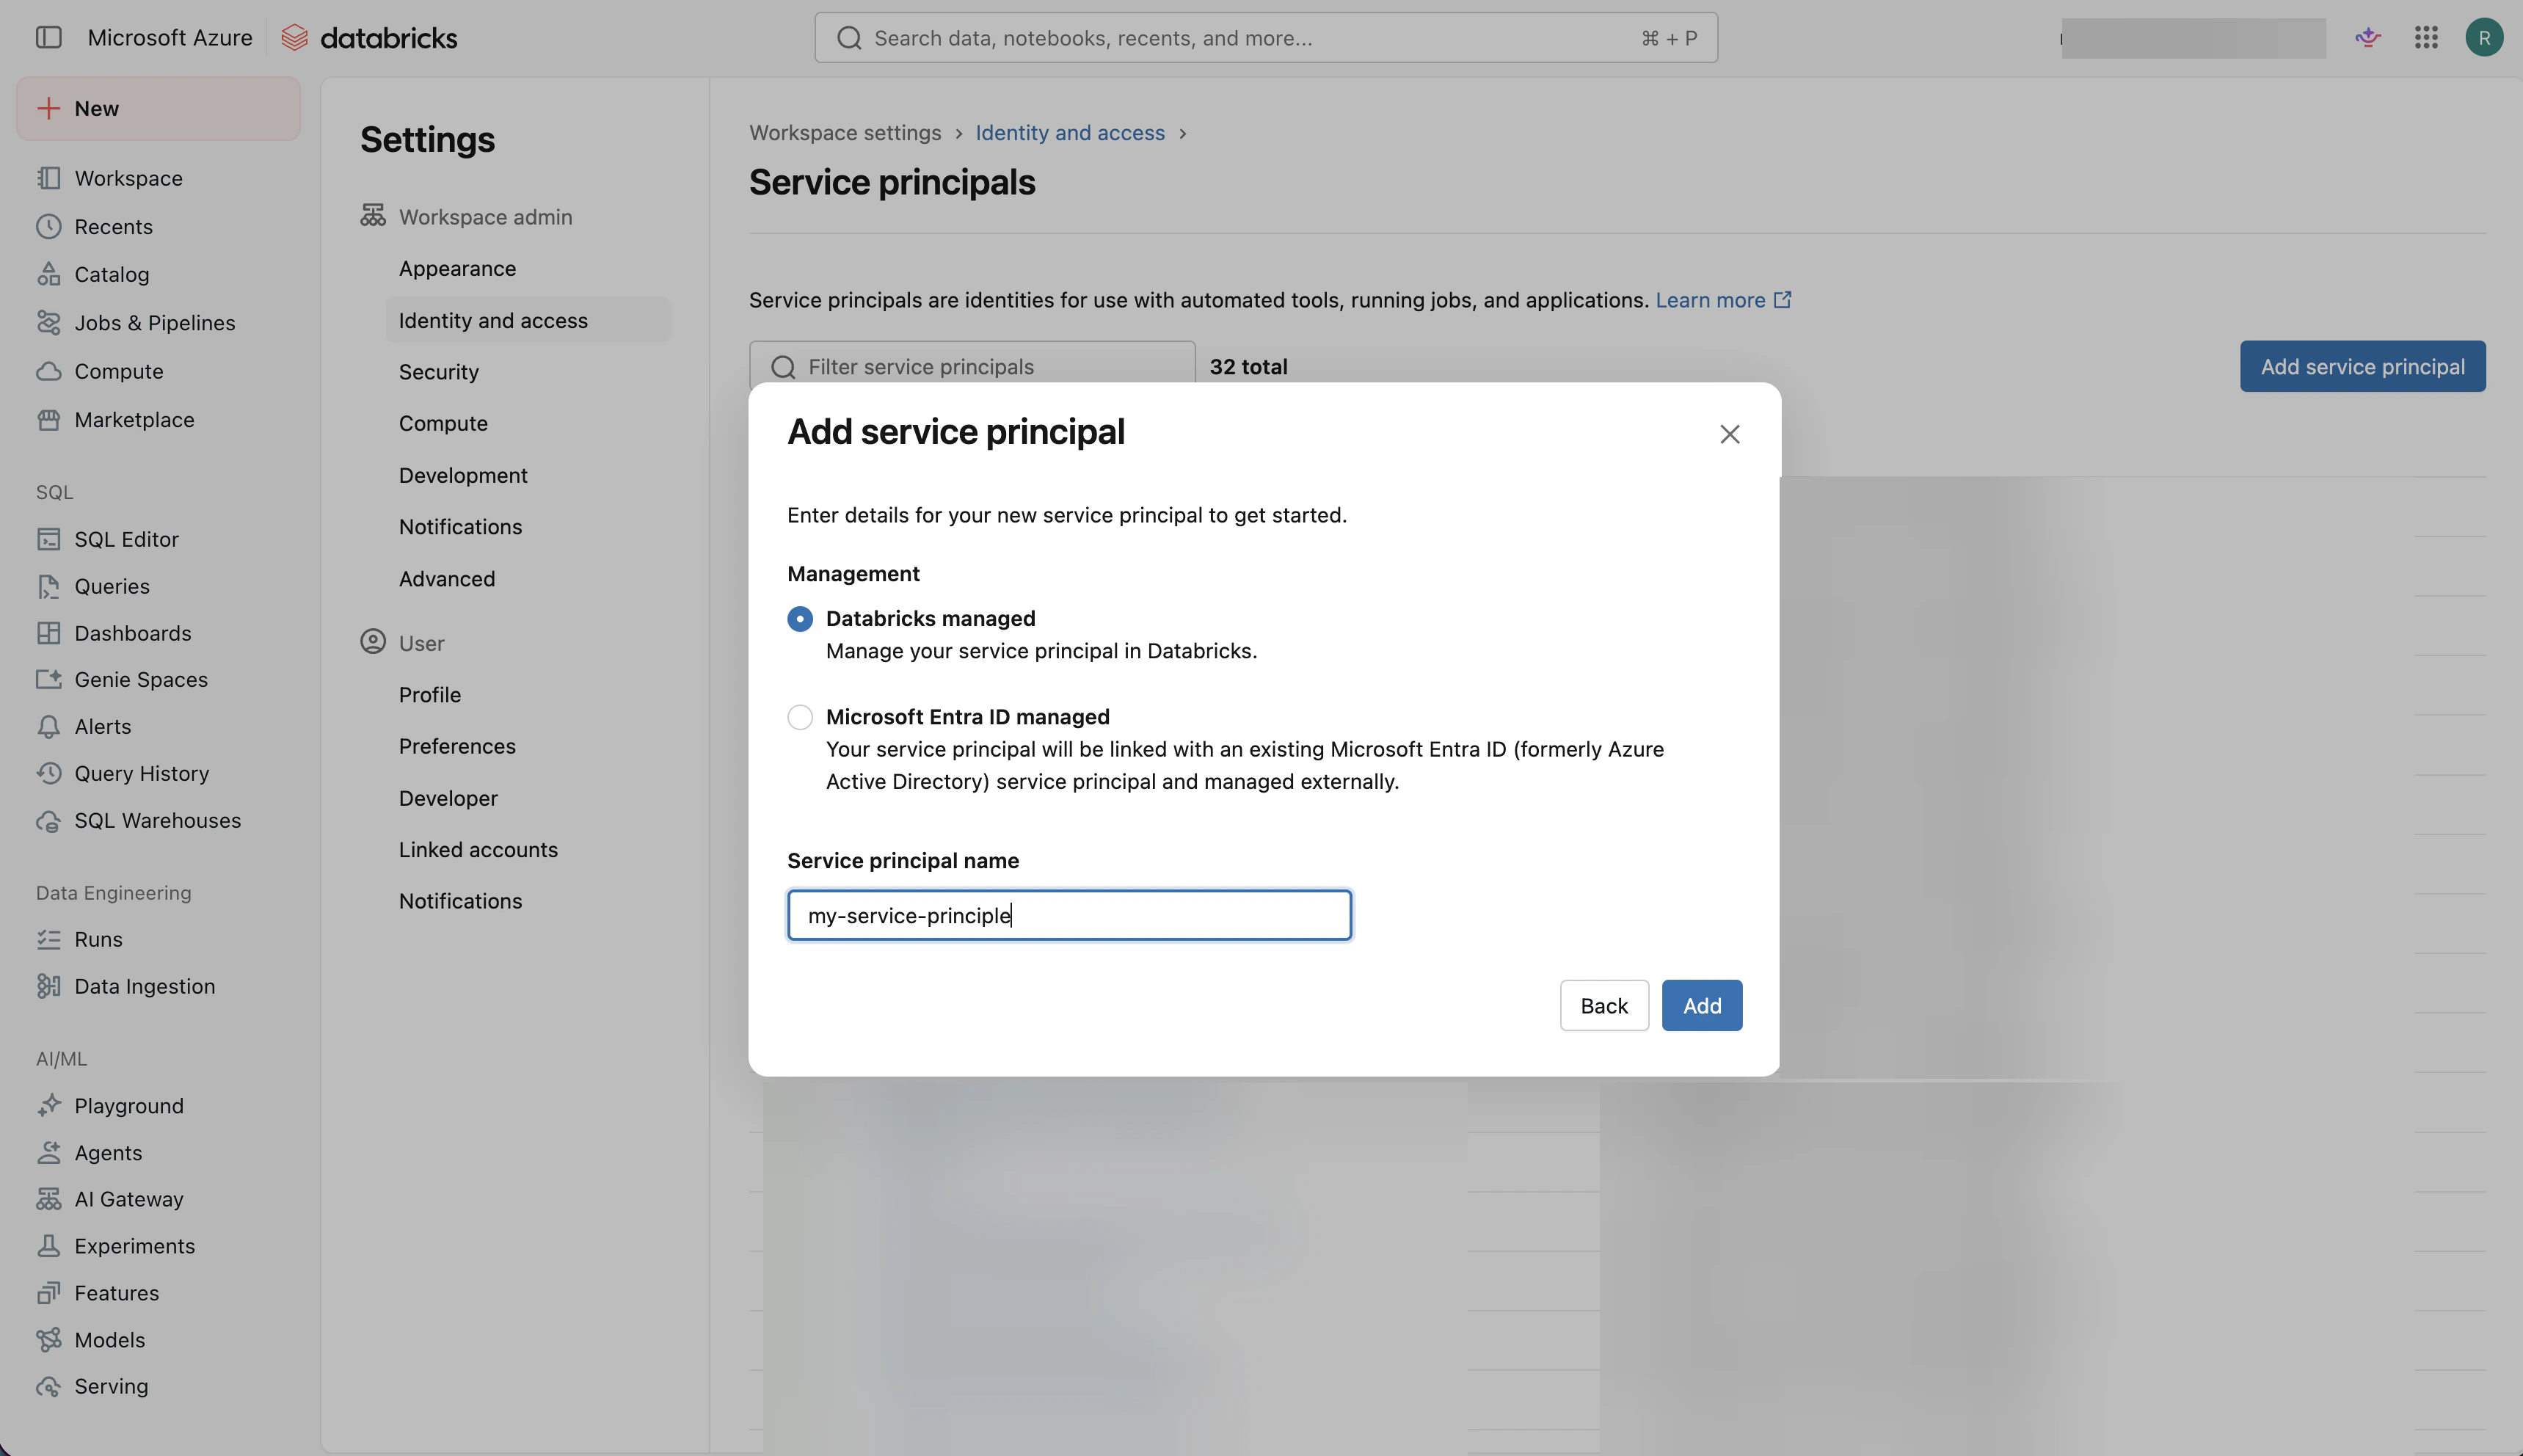
 Enter a clear name for the service principal, then select **Add**.
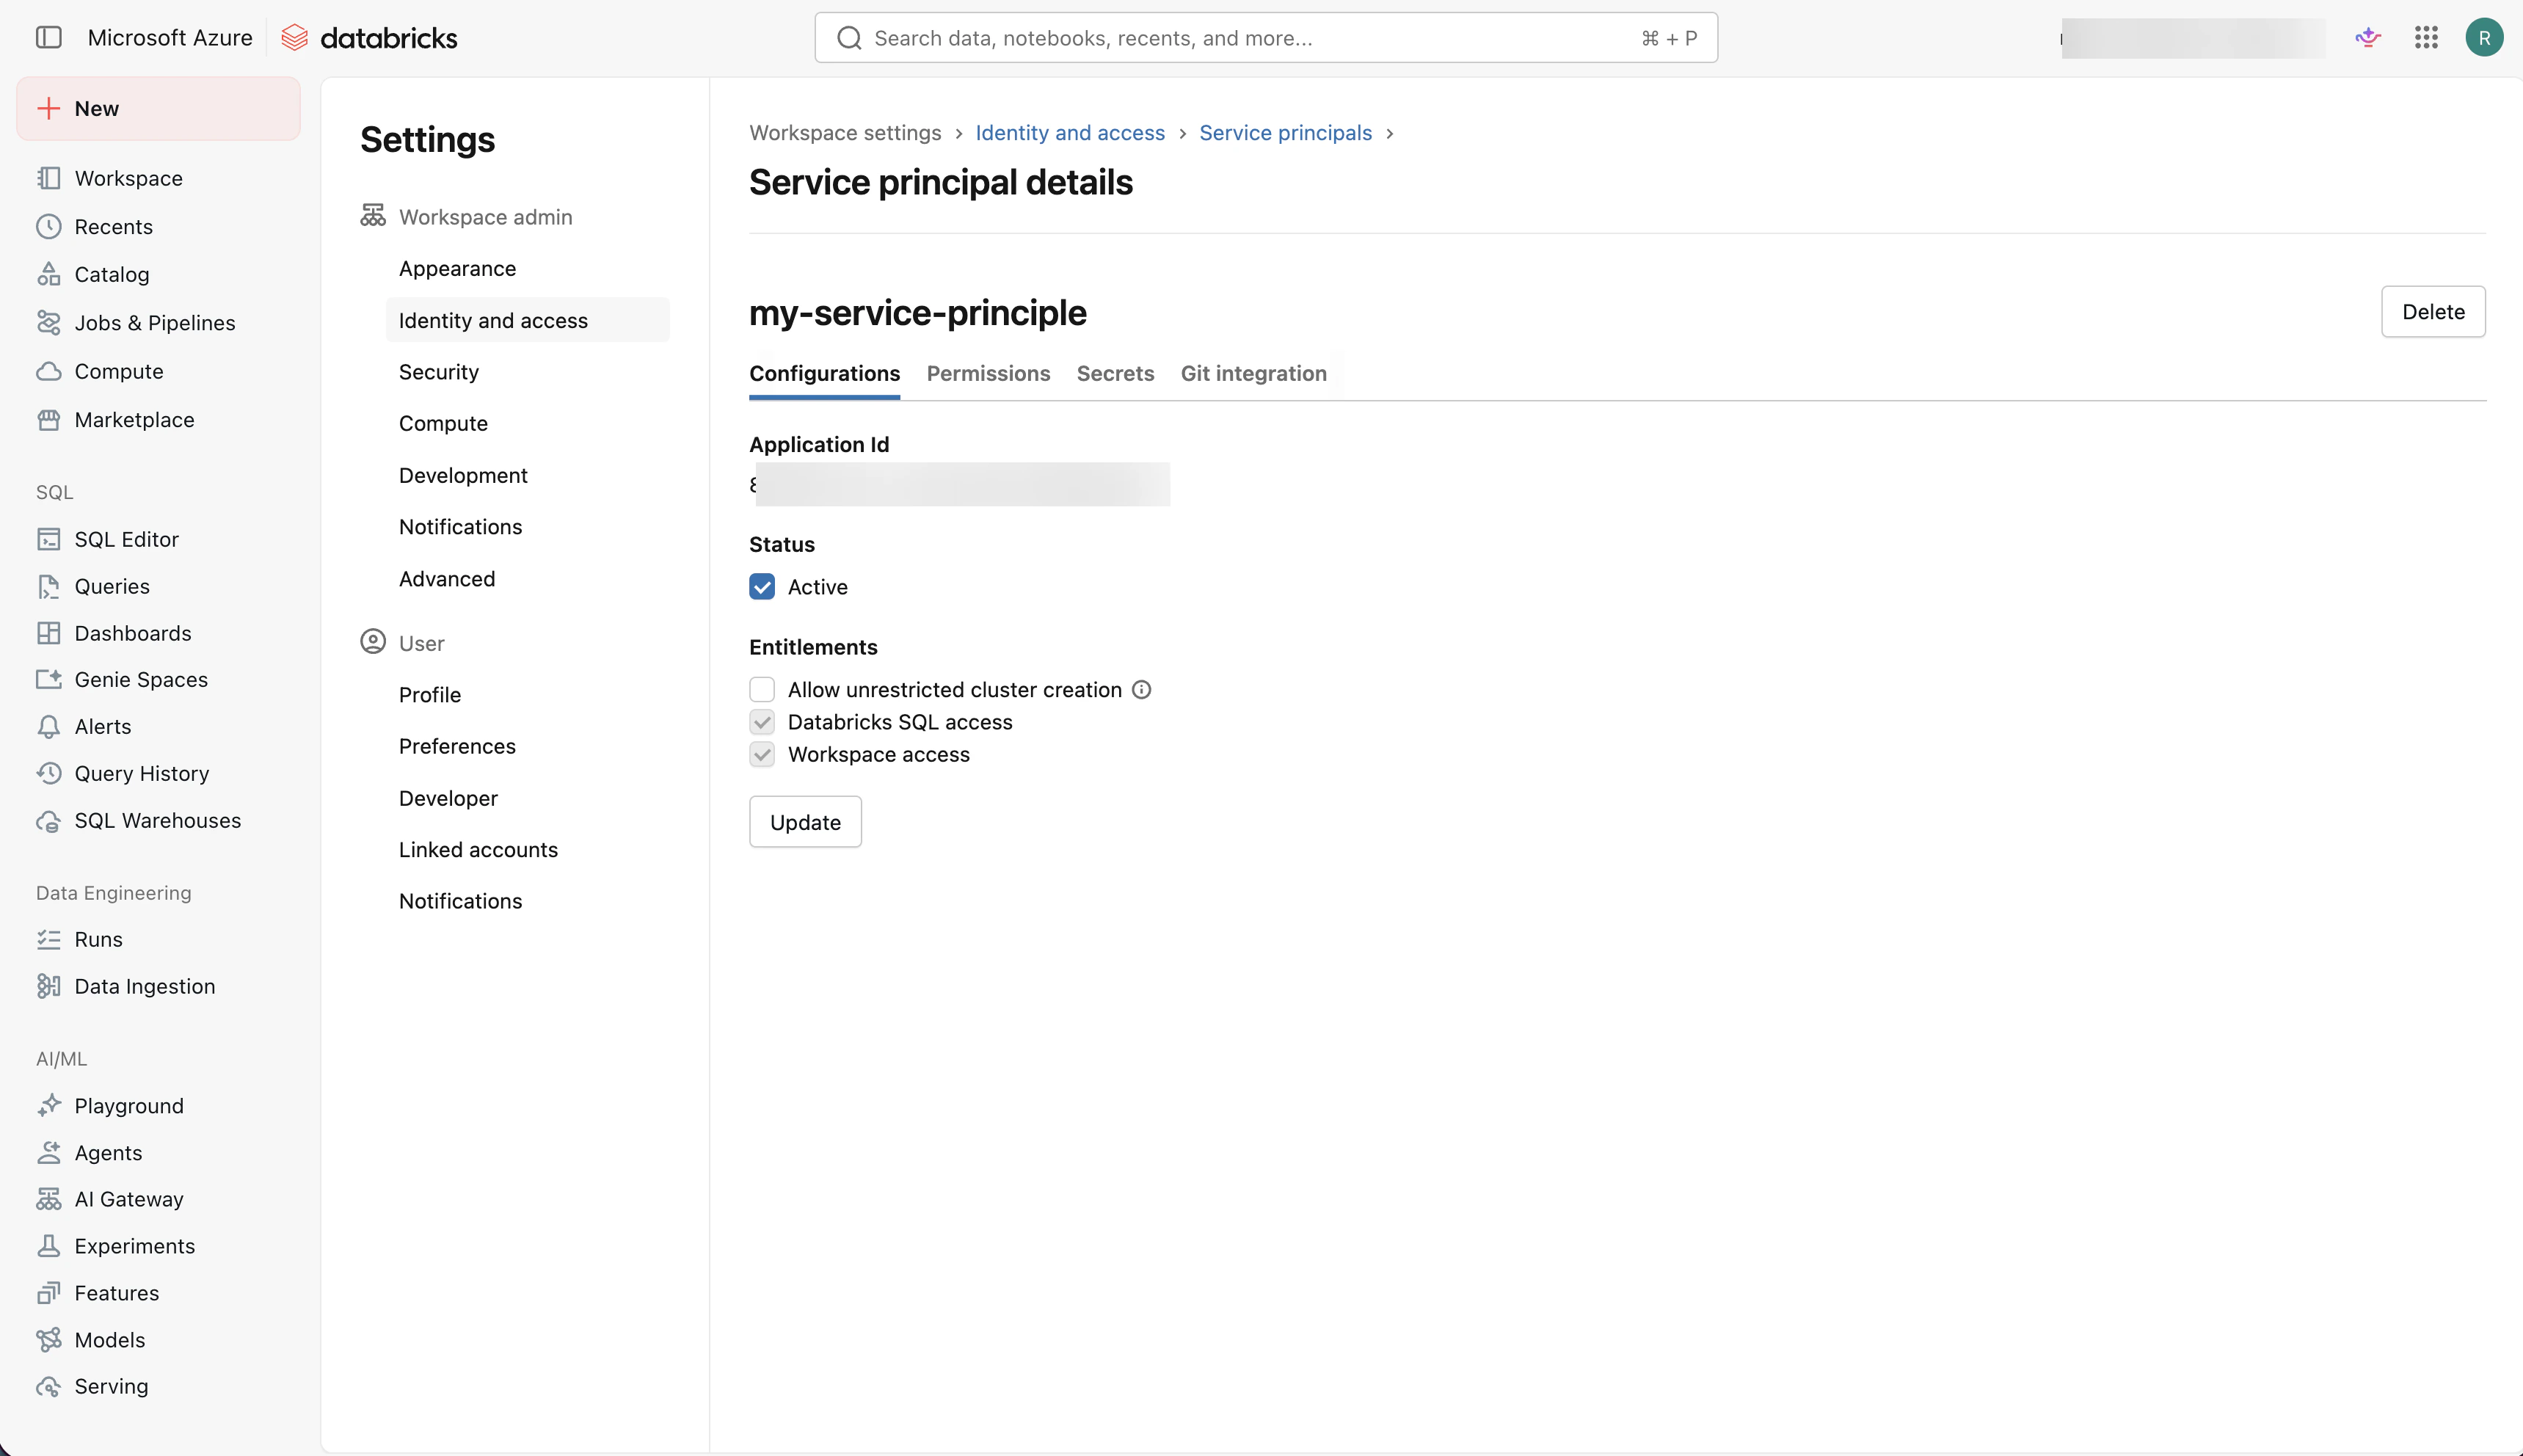
 After Databricks creates the service principal, confirm it is active. Keep this page open if you need the service principal details while configuring the Replit connector.
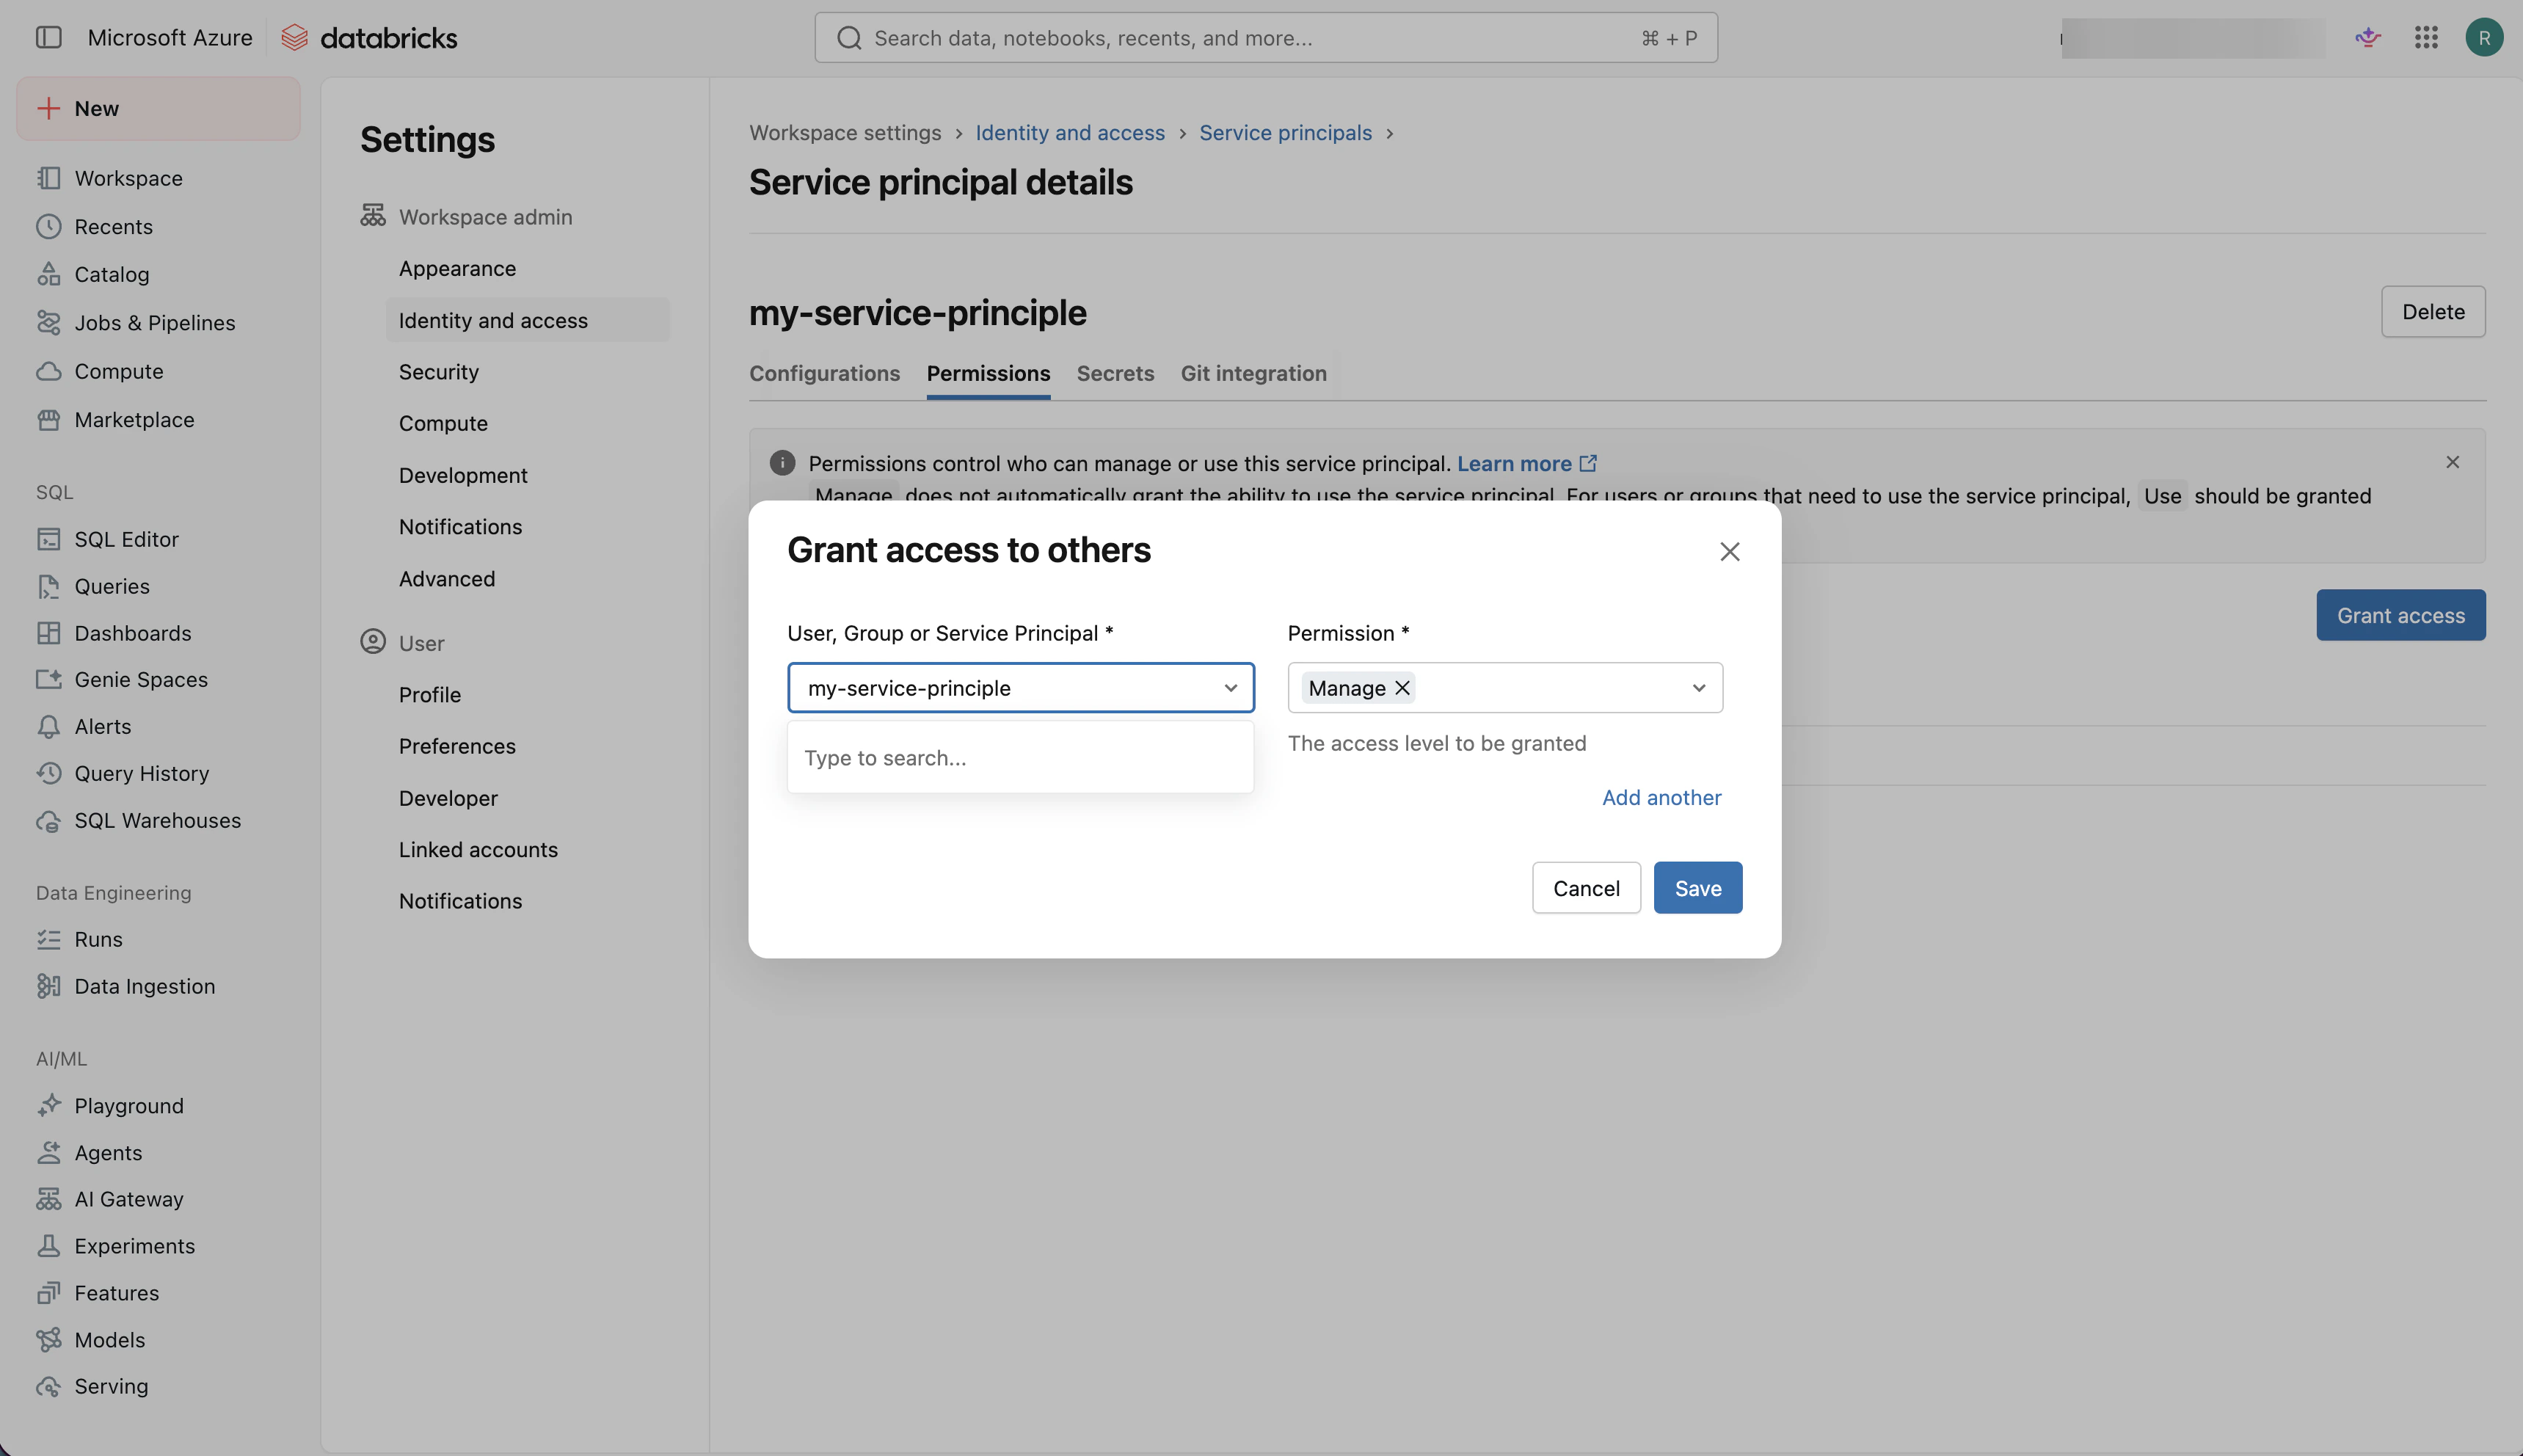
 Open the **Permissions** tab, select **Grant access**, choose the service principal, set the permission to **Manage**, then select **Save**.
 ### Step 2: Get your SQL Warehouse connection details
The Replit connector needs Databricks SQL Warehouse connection details to route queries to the right compute resource.
In the Databricks sidebar, select **SQL Warehouses**.
Select the SQL Warehouse you want Replit Agent to use. If you do not already have one, select **Create SQL warehouse** and create a new warehouse.
Open the warehouse and select **Connection details**. Locate the **Server hostname** and **HTTP path** values. You need these values when creating the Databricks connector in Replit.
### Step 3: Create the Databricks connector in Replit
You must be a Replit organization admin to configure connectors.
The Replit admin adds the Databricks connection details to Replit so builders can use the connector.
From your Replit account home, open the **Integrations** page. Under **Connectors**, find **Databricks (Service Principal)** and select **Sign in**.
### Step 2: Get your SQL Warehouse connection details
The Replit connector needs Databricks SQL Warehouse connection details to route queries to the right compute resource.
In the Databricks sidebar, select **SQL Warehouses**.
Select the SQL Warehouse you want Replit Agent to use. If you do not already have one, select **Create SQL warehouse** and create a new warehouse.
Open the warehouse and select **Connection details**. Locate the **Server hostname** and **HTTP path** values. You need these values when creating the Databricks connector in Replit.
### Step 3: Create the Databricks connector in Replit
You must be a Replit organization admin to configure connectors.
The Replit admin adds the Databricks connection details to Replit so builders can use the connector.
From your Replit account home, open the **Integrations** page. Under **Connectors**, find **Databricks (Service Principal)** and select **Sign in**.
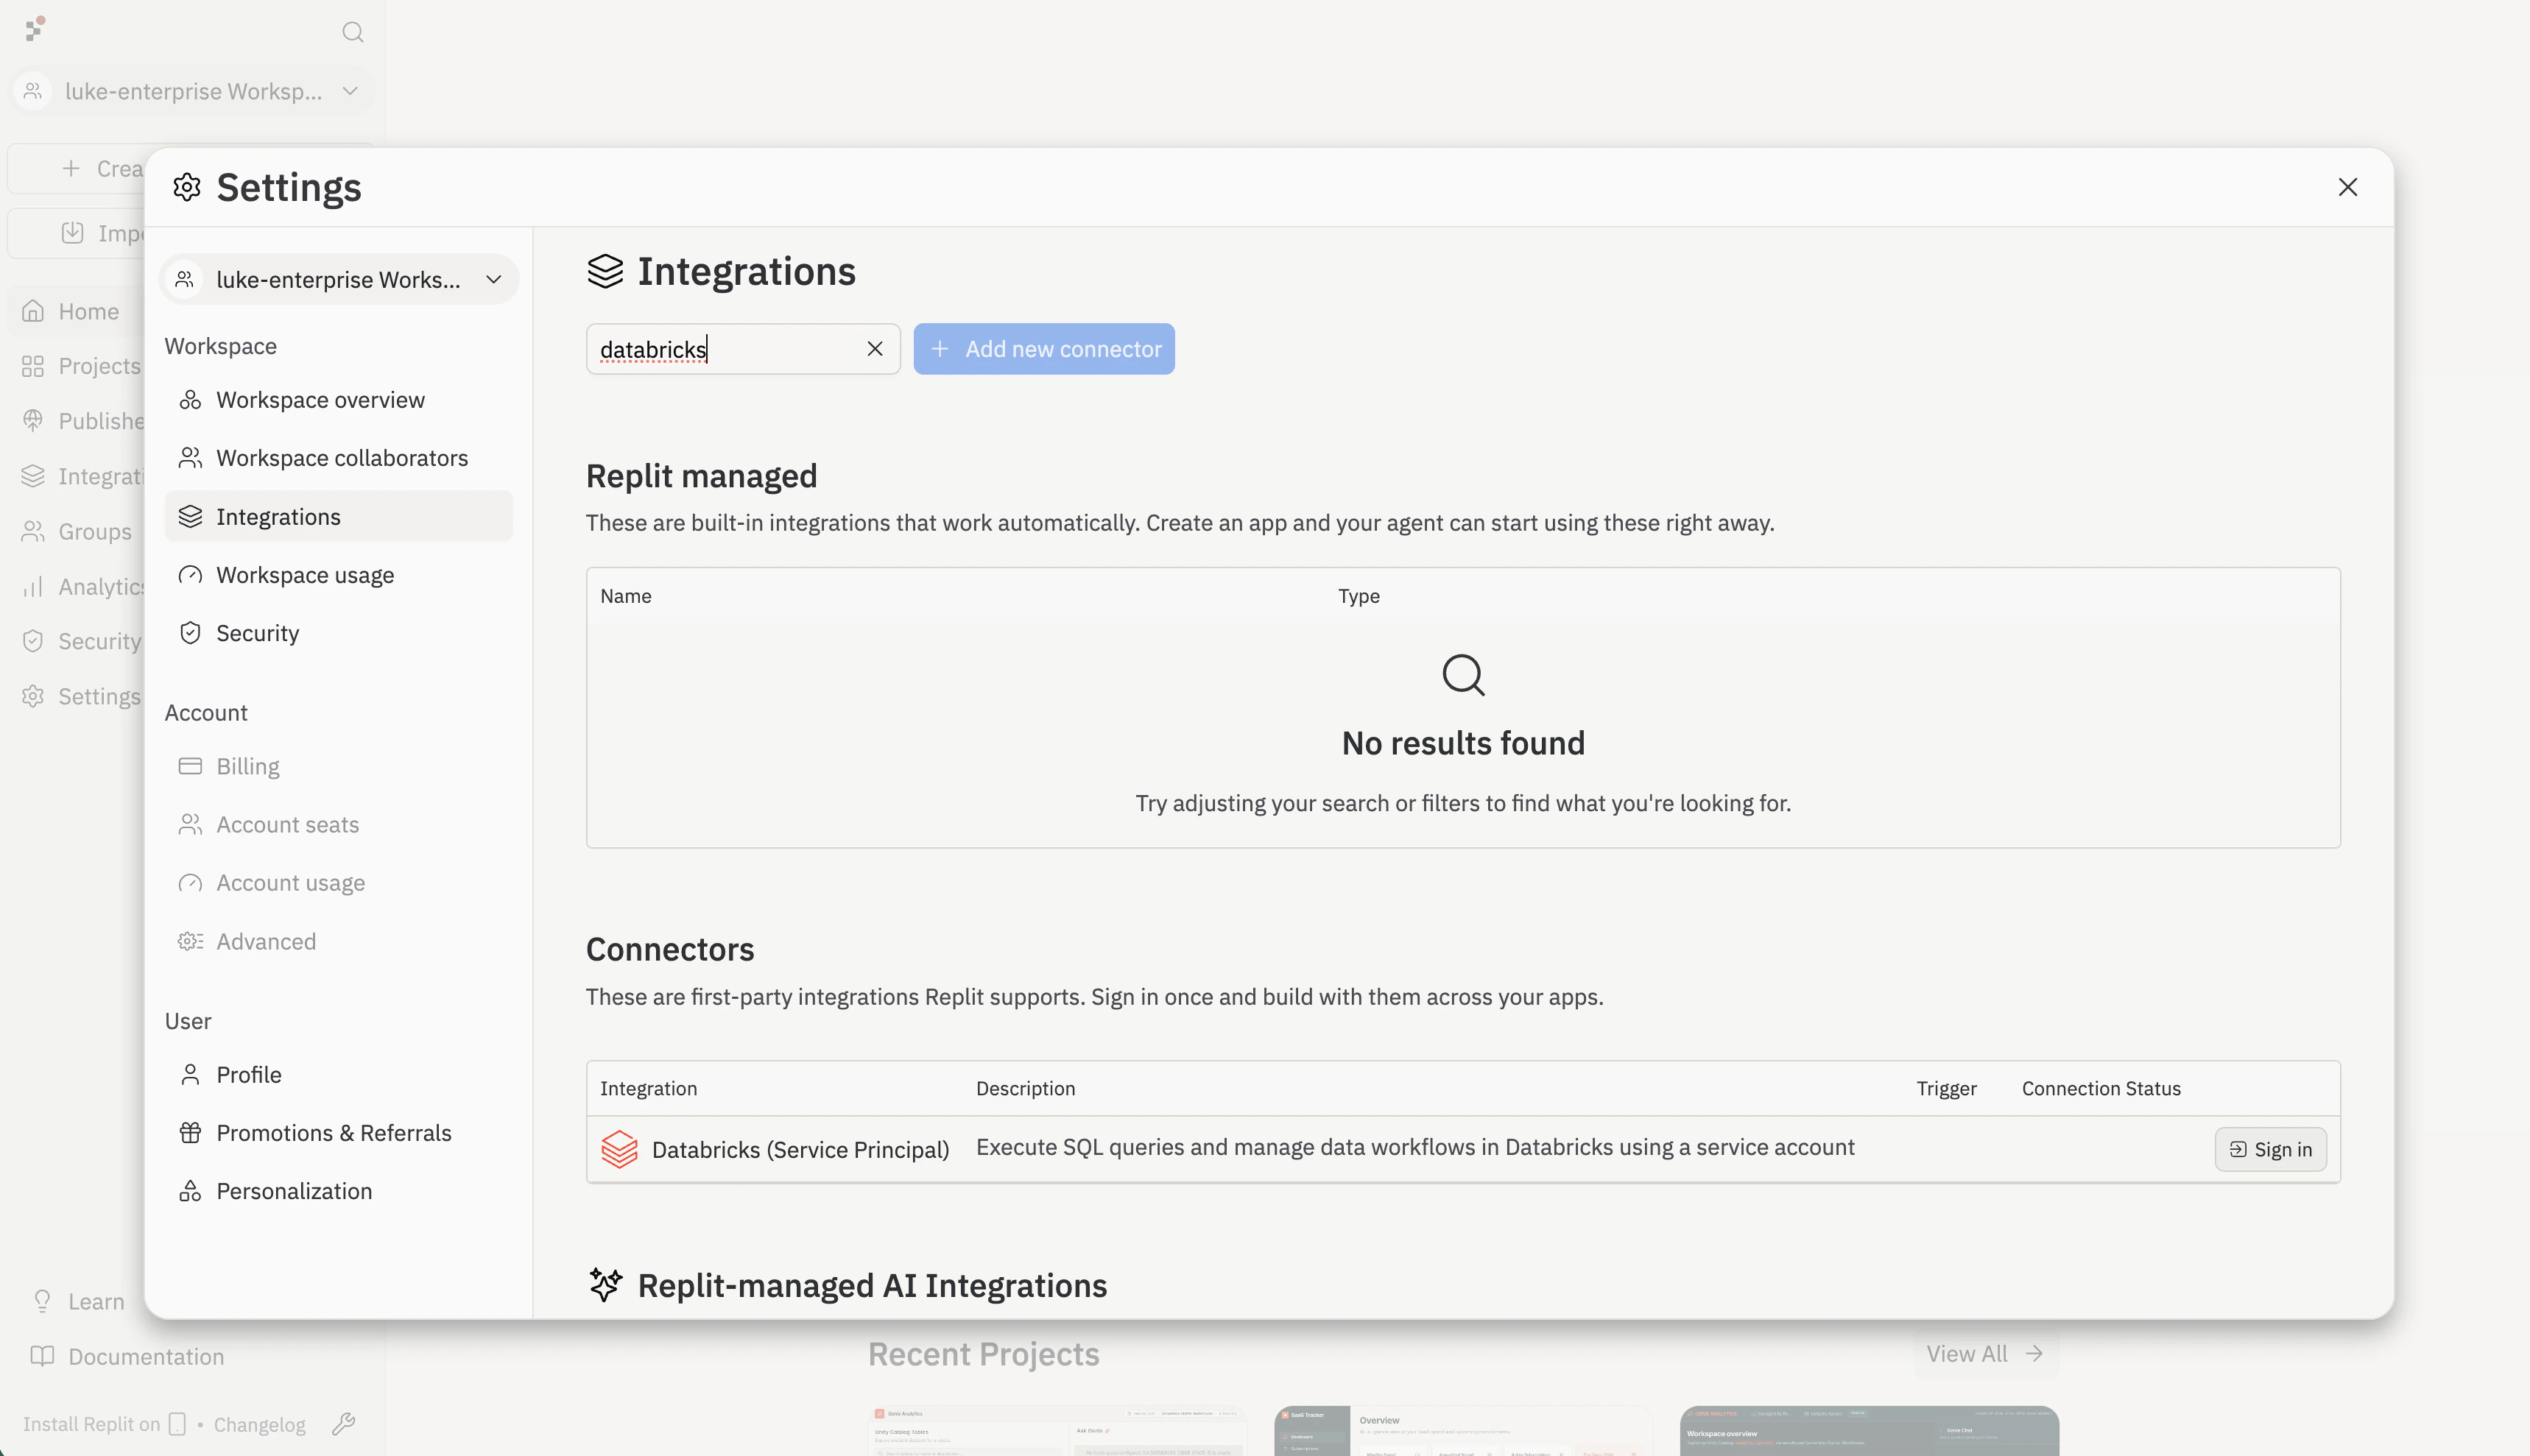 Replit shows a confirmation dialog before redirecting to Databricks for authentication. Review the details and select **Continue to Databricks**.
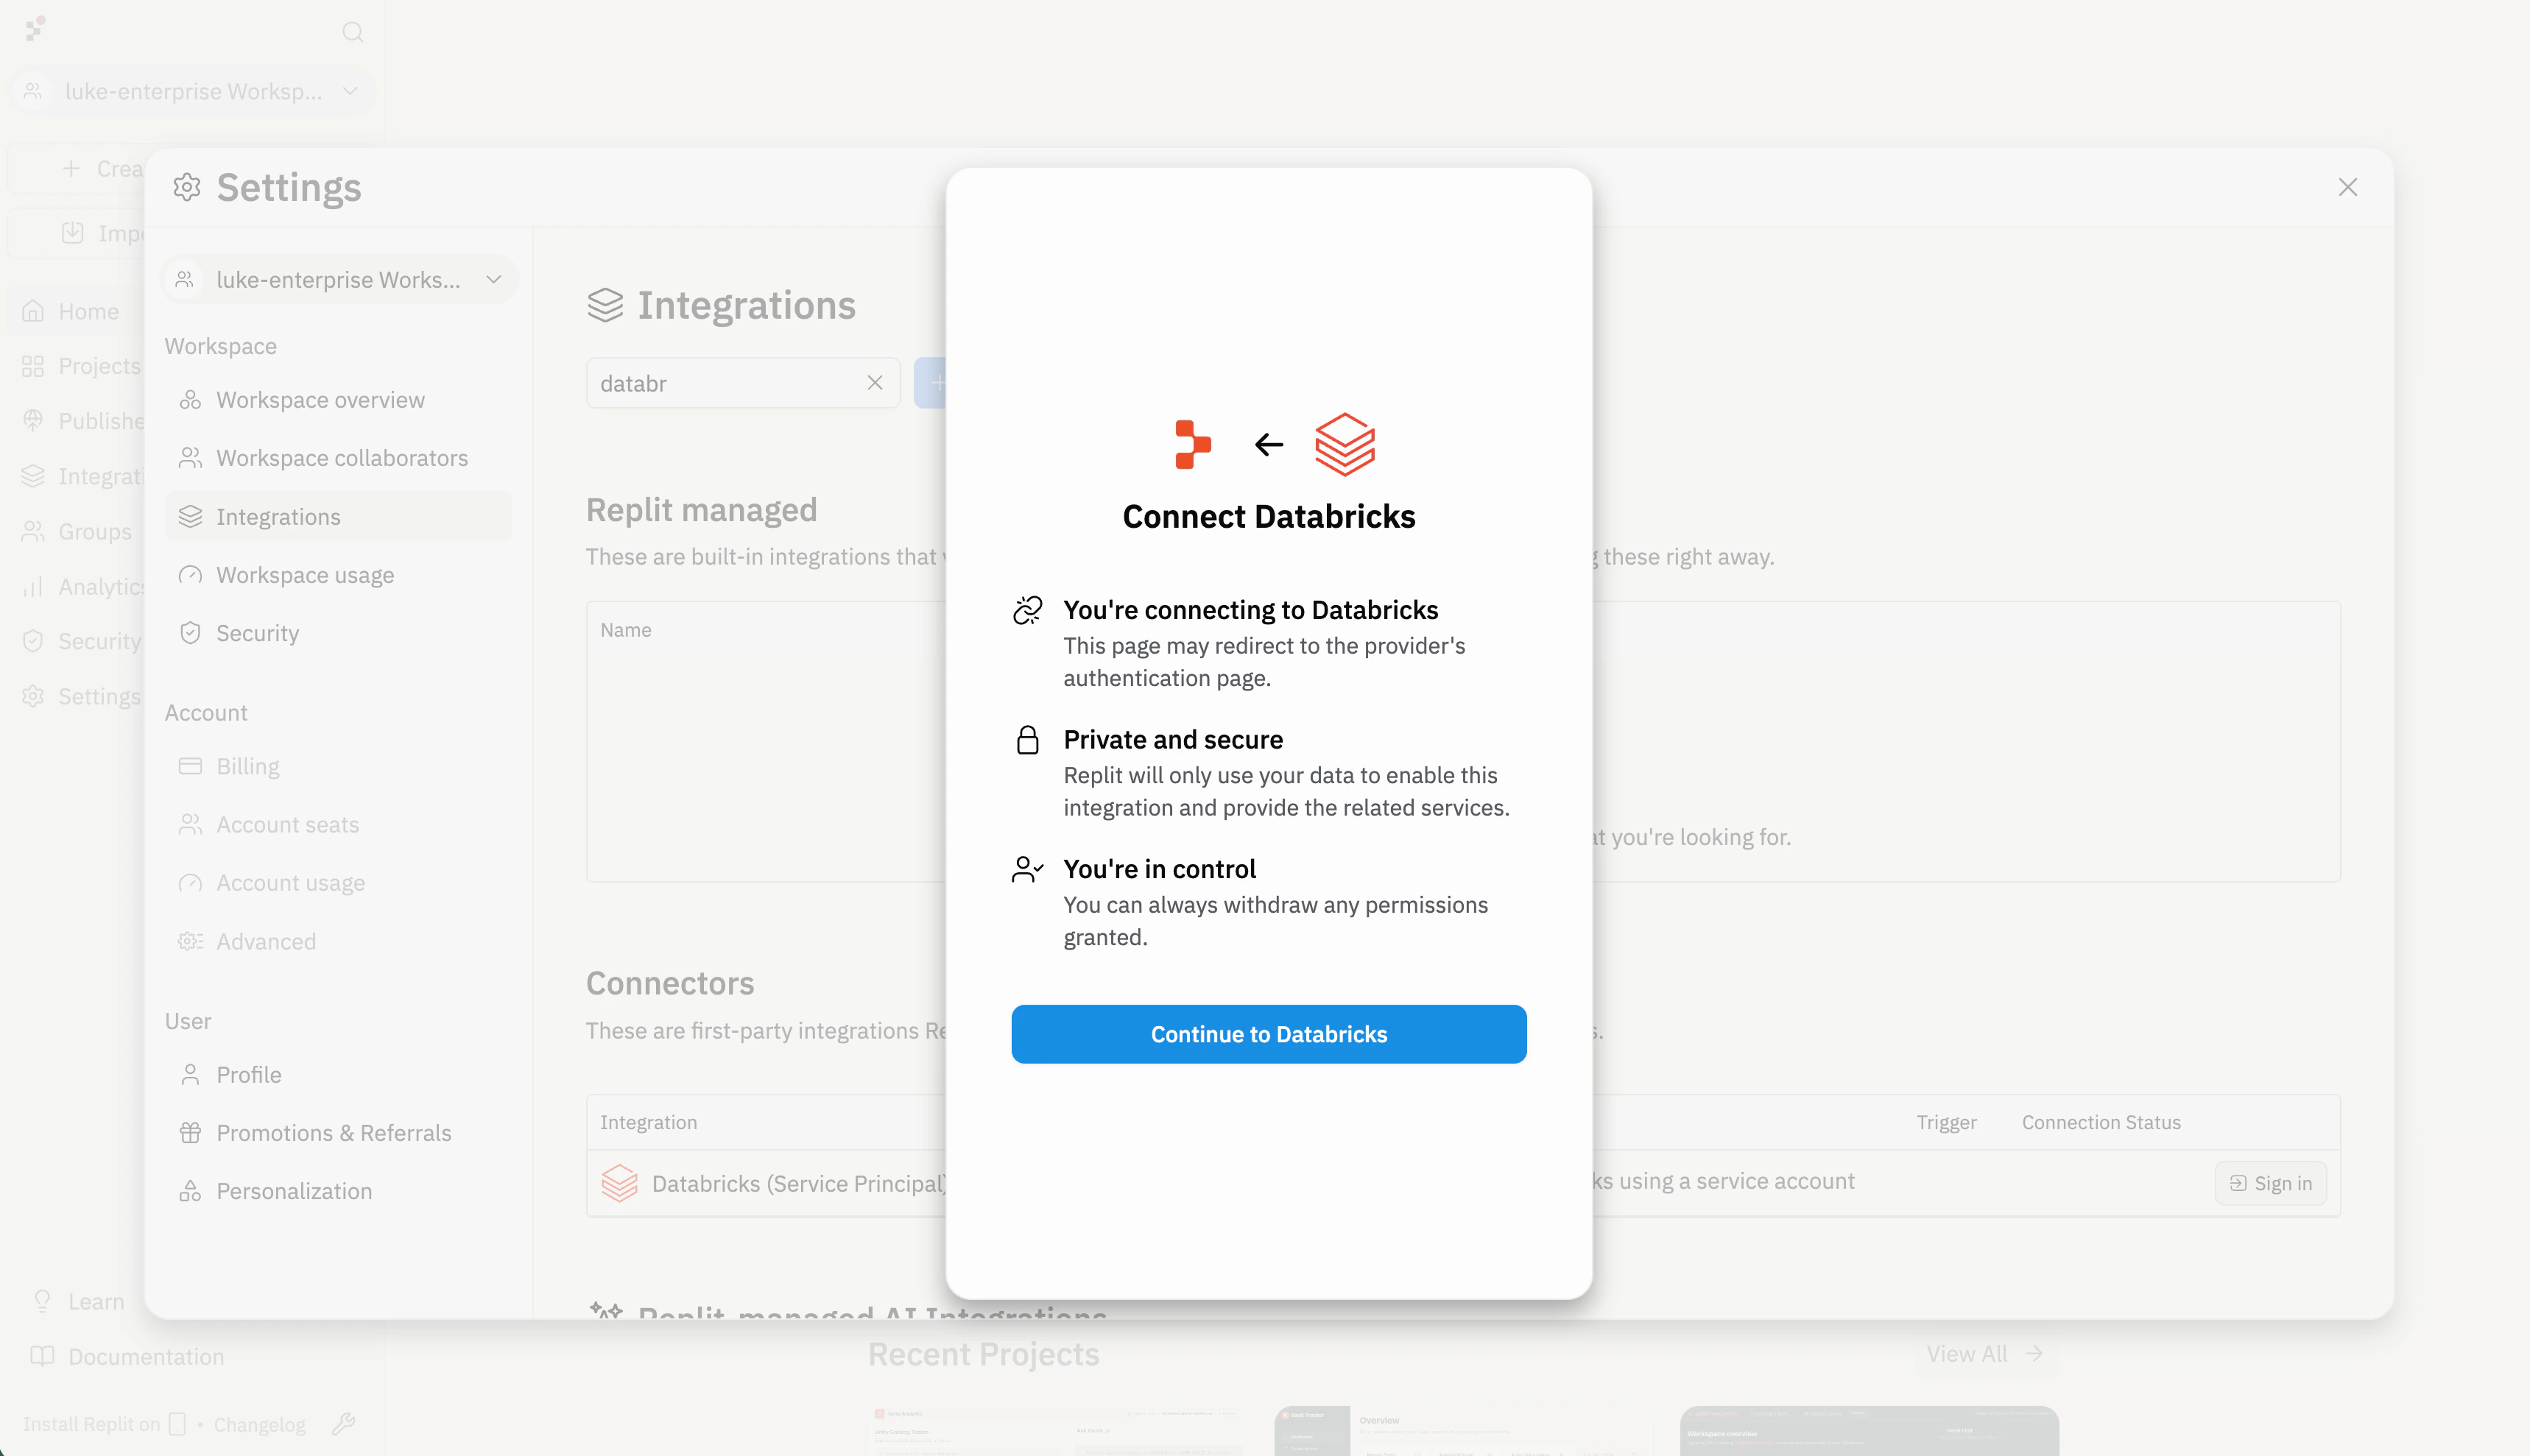 Paste the **HTTP path** from your Databricks SQL Warehouse connection details (for example, `/sql/1.0/warehouses/abcdef1234567890`), then select **Next**.
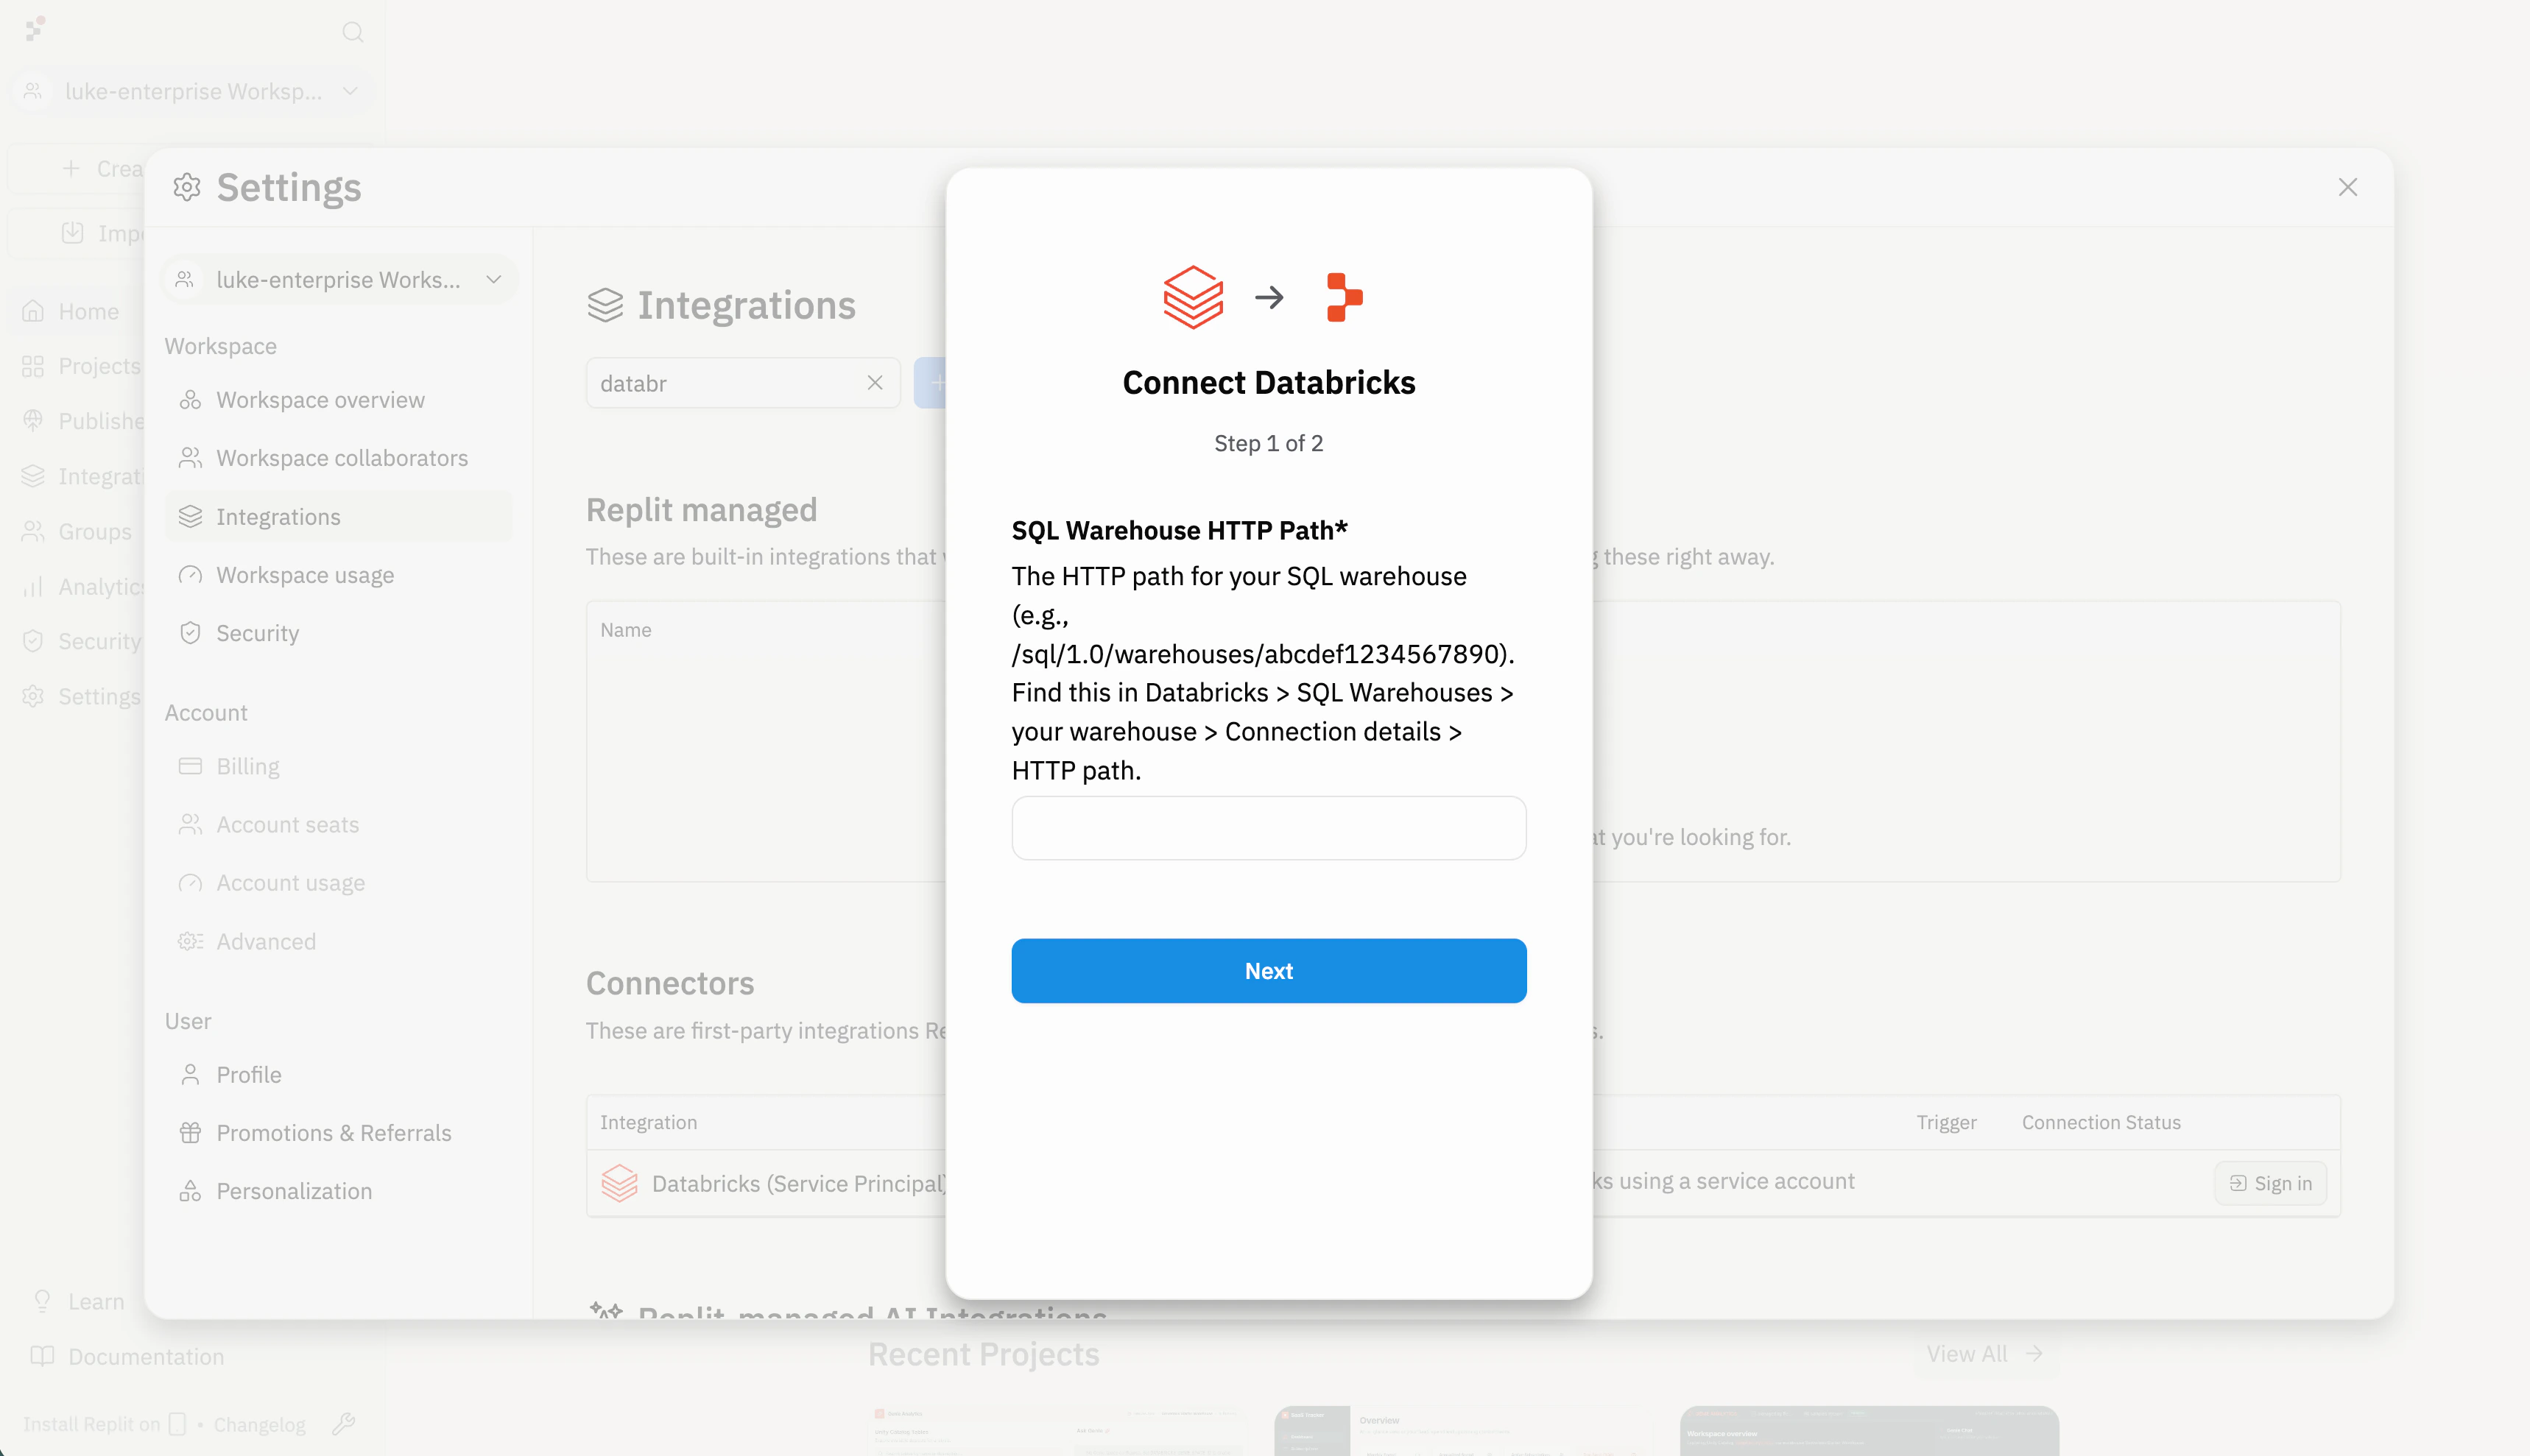 Paste the **Server hostname** from the same connection details (for example, `abc-12345678-wxyz.cloud.databricks.com`), then select **Continue to Databricks** to complete authentication.
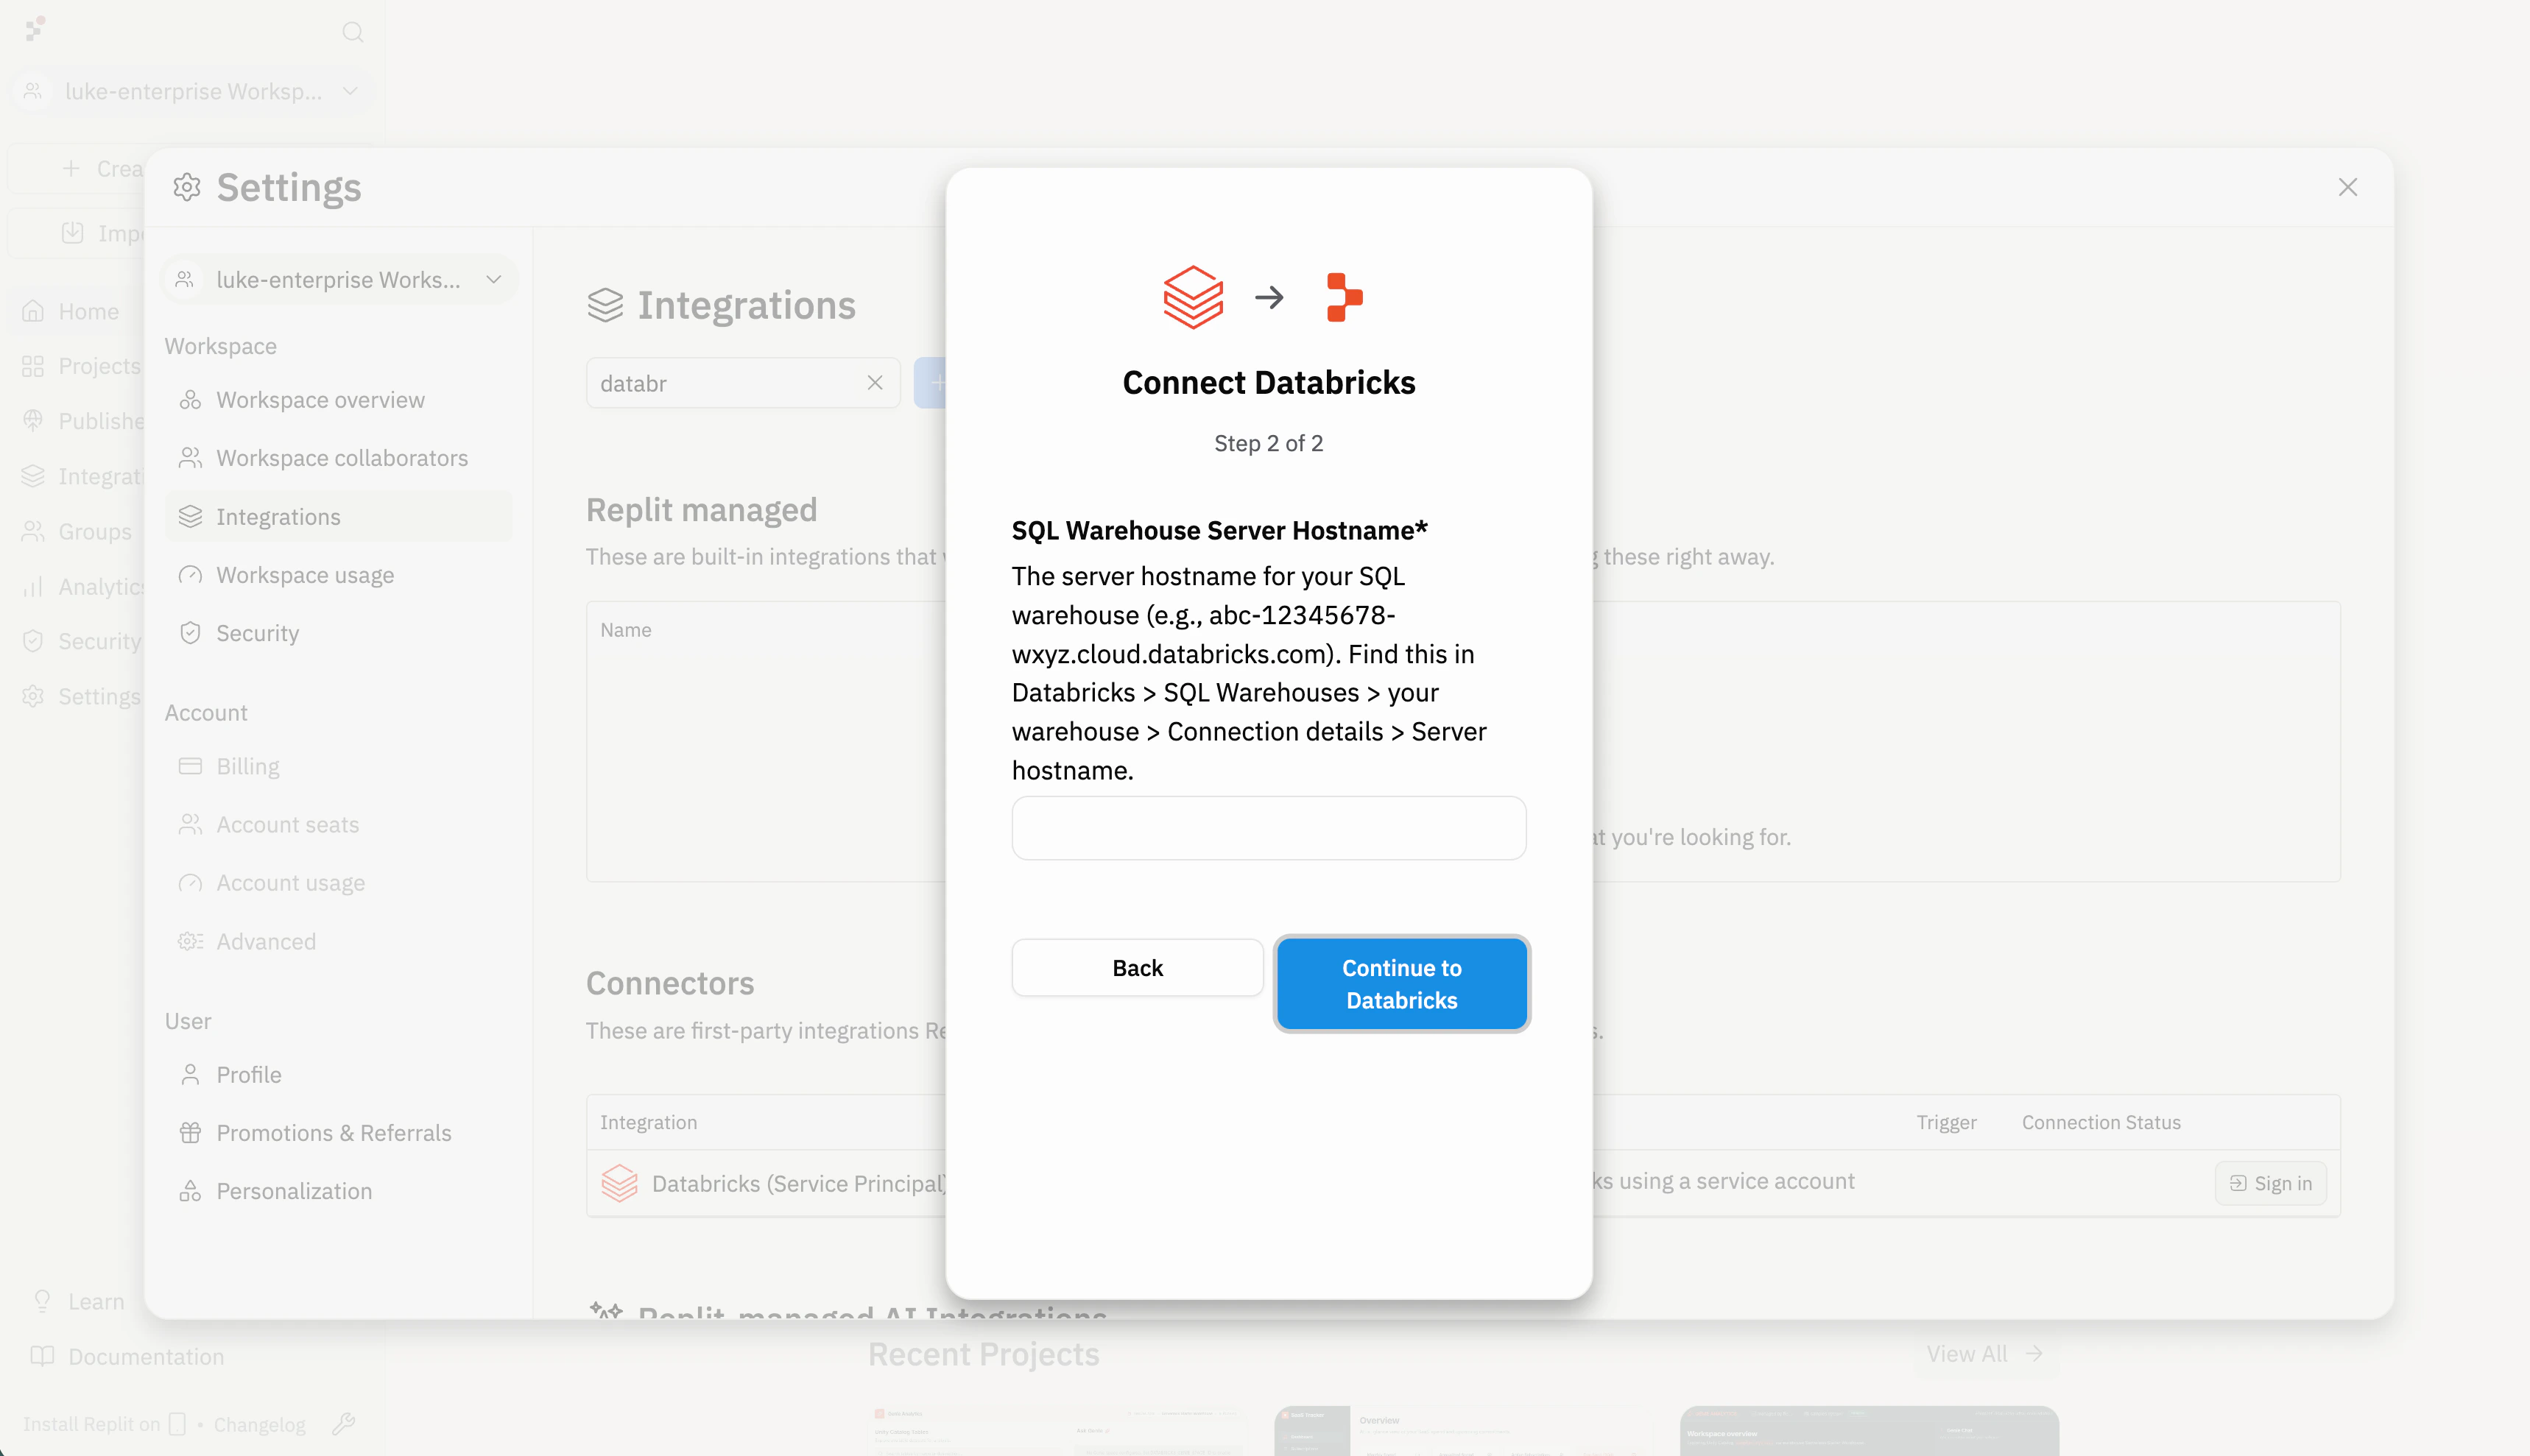 Use Role-Based Access Control to choose which members or groups in your organization can use this connector.
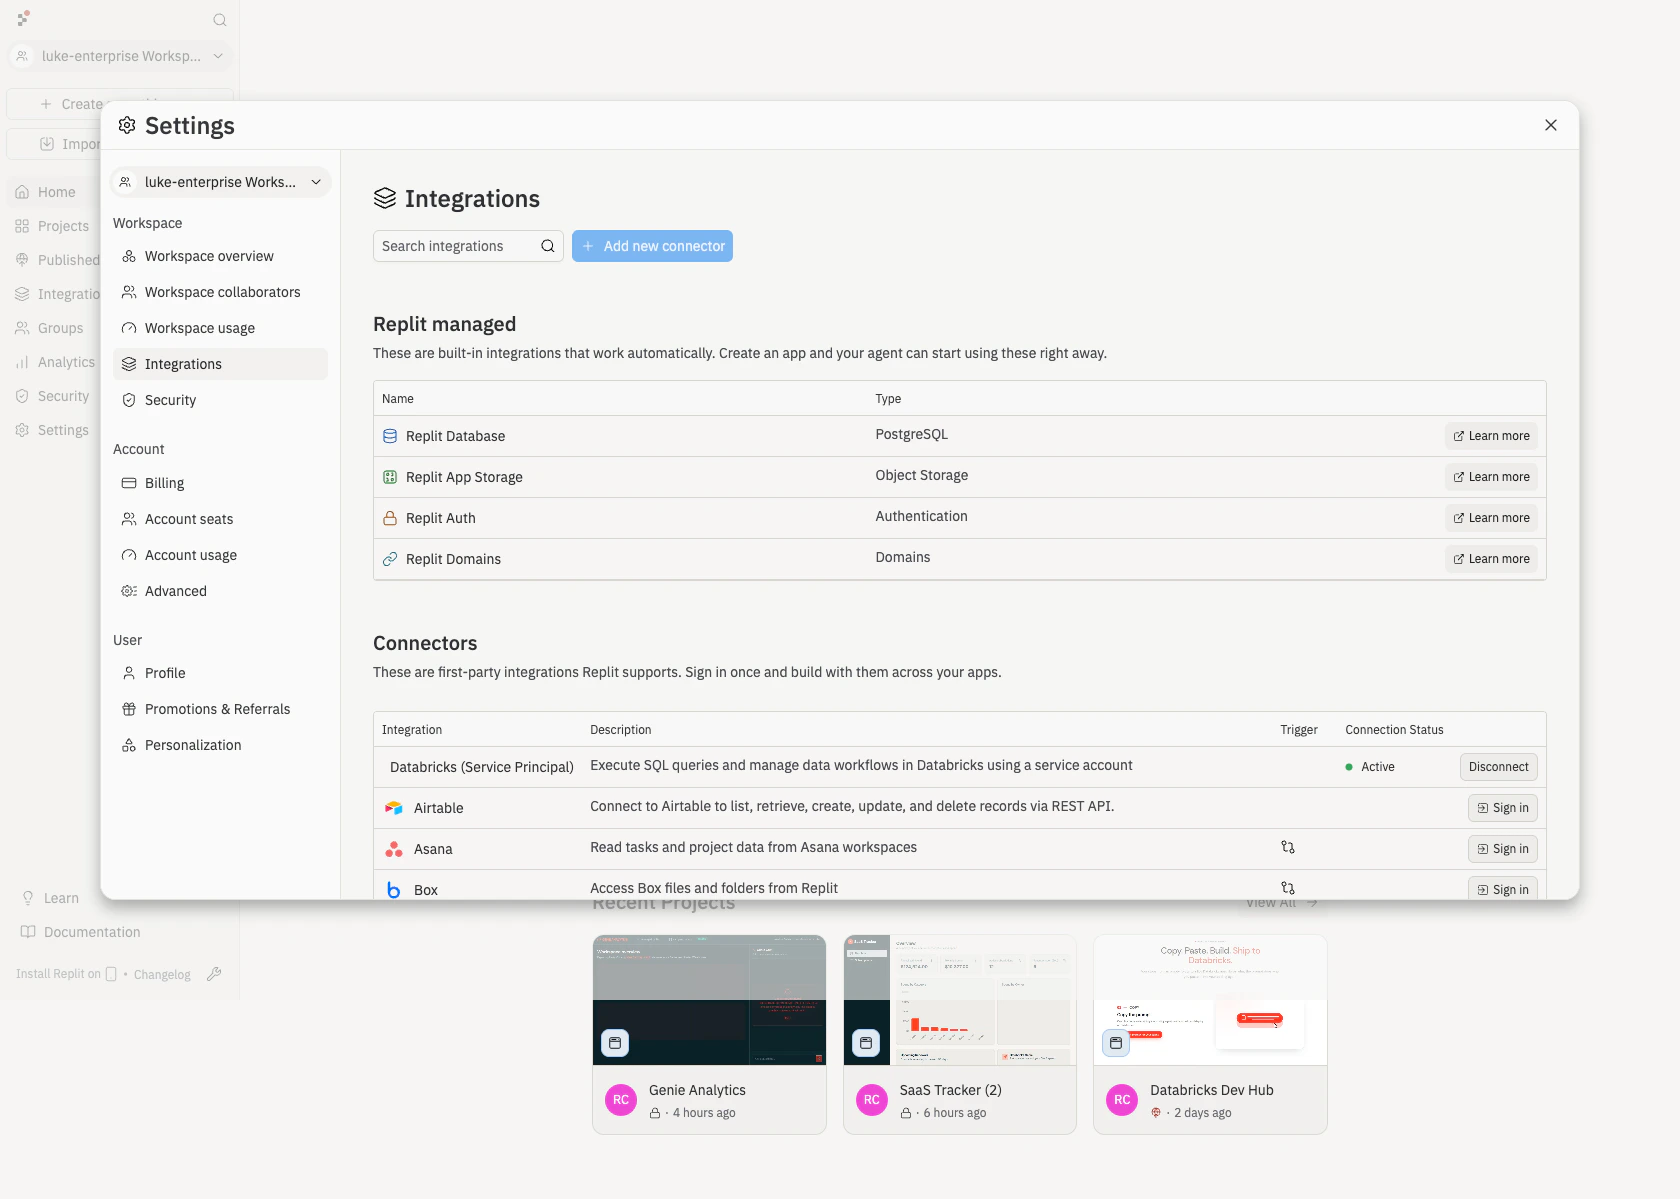
Back on the **Integrations** page, confirm that **Databricks (Service Principal)** appears under **Connectors** with an **Active** connection status.
Use Role-Based Access Control to choose which members or groups in your organization can use this connector.
Back on the **Integrations** page, confirm that **Databricks (Service Principal)** appears under **Connectors** with an **Active** connection status.
 ## Build with Agent
After connecting with either method, builders can create applications that use Databricks data with Agent.
Select the **Databricks App** template when you want to deploy the finished app to your Databricks environment. You do not need the template to use a configured connector to access Databricks data and assets.
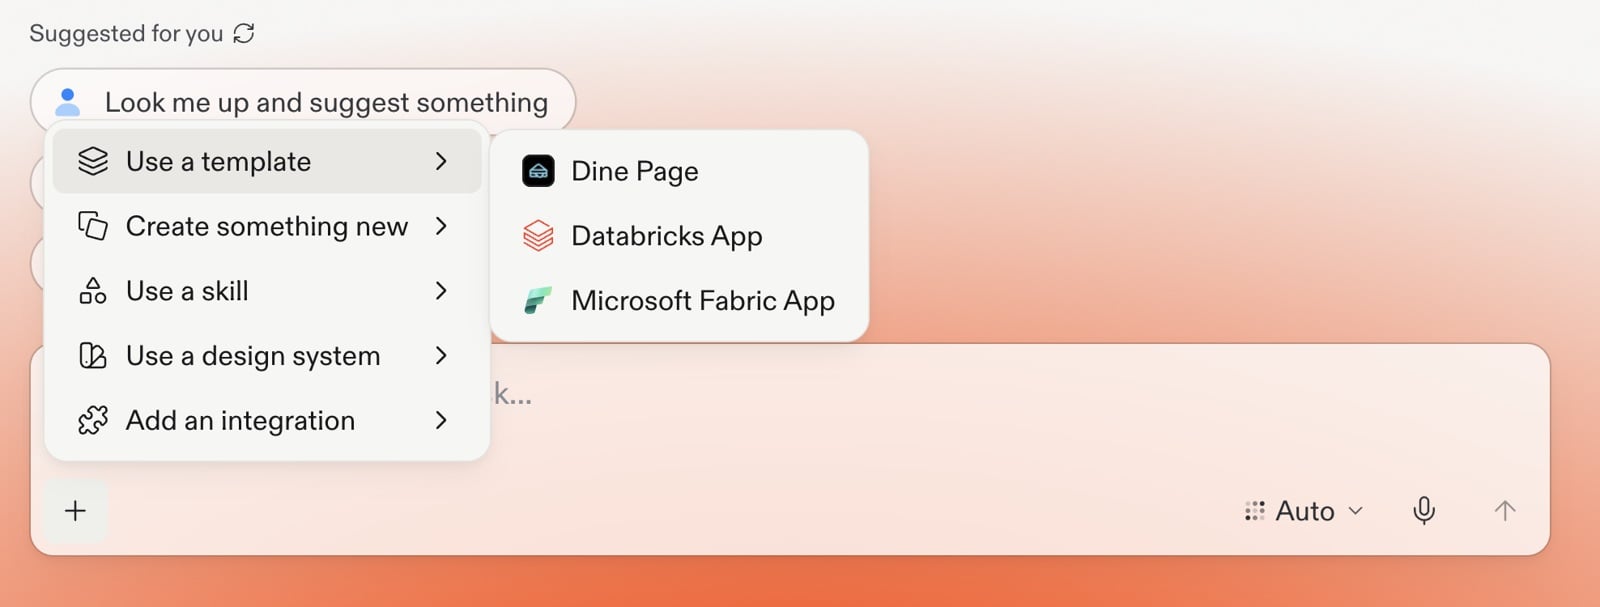
From the Replit home page, select **+** in the prompt box, open **Use a template**, and choose **Databricks App**.
## Build with Agent
After connecting with either method, builders can create applications that use Databricks data with Agent.
Select the **Databricks App** template when you want to deploy the finished app to your Databricks environment. You do not need the template to use a configured connector to access Databricks data and assets.
From the Replit home page, select **+** in the prompt box, open **Use a template**, and choose **Databricks App**.
 Add your prompt after the prefilled instructions. For inspiration, browse the [Databricks Dev Hub templates](https://www.databricks.com/devhub/templates).
Review the SQL Agent generates, the tables it queries, and the application structure. Ask for changes in natural language.
## Use Lakebase for application data
Apps you publish with the **Databricks App** template use Lakebase as their
managed production PostgreSQL database. Build and test against the development
database in Replit. When you publish, Replit prepares a Lakebase database in
your Databricks workspace and applies your schema changes.
Use Lakebase for application state such as user accounts, settings, and
transactions. Continue to use a SQL Warehouse for analytics and Unity Catalog
data.
Ask Agent to add the application data your project needs. Use the
**Database** tool to review tables and data while you build. See
[Development and production databases](/features/data-and-storage/development-and-production)
for how the two databases differ.
Start publishing your Databricks App. Review the schema changes that Replit
applies to Lakebase before you continue. See
[Making safe changes to your production database](/features/data-and-storage/development-and-production#making-safe-changes-to-your-production-database)
for changes that need planning.
Publish the app to create or update its Lakebase database. Replit connects
the published app to Lakebase automatically.
Apps published with other templates use a standard Replit
[production database](/features/data-and-storage/development-and-production)
instead of Lakebase.
## Troubleshooting
Check the Databricks permissions for the identity running the query. With
U2M, this is the individual builder. With the service principal connector,
it is the shared service principal. The identity may have metadata access
but no read permission on the data. Grant the required catalog, schema, or
table permissions and try again.
Verify that the **Server hostname** and **HTTP path** match the SQL Warehouse
connection details in Databricks. For U2M, check the values entered by the
affected builder. Also confirm that the warehouse is running and the query
identity has permission to use it.
For U2M, confirm the Databricks app connection lists
`https://replit.com/connectors/oauth/callback` under **Redirect URLs**, with
no trailing slash. If authentication fails for every builder, verify the
shared Client ID and Client Secret, confirm the secret has not expired, and
make sure the scopes in Replit match the Databricks app connection.
For the service principal connector, verify that the service principal
details entered in Replit match the service principal created in Databricks.
If credentials were rotated, update the connector in Replit.
This can happen with U2M when the refresh token expires or is revoked.
Complete the Databricks authorization flow again. If builders must reconnect
more often than your security policy requires, review the app connection's
token lifetimes.
## Related documentation
* [Warehouse connectors overview](/connectors/warehouses/overview): all supported warehouse connectors.
* [Connect Snowflake](/connectors/warehouses/snowflake): step-by-step Snowflake setup.
* [Managing your connectors](/replitai/managing-connectors): connector management and configuration.
* [Databricks OAuth user-to-machine authorization](https://docs.databricks.com/aws/en/dev-tools/auth/oauth-u2m): Databricks documentation on U2M OAuth.
* [Enable custom OAuth applications in Databricks](https://docs.databricks.com/aws/en/integrations/enable-disable-oauth): Databricks documentation on app connections.
* [Databricks service principals](https://docs.databricks.com/aws/en/admin/users-groups/service-principals): Databricks documentation on service principals.
* [Databricks SQL Warehouses](https://docs.databricks.com/aws/en/compute/sql-warehouse/): Databricks documentation on SQL Warehouse compute.
Add your prompt after the prefilled instructions. For inspiration, browse the [Databricks Dev Hub templates](https://www.databricks.com/devhub/templates).
Review the SQL Agent generates, the tables it queries, and the application structure. Ask for changes in natural language.
## Use Lakebase for application data
Apps you publish with the **Databricks App** template use Lakebase as their
managed production PostgreSQL database. Build and test against the development
database in Replit. When you publish, Replit prepares a Lakebase database in
your Databricks workspace and applies your schema changes.
Use Lakebase for application state such as user accounts, settings, and
transactions. Continue to use a SQL Warehouse for analytics and Unity Catalog
data.
Ask Agent to add the application data your project needs. Use the
**Database** tool to review tables and data while you build. See
[Development and production databases](/features/data-and-storage/development-and-production)
for how the two databases differ.
Start publishing your Databricks App. Review the schema changes that Replit
applies to Lakebase before you continue. See
[Making safe changes to your production database](/features/data-and-storage/development-and-production#making-safe-changes-to-your-production-database)
for changes that need planning.
Publish the app to create or update its Lakebase database. Replit connects
the published app to Lakebase automatically.
Apps published with other templates use a standard Replit
[production database](/features/data-and-storage/development-and-production)
instead of Lakebase.
## Troubleshooting
Check the Databricks permissions for the identity running the query. With
U2M, this is the individual builder. With the service principal connector,
it is the shared service principal. The identity may have metadata access
but no read permission on the data. Grant the required catalog, schema, or
table permissions and try again.
Verify that the **Server hostname** and **HTTP path** match the SQL Warehouse
connection details in Databricks. For U2M, check the values entered by the
affected builder. Also confirm that the warehouse is running and the query
identity has permission to use it.
For U2M, confirm the Databricks app connection lists
`https://replit.com/connectors/oauth/callback` under **Redirect URLs**, with
no trailing slash. If authentication fails for every builder, verify the
shared Client ID and Client Secret, confirm the secret has not expired, and
make sure the scopes in Replit match the Databricks app connection.
For the service principal connector, verify that the service principal
details entered in Replit match the service principal created in Databricks.
If credentials were rotated, update the connector in Replit.
This can happen with U2M when the refresh token expires or is revoked.
Complete the Databricks authorization flow again. If builders must reconnect
more often than your security policy requires, review the app connection's
token lifetimes.
## Related documentation
* [Warehouse connectors overview](/connectors/warehouses/overview): all supported warehouse connectors.
* [Connect Snowflake](/connectors/warehouses/snowflake): step-by-step Snowflake setup.
* [Managing your connectors](/replitai/managing-connectors): connector management and configuration.
* [Databricks OAuth user-to-machine authorization](https://docs.databricks.com/aws/en/dev-tools/auth/oauth-u2m): Databricks documentation on U2M OAuth.
* [Enable custom OAuth applications in Databricks](https://docs.databricks.com/aws/en/integrations/enable-disable-oauth): Databricks documentation on app connections.
* [Databricks service principals](https://docs.databricks.com/aws/en/admin/users-groups/service-principals): Databricks documentation on service principals.
* [Databricks SQL Warehouses](https://docs.databricks.com/aws/en/compute/sql-warehouse/): Databricks documentation on SQL Warehouse compute.